Table of Contents
Once you have connected your Eloqua account and form to Goldcast, the next step is configuring the data you want to send to Eloqua. This process is called Form Field mapping.
In Goldcast, standard fields are mapped at the organization level, while custom fields are mapped at the event level. In this article, we explain how to map your standard fields. For custom field mapping, refer here.
Overview
The Goldcast + Eloqua integration syncs registration and event engagement data from Goldcast to Eloqua. In simple terms, Goldcast transfers event details to Eloqua form fields through form submissions. Field Mapping Setup is a crucial step that enables you to map Goldcast's Standard Event User Fields with specific fields in your Eloqua form. This data will only include registration data captured on your Goldcast Registration page for your event.
However, with the Goldcast + Eloqua integration, you also get the ability to map your event engagement data by including additional fields as guided by Goldcast in your Eloqua Forms (for more details, click here). This empowers you to leverage the processed form data for various actions such as campaign management, lead scoring, nurturing, and follow-ups.
Before You Begin: Ensure your event registration forms are set up to collect your preferred Goldcast properties. If you aren’t collecting registrant data for your mapped properties, no data will be sent to your target system, i.e., Eloqua. For more information about creating and assigning event forms, refer to Creating and Editing Registration Forms.
Pre-requisites
Before proceeding with Form Field Mapping, you should install and set up our Eloqua Integration and connect an Eloqua form to your Goldcast Studio.
For step-by-step guidance, check:
Setting up your Eloqua Form
As mentioned above, the Goldcast + Eloqua integration uses forms to collect information from Goldcast. While setting up Eloqua forms for data collection, you MUST set up your form with the below-given instructions.
For every data field you want to send from Goldcast to Eloqua, you MUST set up a corresponding field on your Eloqua form. You can refer to the Eloqua documentation for more details on creating and setting up Eloqua forms.
1. Registration data
This includes the information the registrant fills in the event registration form. It usually contains fields such as first and last name, email address, company, title, etc. You'll need to set up and map corresponding fields on your Eloqua form to pull this data from Goldcast. Ideally, you'll set these fields as visible in your Eloqua form.
Double-check if you have a field on your Eloqua form that corresponds with the Standard fields on your Goldcast Registration Page. This will allow you to set up Field Mapping in later stages.
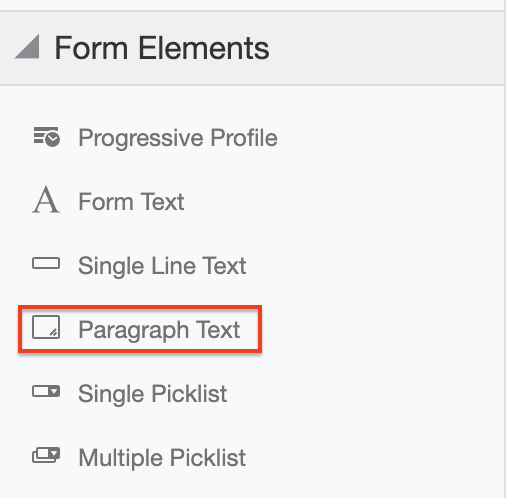
To send Magic Links from Goldcast to Eloqua Form Field, you must create a form element called Paragraph Text.
You can configure the Label Name and HTML Name according to your requirements.
NOTE: The HTML Name for Magic Link should be magicLink.
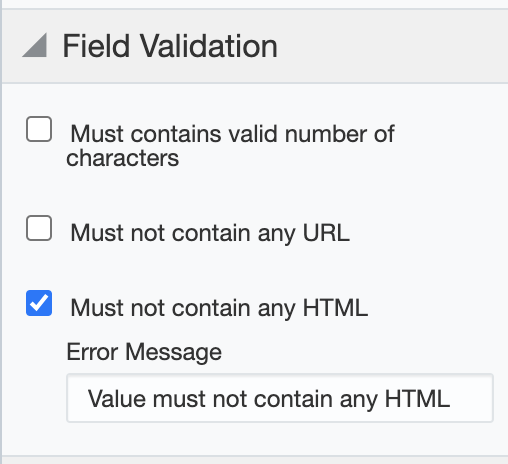
In the Field Validation setup, make sure you check Must not contain any URL box and add an error message, as shown in the snippet below. This has to be done to ensure the magic links for your events are synced to Eloqua accurately without any manual URL inputs overriding existing information.
 |
 |
2. Event Engagement Activity Data
Goldcast syncs your Event Engagement Data to Eloqua Form Fields, which can be tracked as Form Submissions.
To ensure you have all your required Event Engagement Data, it is MANDATORY that you add the fields below to your Eloqua Forms.
It is of utmost importance the Field HTML Name has to be exactly the same as mentioned in the table below. We recommend you add these fields as HIDDEN Fields so that there is no input done manually and solely used for Goldcast sync.
Goldcast Field |
Eloqua Field HTML Name |
|---|---|
Activity Type |
activityType |
Activity Id |
activityId |
CTA Button Text |
ctaButtonText |
CTA Confirmation Message |
ctaConfirmationMessage |
CTA Confirmation Title |
ctaConfirmationTitle |
Engagement Score |
engagementScore |
Engagement Type |
engagementType |
Event Name |
eventName |
Event ID |
eventId |
Event Type |
eventType |
Poll Answer |
pollAnswer |
Poll Options |
pollOptions |
Poll Question |
pollQuestion |
QnA Answered |
qnaAnswered |
QnA Question |
qnaQuestion |
Resource Link |
resourceLink |
Resource Name |
resourceName |
Booth Timespent |
boothTimespent |
Broadcast Timespent |
broadcastTimespent |
Discussion Group Timespent |
discussionGroupTimespent |
Event Timespent |
eventTimespent |
Session ID |
sessionId |
Session Title |
sessionTitle |
Session Type |
sessionType |
Data Share Consent |
dataShareConsent |
Visa Required |
visaRequired |
| Time of Survey | surveyTime |
| Survey Question | surveyQuestion |
| Survey Answer | surveyAnswer |
Key points to note:
- Standard Boolean Fields in Goldcast, like Data Share Consent and Visa Required, can't be mapped currently using the standard Field Mapping Setup. You must add Data Share Consent and Visa Required as fields in your Goldcast form and follow the HTML naming convention above to create fields in Eloqua.
- Any field that contains a URL must have the field validation. It must not contain any URL option Disabled.
- When creating the Eloqua form, double-check if you have included ALL fields for which you want to receive data from Goldcast.
- Make sure the HTML names of your Eloqua form's target fields exactly match those given in the table above. This is a MUST to capture all the Goldcast platform data accurately. If there’s a mismatch in the HTML field names, you will encounter mapping errors, which can cause the integration to fail.
Setting up your Form Field Mapping in Goldcast
This Field Mapping only applies to the registration data collected from your Goldcast registration page for your events. The event engagement data will be automatically mapped once you have configured your Eloqua form based on the guidelines above.
Note: To ensure seamless data transfer to Eloqua, ensure the HTML Names of the fields in Eloqua match those in the table above. Failure to do so will result in data sync issues or incomplete data in your Eloqua instance.
Follow these steps to set up your Form Field Mapping.
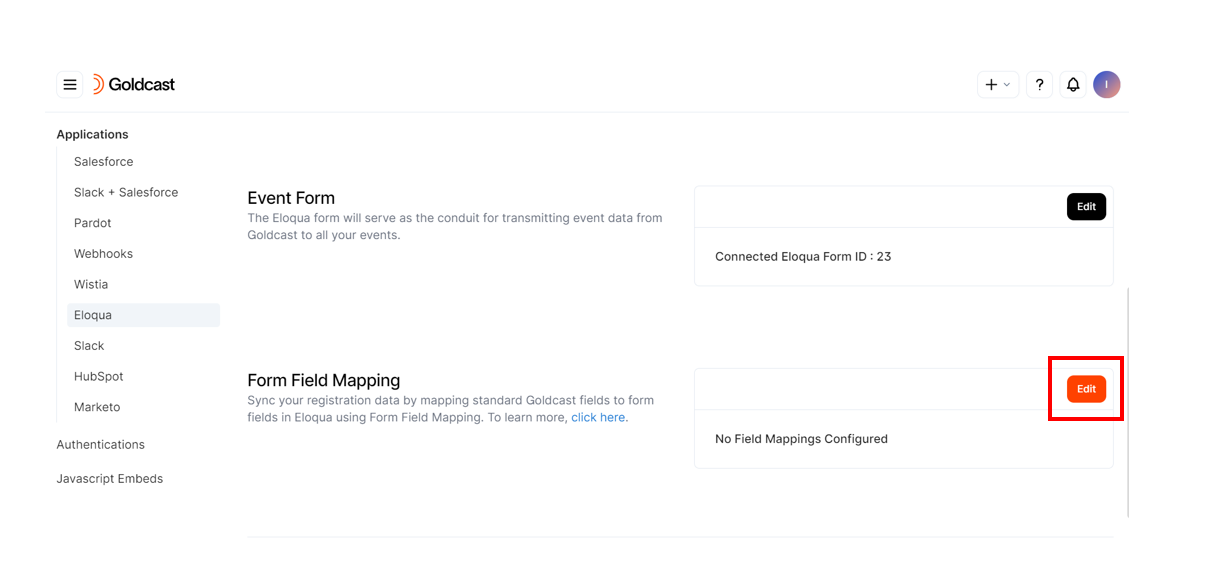
- In Goldcast Studio, navigate to Integrations → Eloqua and click the Edit button in the Form Field Mapping section.
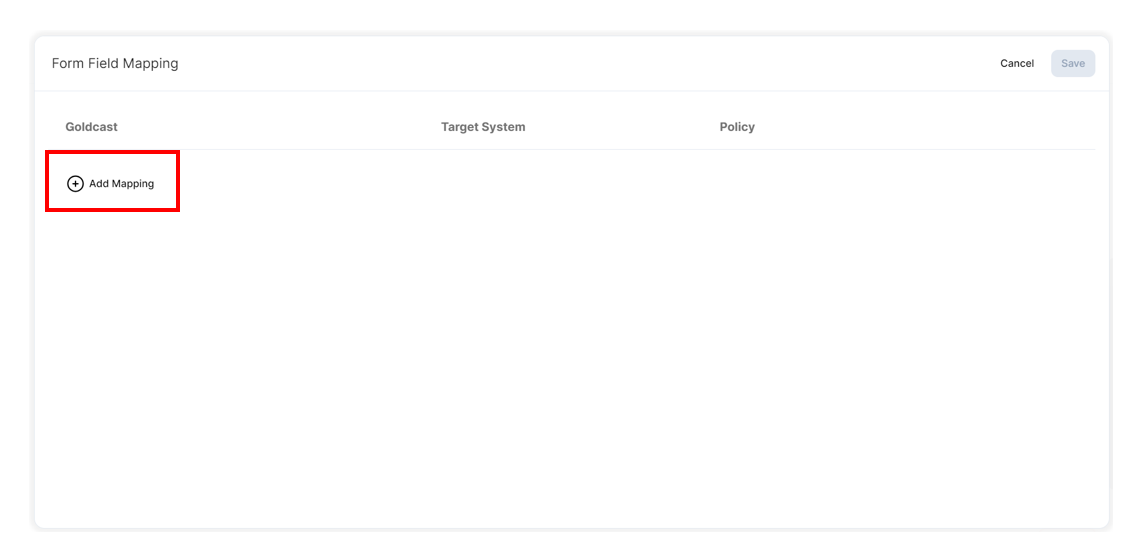
- Click the Add Mapping button.
- Use the dropdown list to map your Goldcast event registration form fields to their counterparts on your Eloqua form. The target system dropdown displays the corresponding Eloqua form field label and field ID.
- Add the required fields for which you want to send data from Goldcast to Eloqua.
- Click Save to complete the action.
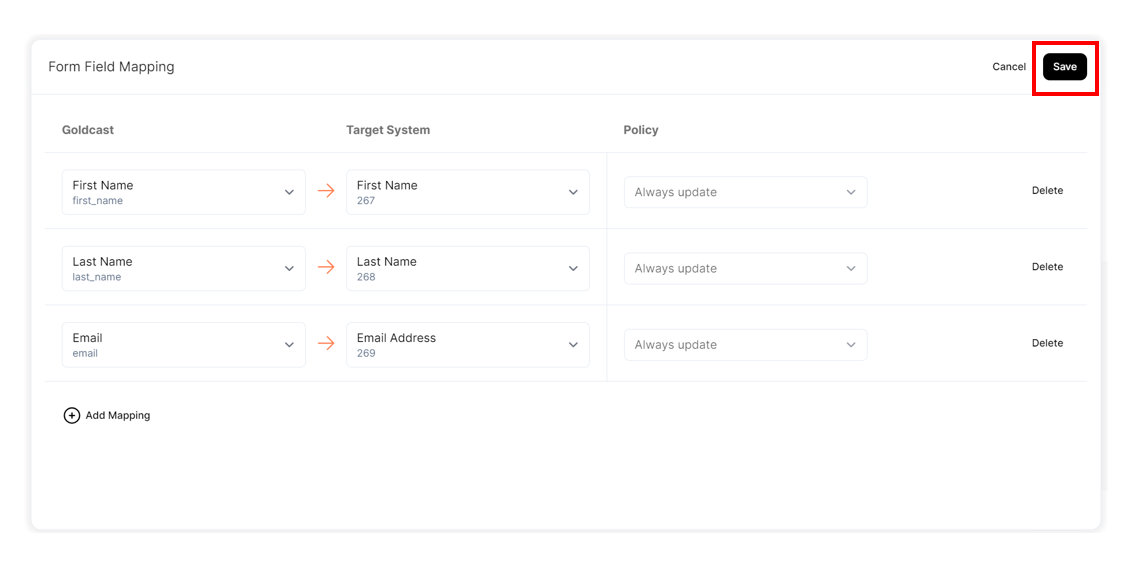
The update policy for each field is set to Always Update by default, and you cannot change it.
Syncing Magic Links
Magic Link is an integral part of the Registration that will be sent to your Eloqua Account as a form submission. To sync magic links, please make sure you have a mapping done as shown above in the Form Field Mapping setup in your Goldcast Studio.
Here is a step-by-step example of how you can map Magic Link to your Eloqua Form Field:
- In Goldcast Studio, navigate to Integrations → Eloqua and click the Edit button in the Form Field Mapping section.
- Click the Add Mapping button.
- Click on the first Goldcast dropdown and search/select Magic Link
- Click the second Target System drop-down and search the field you created for Magic Link as guided above.
- Choose the field and Click Save.
Syncing Unique Event Registrant Identifier
Goldcast has introduced a standard field: the Unique Event Registrant Identifier, which can be mapped with your Eloqua form fields and will be synced for all custom activities sent from Goldcast to Eloqua. This field combines the Registrant's Email and Event ID, making it unique for each registrant for each event.
For example: janedoe@goldcast.io_1ce4e3d4-23f3-4a41-abea-2b139e191fb5.
You can use this identifier as a key to segregate or process data in Eloqua for a particular event and use it in your Custom Data Objects.
Note: To pass this field data to Eloqua, you need to map it via the Form Field Mapping section at the org level. To do this, see instructions below.
To set this up:
- Log into Goldcast Studio and go to Integrations → Eloqua.
- In the Form Field Mapping section, click the Edit button.
- Click +Add Mapping and select the Unique Event Registrant Identifier field in the Goldcast dropdown.
- Select an appropriate field in the Target System (Eloqua) dropdown. Ensure you have a corresponding field in your Eloqua form to capture this activity.
- Click Save.

Once this mapping is done, this field will pass the Unique Event Registrant Identifier to the corresponding field you have chosen in your Eloqua form for all custom activities.
Heads up! Do not place any character limitations on the target field in Eloqua that will receive this data.
Congrats! You’ve now completed the setup for Goldcast + Eloqua integration. All the settings you made are applicable at the organizational level.
Configure your Events data synced to Eloqua
Once you have completed field mapping at the organization level, you can customize Eloqua integrations for any particular event.
For example, you might not want to send the data for an internal company event to Eloqua. In this case, you can turn off Eloqua integration for this particular event.
Follow these steps to customize Eloqua integration settings for individual events:
- Login to Goldcast Studio using your credentials.
- From the Events list, choose your preferred event.
- Click Integrations on the left navigation panel and select Eloqua to open the event-level Eloqua settings tab.
- Turn on the toggle for specific custom activities for which you want to send relevant data to Eloqua.
- If you don’t want to send any data to Eloqua for this event, turn off the Enabled for Event toggle.
- Click Save.

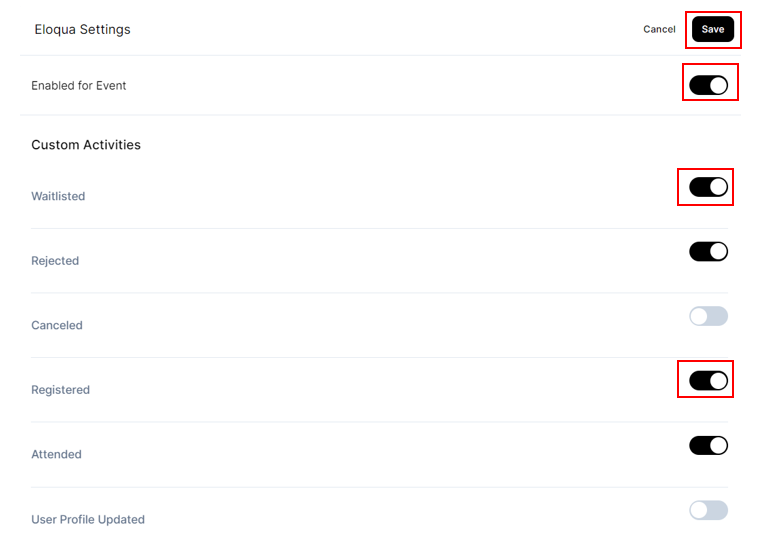
Note: If you have a Magic Link mapping setup, DO NOT disable Registered Activity for your event to ensure the Magic Link is sent back successfully to Eloqua.
The events engagement data selected for any event, using the toggle ON or OFF button, will only be synced if you have the right form fields created as guided above in your connected Eloqua form.
How to access Goldcast data in Eloqua
Follow these steps to retrieve the data Goldcast sends to Eloqua:
- Log in to your Eloqua account using your credentials.
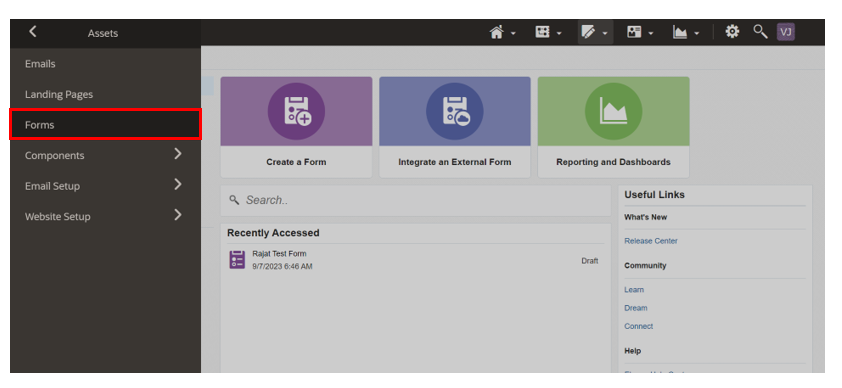
- Click on the hamburger
 icon, navigate to Assets → Forms and open the form you’ve connected with Goldcast.
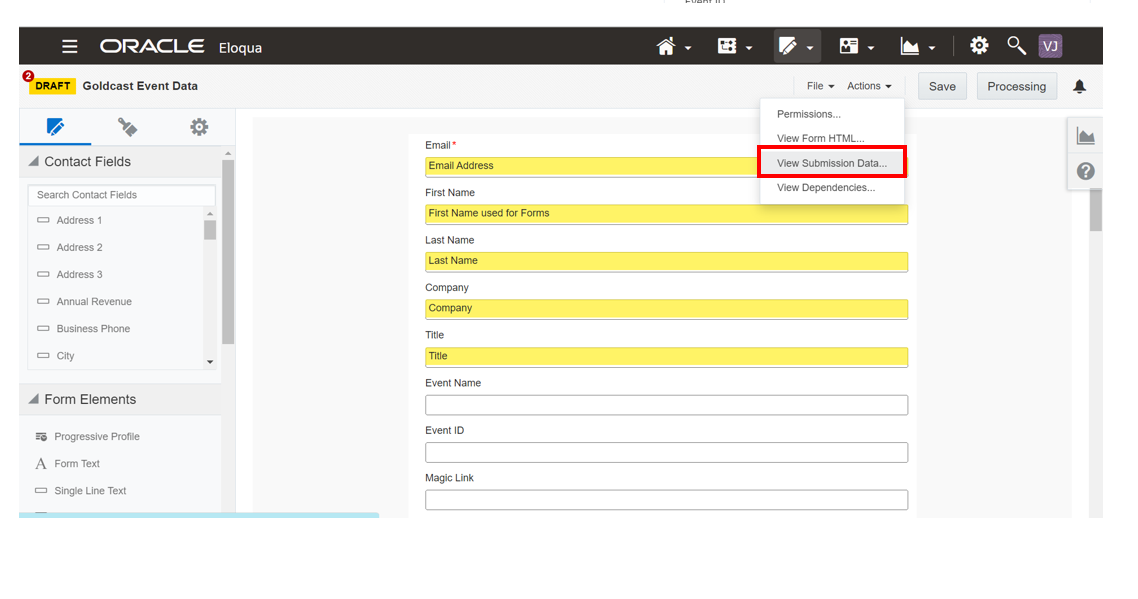
 - Click the down arrow next to the Actions menu and select View Submission Data.
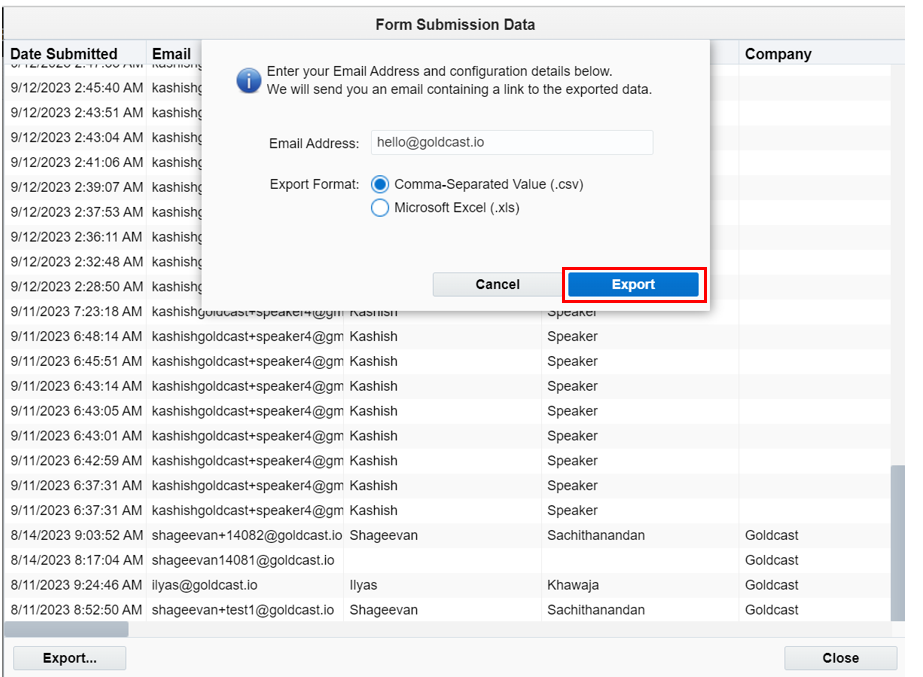
- This opens the Form Submission Data window. You can scroll through the list to view the registrant and event engagement activities data your Eloqua form received from Goldcast.
- Click the Export button to send this data as a .csv or .xls file to your email.