Table of Contents
| Plan Availability | Starter | Pro | Premium | Enterprise |
 |
Add-on | Add-on | Add-on |
For customers with contracts starting March 2024 or later, feature availability is based on your pricing tier. If interested, contact your CSM or our Sales Team to discuss pricing options.
This article answers the most commonly asked questions about Goldcast’s field events.
General questions
1. What type of events can I use this for?
Goldcast’s Field Events suit all in-person business events, such as conferences, seminars, workshops, networking events, product launches, executive summits, roundtables, partner events, training sessions, company retreats, and more.
2. What is the maximum number of attendees for field events?
The check-in website is recommended for events with less than 1000 attendees for best performance.
3. Are walk-ins allowed?
Yes. You can register and check in walk-in guests using the +Add Registrant button on the check-in site.
4. Do Goldcast’s field events support badge printing?
We recommend using QR codes to check in as they are easier, quicker, and an eco-friendly alternative to printing paper badges. However, if you’re interested, we can recommend external vendors. Connect with your CSM to know more.
Creating and managing field events
1. How do I modify the event venue?
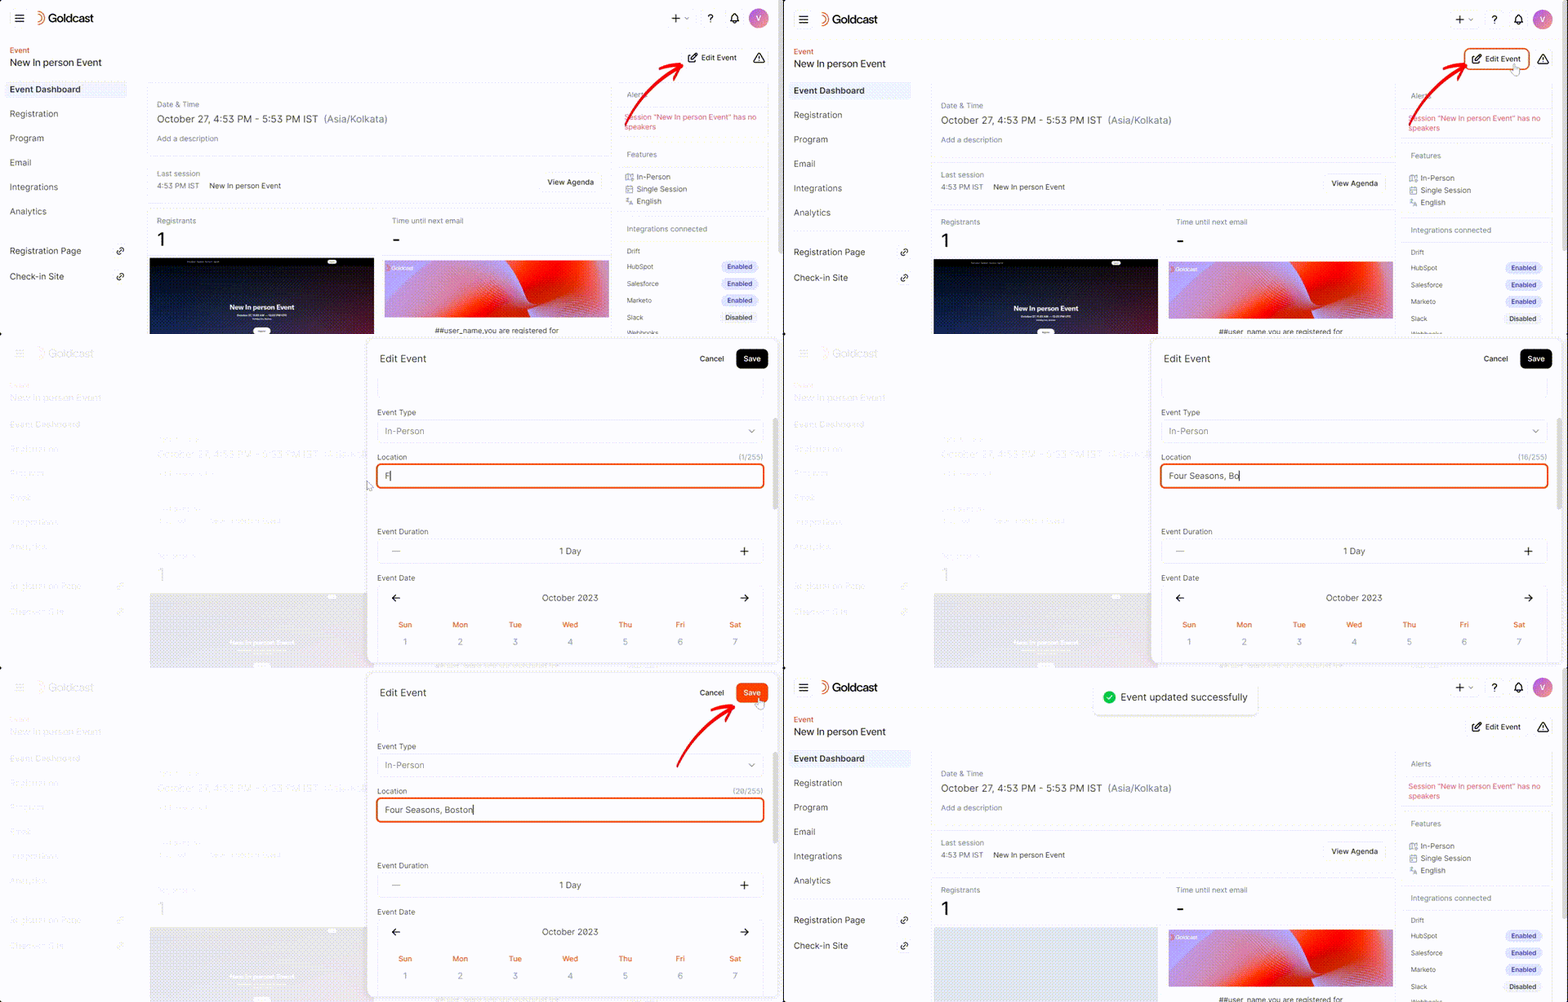
- Login to Goldcast Studio using your credentials.
- From the Events list, click the event you would like to modify.
- Click the Edit icon in the top right to open the Edit Event window.
- Scroll to the Venue field and enter your new location.
- Click Save.
2. Can I convert a field event to a virtual/hybrid event?
No. Once you create a field event, you cannot change the event type in Studio.
3. Can I convert an existing Goldcast event to a field event?
No. You cannot edit the event type in person for already created events in Studio.
Checking-in attendees
1. Is the check-in website accessible via mobile phones?
Yes. You can check in guests using any handheld mobile device, such as a smartphone or tablet.
2. Can attendees self-check in?
Yes. Before entering the event, registered attendees with QR codes can walk to the check-in tablet or smartphone at the venue, show their QR code to mark their attendance, and complete the self-check-in process without any assistance from event staff.
3. What happens if I don’t have details of the staff handling the check-in desk?
No worries! You can create a generic check-in link using your email (or a shared office email). Generate the check-in magic link and share it via email or text with the staff assigned to the check-in desk on the event day.
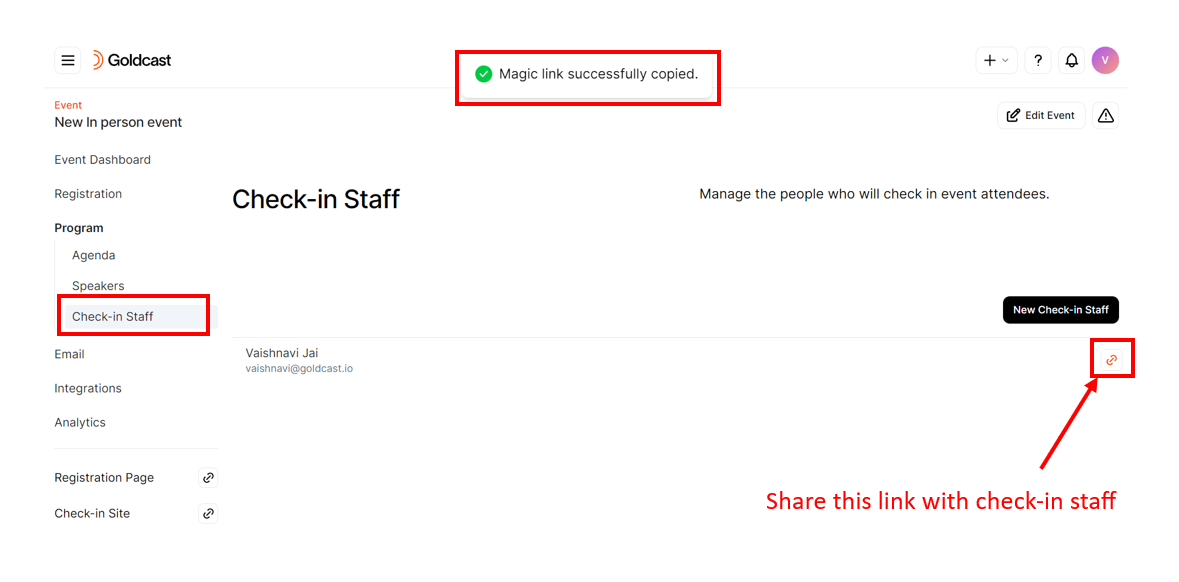
To copy the check-in magic link, navigate to Program → Check-in Staff and click the copy link button on the right.
The check-in magic link is now copied to your clipboard, and you can share it via email or text with the check-in staff.
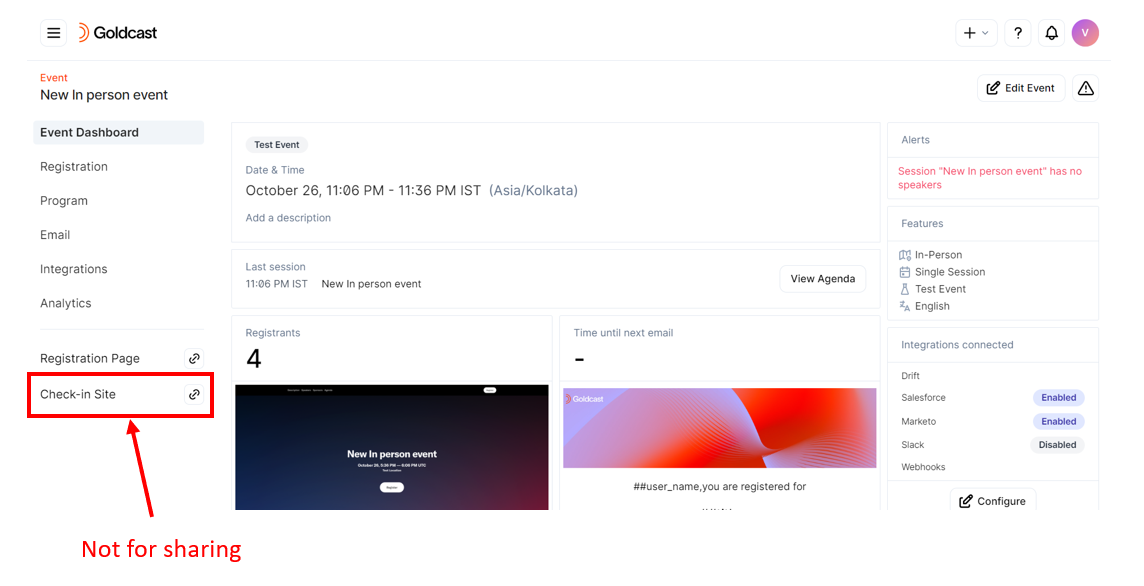
 Note: The quick link to access the check-in site in the Event Dashboard is NOT for sharing. This link works only when you’re logged into Goldcast Studio. So, ensure you share the correct magic links with the check-in staff.
4. Can event organizers check in attendees?
Yes. Anyone with a check-in staff magic link can check in attendees on the event day. Additionally, event organizers can log into the Goldcast Studio and access the check-in website using the quick links on the left sidebar on the event page.
5. How many check-in staff do I need for a field event?
We recommend assigning one check-in staff member for every 50 attendees to avoid long lines. For example, if 100 people have signed up for your event, you should allocate at least two check-in staff members at the door. However, note that these numbers are ballpark figures. The actual size of your check-in team will vary depending on the event size and the allocated duration for checking-in attendees.
6. For how long can I check in guests using the website?
The check-in website is available until one hour after the event ends. After that, you cannot use it to check in guests. However, organizers can utilize the manual attendance upload functionality in Goldcast Studio to mark registrants’ attendance even after the event.
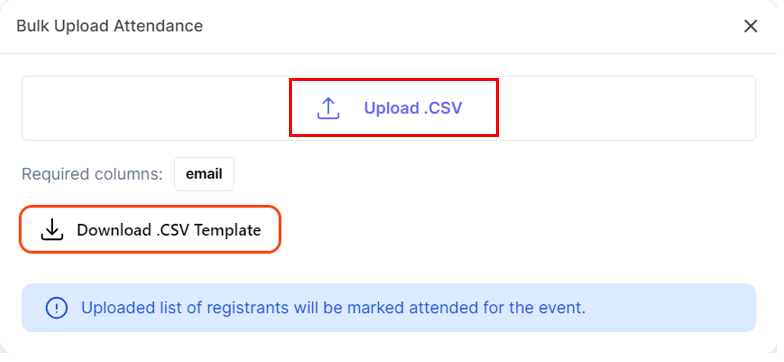
7. Can I manually upload attendance details?
Yes. Goldcast allows you to import attendance details as a .csv file.
 Note: You can manually upload attendance only for guests who have registered for the event. Goldcast doesn’t allow you to mark attendance for walk-in guests who haven’t registered.
Follow these to upload attendance details manually:
- Login to Goldcast Studio and open your preferred event.
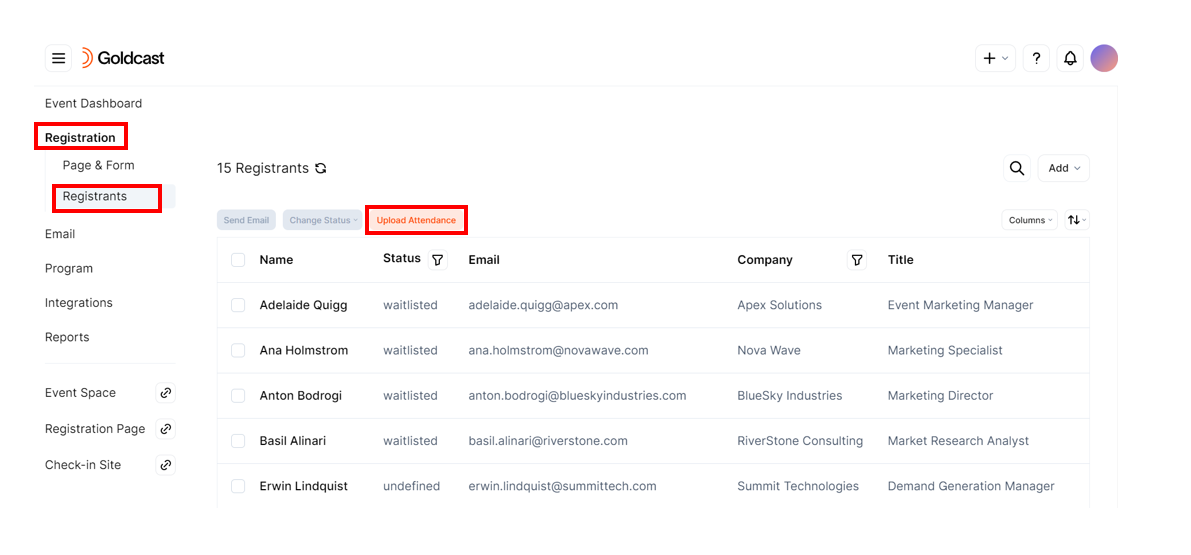
- Navigate to Registration → Registrants using the left navigation panel.
- Click the Upload Attendance button to open the Bulk Attendance popup.
- Download the provided .csv template and use it to upload attendee details.
- Click Upload .CSV to complete the action.
8. How are attendee check-in QR codes generated?
We generate QR codes internally. We don’t use any sensitive guest information to create these QR codes. So you’re assured of data privacy.
9. Can I undo check-in for an attendee?
Yes. If you’ve accidentally marked check-in for an attendee, you can reverse the action by following these steps:
- On the check-in website, select the attendee for whom you want to reverse attendance. Use the search/filter buttons to quickly select the attendee.
- Click the undo check-in button to reverse the check-in.

Integrations
1. When and what data syncs to my CRM?
Registration and Attendance data sync to your CRM and other MAPs one hour after the event's completion (provided you have enabled integrations for the event on the Goldcast Studio). You can also sync attendee check-in QR code links to your CRMs and MAPs.
Any edits made to registrants' details via the check-in site will be synced to connected CRMs and MAPs.
2. What happens to attendance data sync to CRMs if a check-in happens post-event end?
We allow check-ins via the website one hour after the event ends, and this data auto-syncs to your CRM and MAPs. After the one-hour mark, you can upload attendance manually to the Studio, and this data will sync automatically with your CRM.
Got more questions? Contact your CSM to get them answered.
