Table of Contents
| Plan Availability | Starter | Pro | Premium | Enterprise |
| Add-on | Add-on |  |
|
For customers with contracts starting March 2024 or later, feature availability is based on your pricing tier. If interested, contact your CSM or our Sales Team to discuss pricing options.
Overview
The Marketo integration allows you to sync Goldcast events and event user data with Marketo Programs. This will allow you to track event user activities and attendance through your Marketo account.
Prerequisites
The following prerequisites must be satisfied before you begin the integration process.
Goldcast: Event Organizer access to your instance of Goldcast.
Marketo: In order to integrate your Marketo instance with your Goldcast organization, users will need to have access to the Admin and Marketing Activities pages as well as the WebServices and LaunchPoint integration pages. Additionally, users may also require permissions to create Programs, Channels, and LaunchPoint Services if they have not already been set up for your event.
Your Marketo LaunchPoint User must have at least the following permissions:
- Access User Management API
- Read-Write Activity
- Read-Write Assets
- Read-Write Campaign
- Read-Write Person
- Read-Write Activity Metadata
- Read-Write Schema Custom Field
- Read-Write Schema Standard Field
Additionally, you will need to verify the maximum number of custom activities supported by your instance of Marketo and make sure there is enough space for adding at least two custom activities.
Heads Up! If you are using Goldcast Registration forms and have duplicate leads in your Marketo database with the same Email, our integration/field mapping setup updates the oldest record found in your Marketo. Ensure you account for the duplicates before setting up your emails, and post-event flows. This can lead to unusual data sync to different leads.
Connect your Goldcast Org to Marketo
Obtain the Required Marketo Account Information
To complete this integration, you will need the following information from your Marketo account:
- REST API domain name
-
Client Secret and ID from a LaunchPoint Service
Follow the instructions below for obtaining this information and setting up your integration.
- On the top menu, click Admin.
- In the side menu, expand Integration and click Web Services link.
- Once you are on the Web Services page, in the REST API section, copy the REST API domain name, leaving out /rest. We recommend saving this in a note or document for later use.
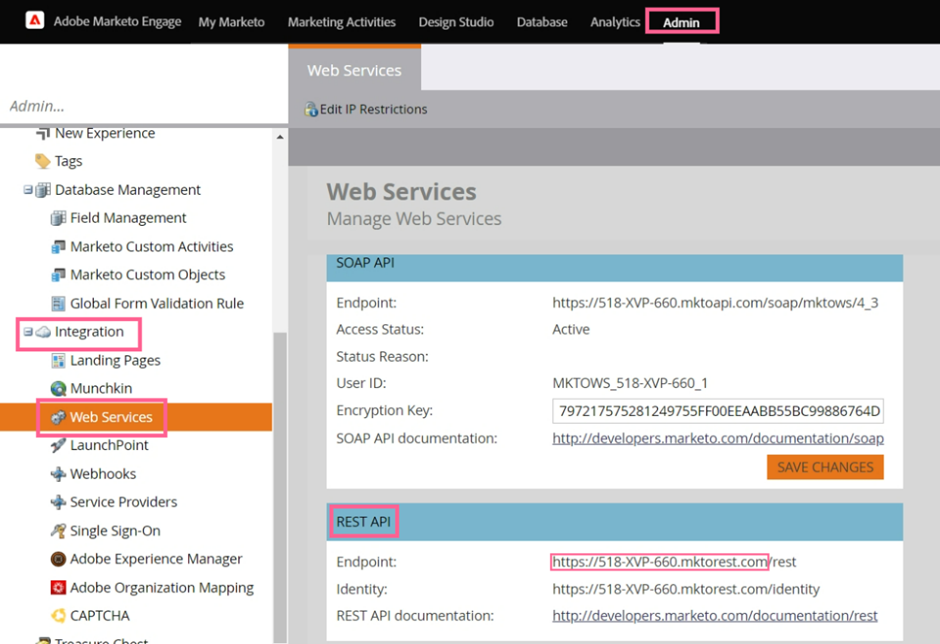
- In the side menu, click the LaunchPoint link under Integration . You will be redirected to the Installed Services page that contains a list of all of your LaunchPoint Services.
- Click View Details of the installed service you want to connect to your Goldcast org. The Details window appears.
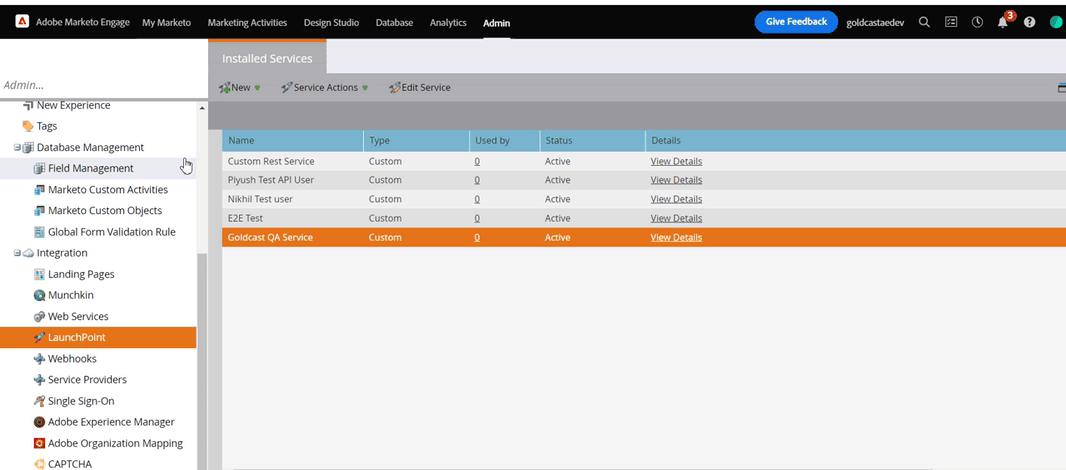
- Copy the Client ID and Client Secret and save them in a note or document for later use.
Install Marketo Integration
We recommend logging into your Goldcast org ahead of time to avoid having to do so during this process.
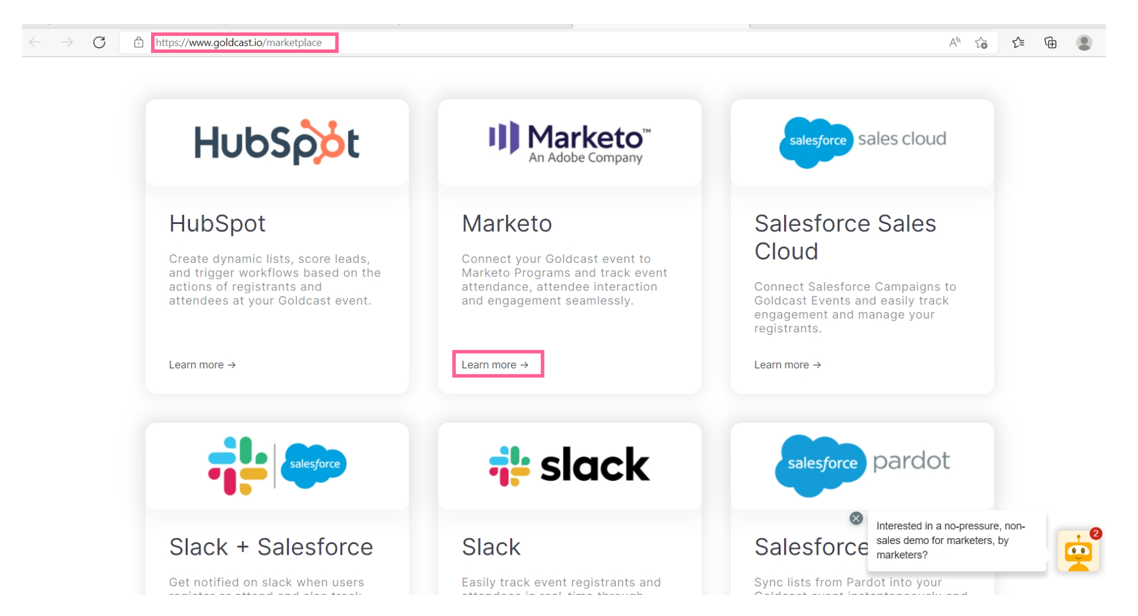
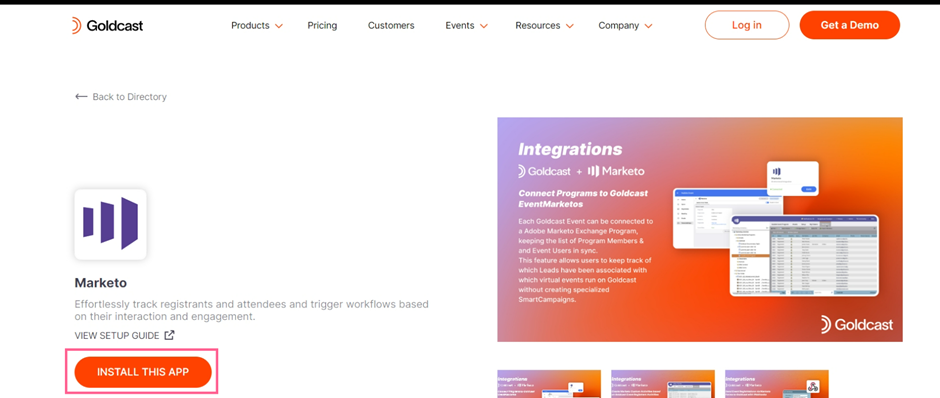
- From the Goldcast Marketplace page, click the Learn More link on the Marketo tile.
- Select the Install This App button to initiate the installation.
Upon clicking, you will be redirected to the Integrations page for your Goldcast Org, and a pop-up titled "Install Marketo" will appear. - Click the "Install" button to complete the installation.
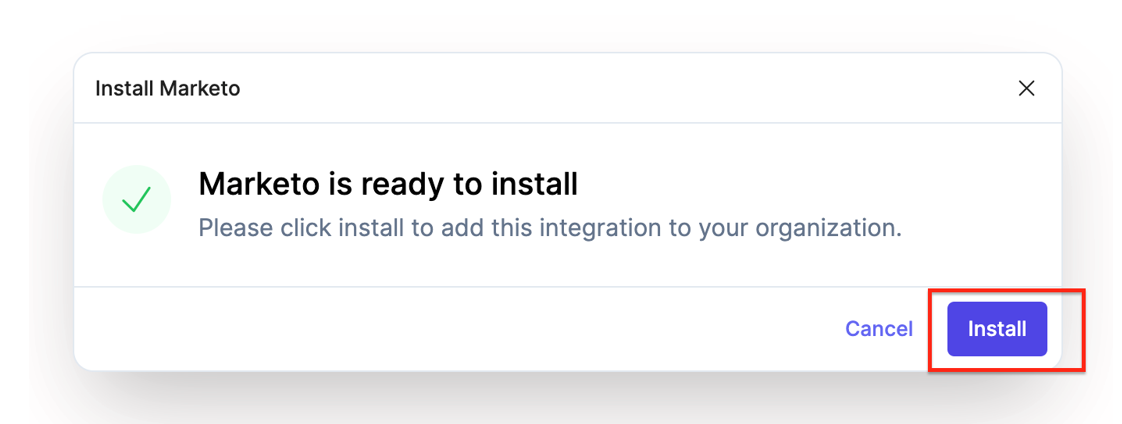
- You will receive a confirmation pop-up for the installation, and then you will be redirected to a screen to authenticate your Marketo account.
Connect your Marketo Account
Retrieve the API domain name, Client ID, and Client Secret you copied earlier. You will need them to connect your Marketo account.
Follow the instructions below to connect your Marketo account.
- To begin, click on the New Authentication button on the screen.
- In the popup that appears, enter a name for your integration in the provided field and click Create to proceed. You can choose any name you prefer for your authentication.
- Enter the API domain name, Client ID, and Client Secret you saved earlier into the provided fields.
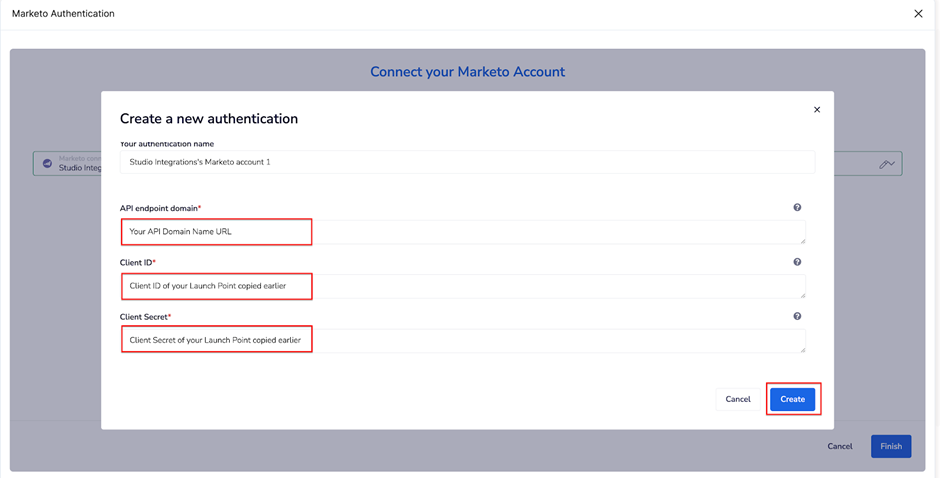
- Click on the Create button.
- Once you are redirected to a Marketo authentication screen, click Allow to proceed.
- If the account connection is successful, a confirmation message will pop up, indicating that Marketo has been configured successfully.
- Click the Finish button to complete the Integration Setup for Marketo in your Goldcast account. This will create two templates for Goldcast in Custom Activities in your Marketo account.
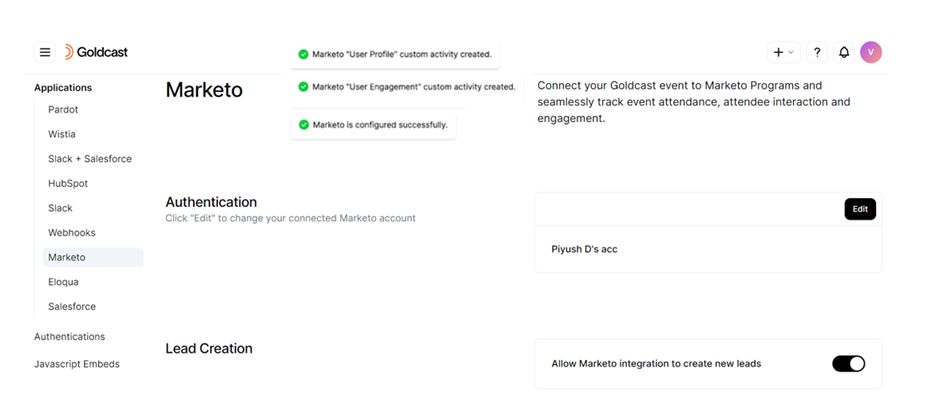
Configure lead creation
By default, Goldcast automatically creates new leads in Marketo to sync the data of event registrants not already present in your connected Marketo account. However, if you don’t want Goldcast to create new leads in Marketo, you can turn off this feature.
To do so:
- You will land on the Marketo integration page in Goldcast Studio once you complete the previous steps successfully.
- Navigate to the Lead Creation section, and turn ON or OFF the toggle as per your requirements.
Heads Up! If disabled, this toggle will not create leads for event registrants who are not present in your Marketo account. If you have any questions about this toggle, contact the Goldcast support team at support@goldcast.io.
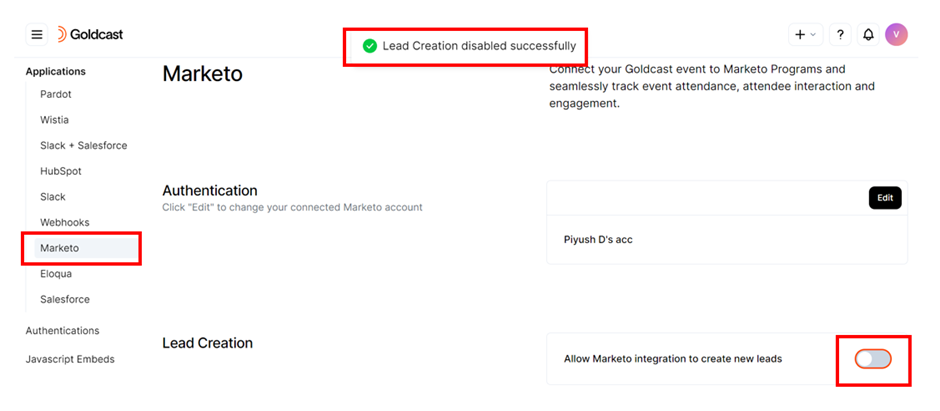
Heads Up! If you are an existing user of our Marketo Integration, this toggle is enabled by default. If you want to turn this off, navigate to Integrations → Marketo and turn off the Lead Creation toggle.
By following these steps, you can easily set up authentication for the Marketo Integration.
Now, all custom activities data based on Goldcast Activity triggers that have been toggled ON in the Event level setup will be sent to your Marketo Account.
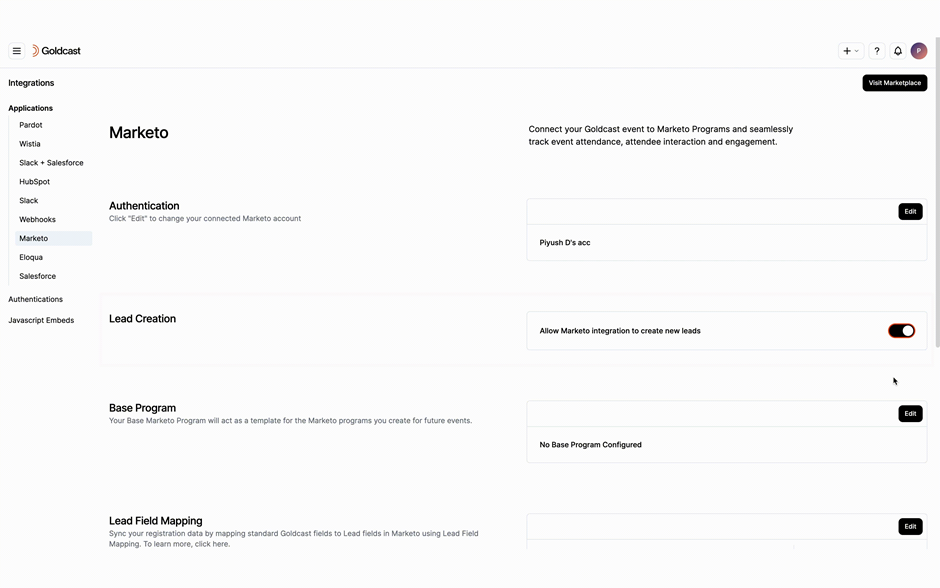
You will now see sections in Marketo connecting settings like Base Program, Lead Field Mapping, and Program Member Field Mapping.
- There is another tab named Base Program that is used for working with Marketo Clone Feature. For more information on how to set up and use this feature, refer to Setting up your Base Marketo Program.
- You will also get access to new feature tabs such as Lead Field Mapping and Program Member Field Mapping. For more information about these features and their setup, refer Lead and Program Member Field Mapping in Marketo.
Connect a Goldcast Event to a Marketo Program
IMPORTANT: Goldcast Events can only be integrated with Marketo Programs that have been set up as of type Event.
After creating an event in Goldcast, you can connect it to your Marketo Program. This allows you to sync Goldcast Event Users with your Program Members in Marketo. Once a Goldcast event has been linked to a Marketo program, you will be able to track Event User's activities as well as their attendance statuses for the event.
Currently, there are two ways you can connect a Goldcast Event to a Marketo Program:
Note: The registrations will start syncing to your Marketo Program if and only if there's a Marketo Program connected to your Goldcast Event. It can be done in either of the ways described below. It is highly recommended to connect a Marketo Program to a Goldcast Event before registrations start for your event.
Connect a Goldcast Event to Marketo Program manually
- In Marketo, on the top menu, click Marketing Activities.
- On the Marketing Activities page, select the Program you would like to connect with your Goldcast Event.
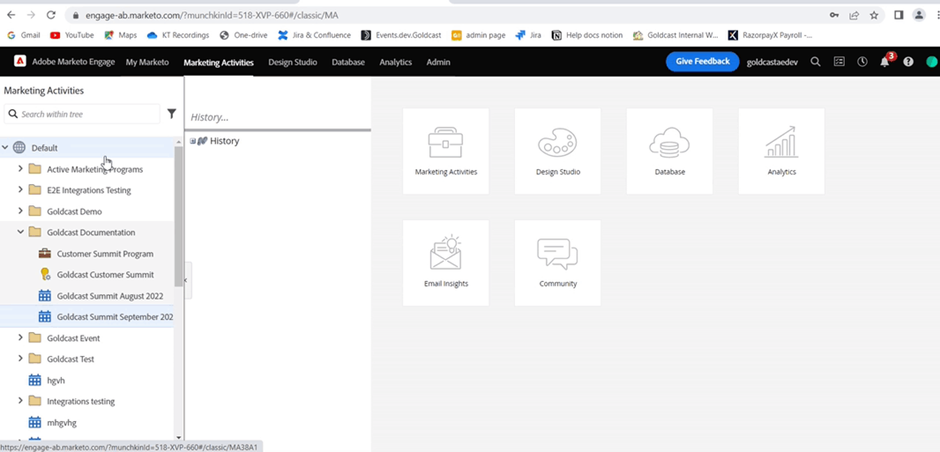
- After you've opened the program's page, copy the Program ID. This ID is used to integrate the program with your Goldcast Event.
Program IDs are four numbers in length and will always be located between #ME and A1 at the end of a program's URL.
Ex. https://engage-ab.marketo.com/?munchkinId=877-CID-123#/classic/ME1234A1
Here the Program ID is 1234. - Highlight and copy the Program ID. We recommend saving it in a note or document so you can use it later.
- Select the Event
- Log in to Goldcast Studio with your credentials.
- From the Events list, choose the event you want to set up the Marketo integration for. You will be redirected to the Event Dashboard page.
- Access Integrations:
Click on the Integrations option from the left panel. Alternatively, you can click on the Configure option in the Integrations available section within the Event dashboard.
- Navigate to Marketo:
You will be redirected to the Integrations page. Locate and click on the "Marketo" integration.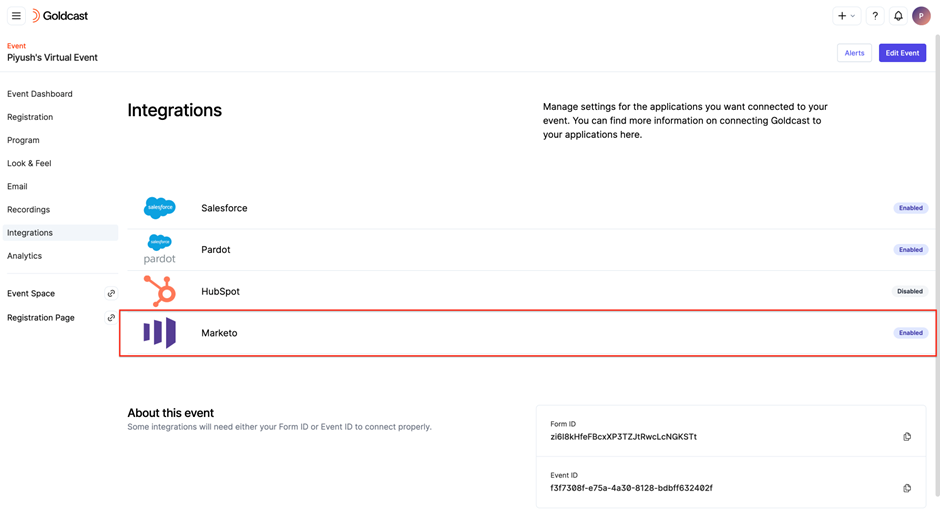
- Connect Marketo Program manually(or you can Clone it as well if you have Base Program setup):
A drawer will appear from the right side of the screen, providing a text field to enter the Program ID. This will validate the Program. Once done, click on Connect button to proceed.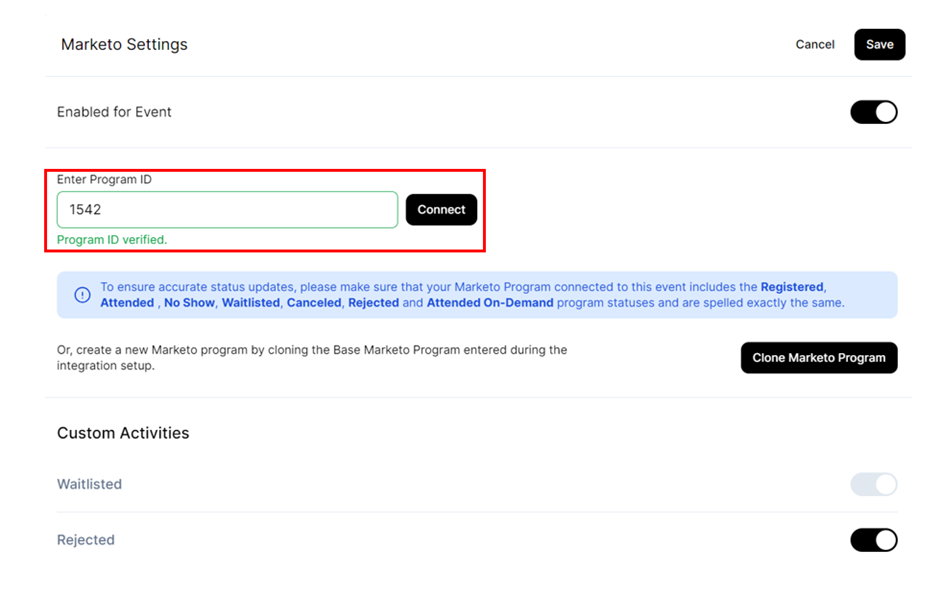
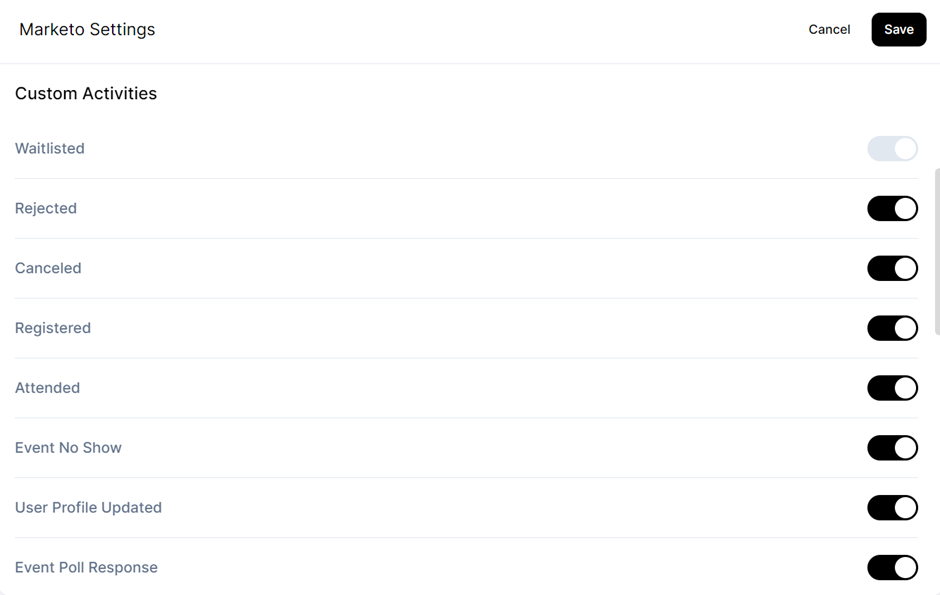
- Configure your Custom Activities:
Additionally, you scroll below and choose activities you want to be sent to Marketo for your event registrants. You can accordingly turn the toggle ON or OFF.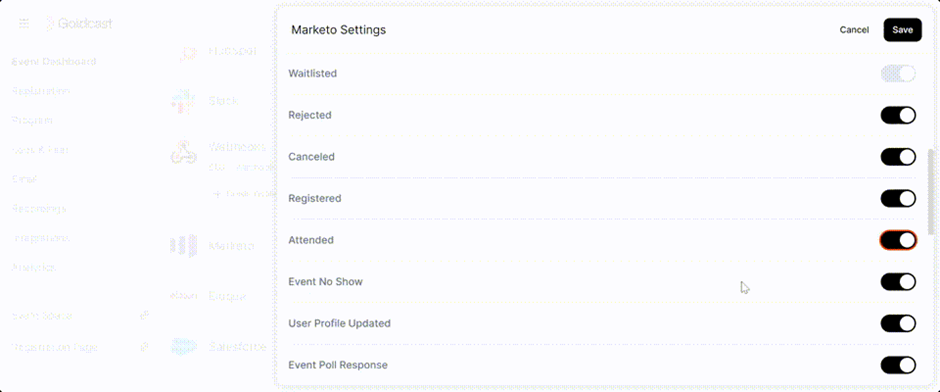
- Save:
Upon making the above changes, Click on Save button to save the configuration for your event.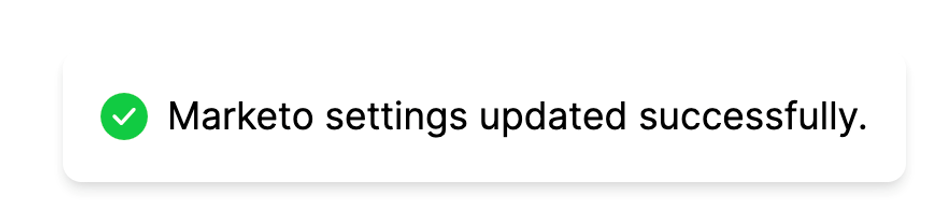
Note: Make sure you don’t delete the Program post-event integration setup. This will cause the integration to fail. You will need to reconfigure the integrations. Make sure you have appropriate Program Statuses configured before connecting in Goldcast.
It is of critical importance to connect your Goldcast Event to Program in Marketo. Make sure you've entered the Program ID in your Marketo setup of your Goldcast Event to ensure the data being updated at a Program Member level. If not connected, this will result in failing of data being synced to Marketo Programs, and also impact features like Marketo Program Member Field Mapping and its related data.
Clone Marketo Program and Connect to Event within Goldcast
To use this functionality, you will need to set up a Base Marketo Program which will act like a template from which the newly created Program in Marketo will resemble its properties. Also, you will need to disconnect existing connected programs if you need to use the Clone Marketo Feature.
Setting up your Base Marketo Program
- Login to Goldcast Studio using your credentials.
- Click on the Avatar logo in the top right corner of your screen.
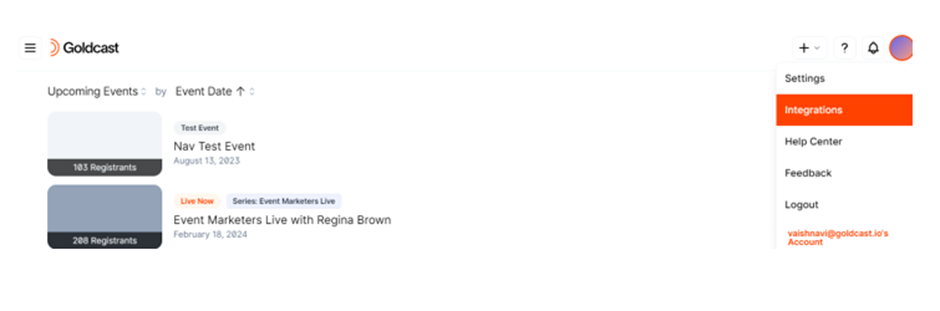
- Click on Integrations and navigate to Marketo Integration
- Navigate to the Base Program Section and click on the Edit to configure or modify.
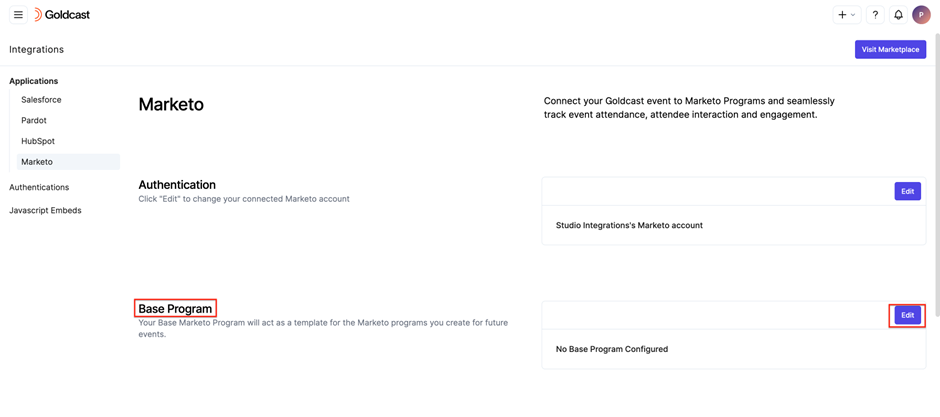
- Enter the Program ID from Marketo that will act as your template Program from Marketo to clone via Goldcast and create a new program in Marketo of a similar configuration.
- After you enter the Program ID, the system auto-verifies and validates the ID with your Marketo instance.
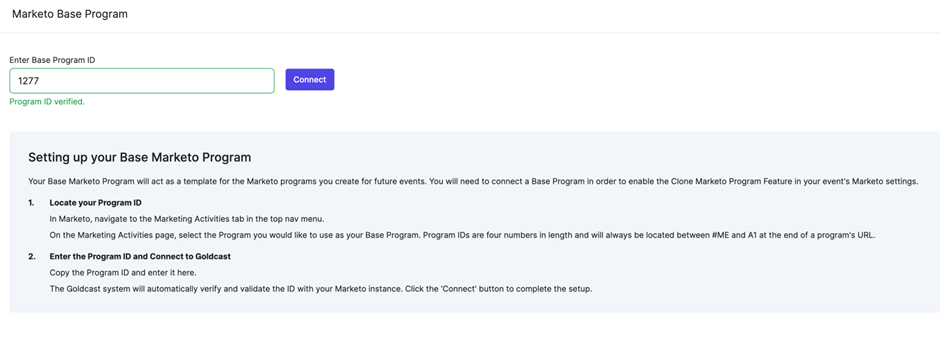
- Click the Connect button to set up the Base Marketo Program to obtain a success message.

Clone and Connect a Marketo Program in an Event
1. Select the Event
Log in to Goldcast Studio with your credentials, and select the Events tab to get a list of all your events. From the Events page, choose the event you want to clone Marketo. You will be redirected to the Event Dashboard page.
2. Access Integrations
Click on the Integrations option from the left-side panel. Alternatively, you can click on the Configure option in the Integrations available section within the Event dashboard. 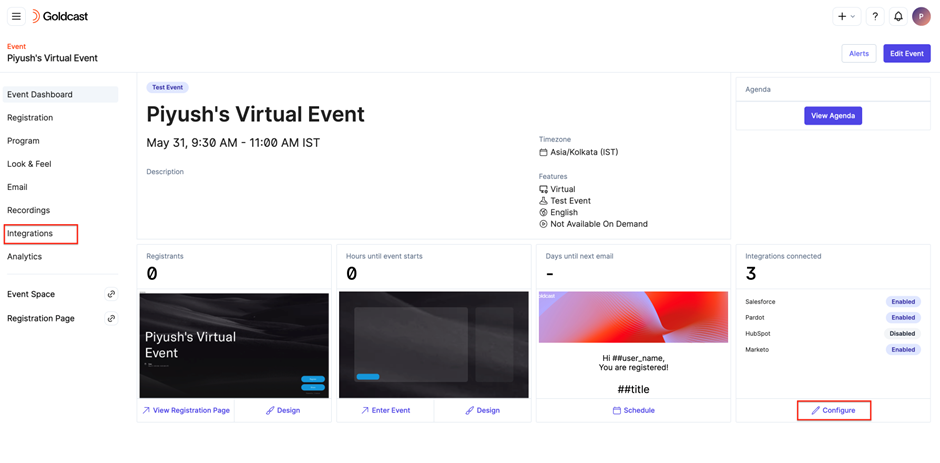
3. Navigate to Marketo
You will be redirected to the Integrations page. Locate and click on the "Marketo" integration. 
4. Clone Marketo Program
A drawer will appear from the right side of the screen, Click the Clone Marketo Program button.
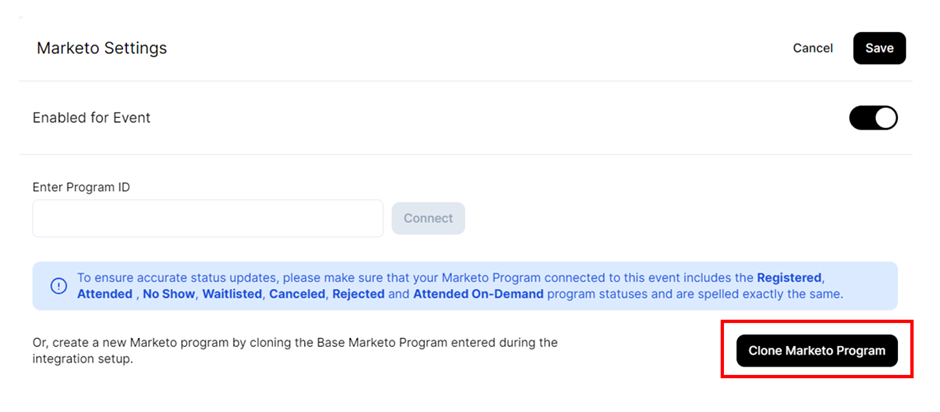
This will give you a popup to ‘Program Name’ and enter a name of your choice for the new program that will be created in Marketo. Also, in the drop-down ‘Campaign Folder’, select the location of the folder that the newly created Program will reside in. Upon clicking the dropdown, you can see all the folder hierarchy structures in your Marketo instance. 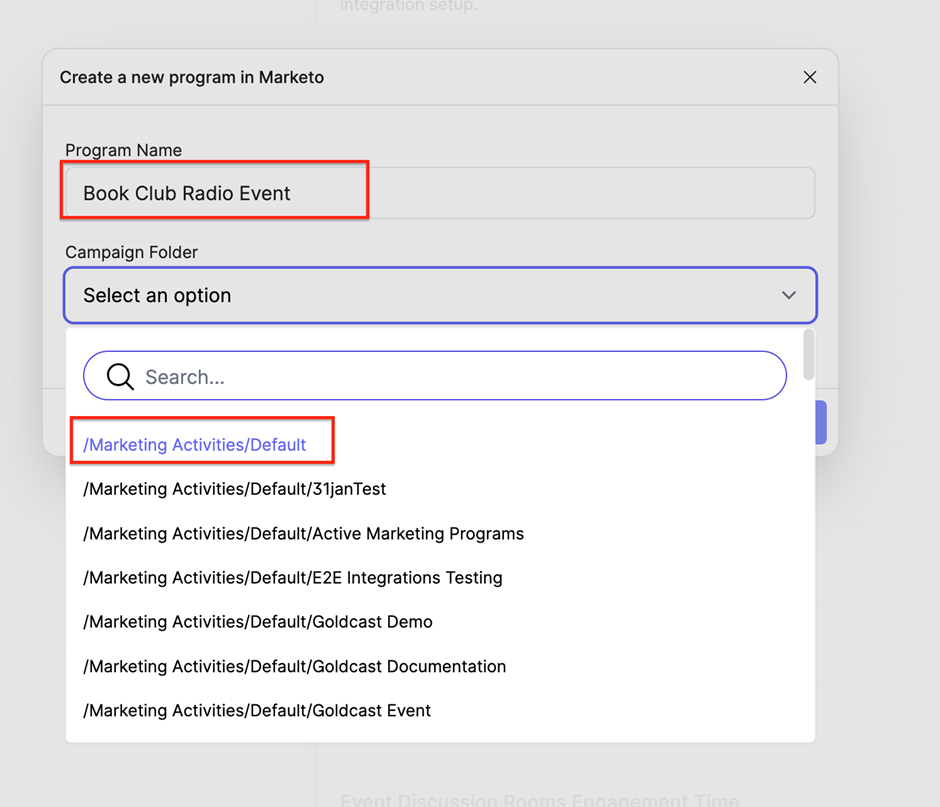
5. Connect the Program
Once all the settings are defined, click the Clone & Connect button to successfully create a clone from the base program and connect it automatically to your event. 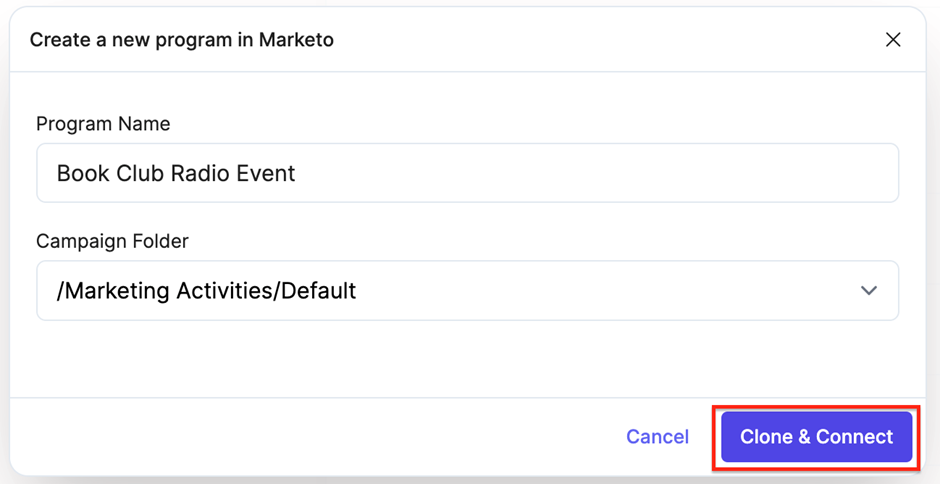
6. Configure your Custom Activities
Additionally, you scroll below and choose activities you want to be sent to Marketo for your event registrants. You can accordingly turn the toggle ON or OFF.
7. Save
Upon making the above changes, Click the Save button to save the configuration for your event.
Note: To verify if a new Program has been created in Marketo, you'll need to login to your Marketo Instance. If you cannot see the program you created, we recommend checking again in a few minutes.
Note: The Custom Activities for Event Users will continue to sync into your Marketo account(at a Lead level in Marketo not to a Program Member), irrespective of you connecting a Marketo Program to an event. It is of critical importance to connect your Marketo Program while setting up your Goldcast Event before the registration starts for the event which is considered a recommended practice.
Viewing Goldcast Event User Engagement Activities in Marketo
Note: Registrations in Goldcast can take up to five minutes to import into Marketo. If you do not see your new registrants in the Program Members list, check back in a few minutes.
After you have connected a Marketo Program to a Goldcast Event, you will be able to view Event User activities in Marketo. This includes attendance statuses as well as engagement with various elements of your event such as participation in polls and networking rooms.
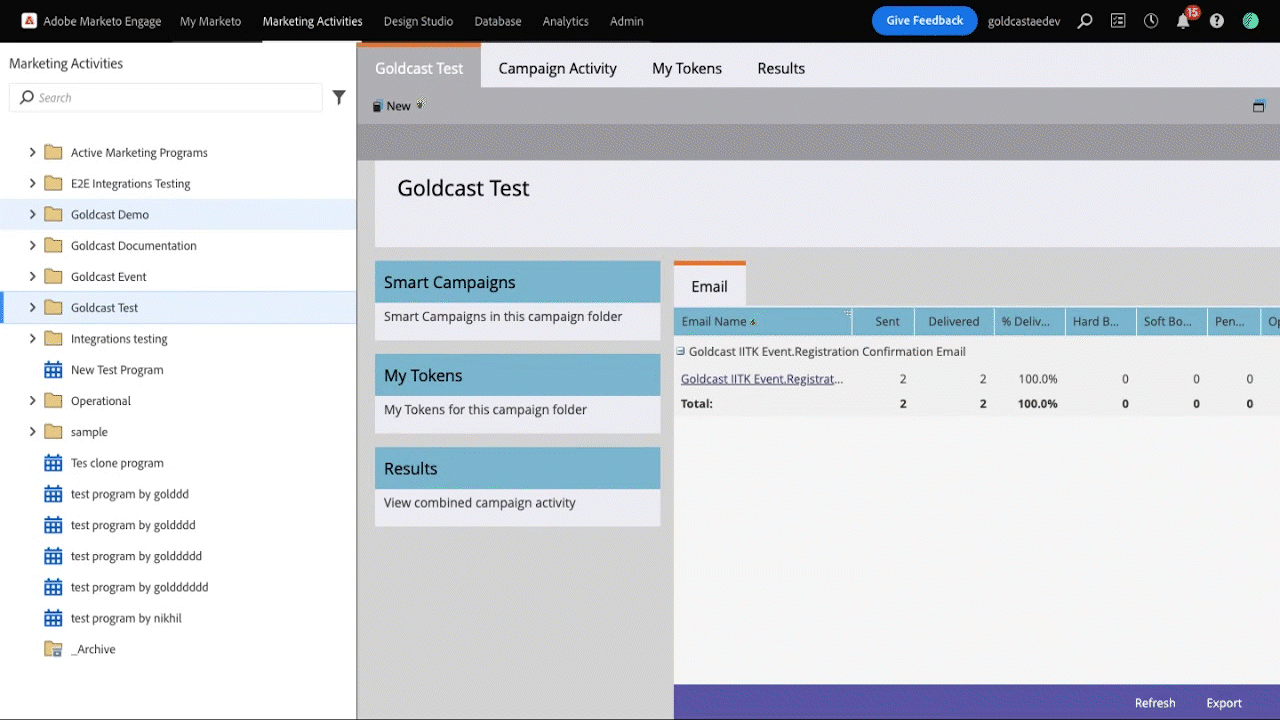
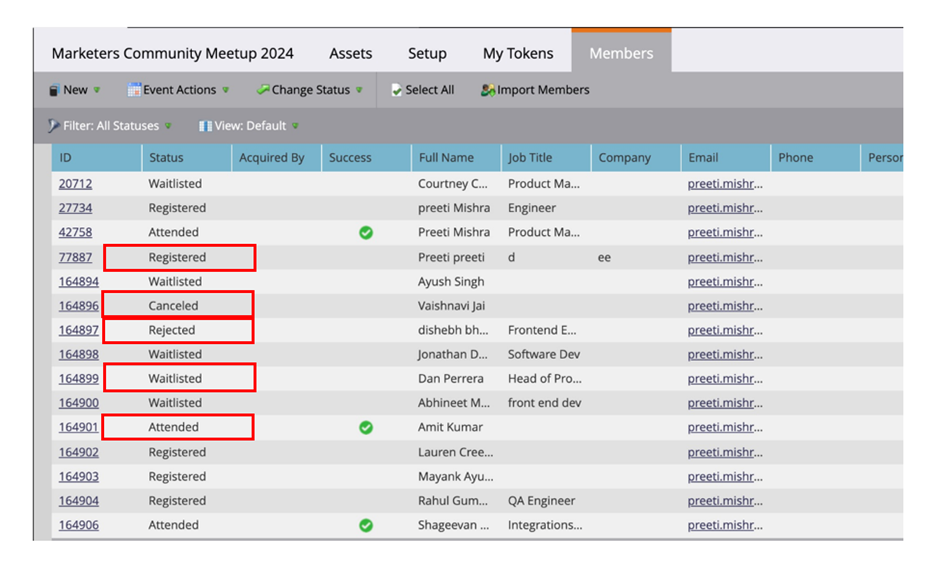
A list of all Event Users can be found under the Members tab of your program.
- Event User attendance statuses are listed under the Status column.
- A green checkmark will appear under the Success column once a user has attended your event.
Additional information about a user's activities can be viewed in the Activity Log associated with their Program Member profile. 
Filtering/Triggering Actions in Marketo based on Goldcast data
You can use Goldcast Event Engagement data synced as custom activities to a Lead to trigger and filter in your Marketo Smart Campaigns to create lists of certain criteria or trigger based on Goldcast engagement.
Here's a table on which you can use to filter on using Activity Type Column for the respective Goldcast Event Engagement Activity.
On-Demand Custom Activities in Marketo
We sync four types of User Engagement Activities for On-Demand events, distinguished by the Engagement Type property in the Custom Activity for your leads in Marketo. These activities include:
- Attended
- Attended Session
- Event CTA
- Resource Downloaded
For these activities, Engagement Type can have two different values i.e. Live and On-Demand.
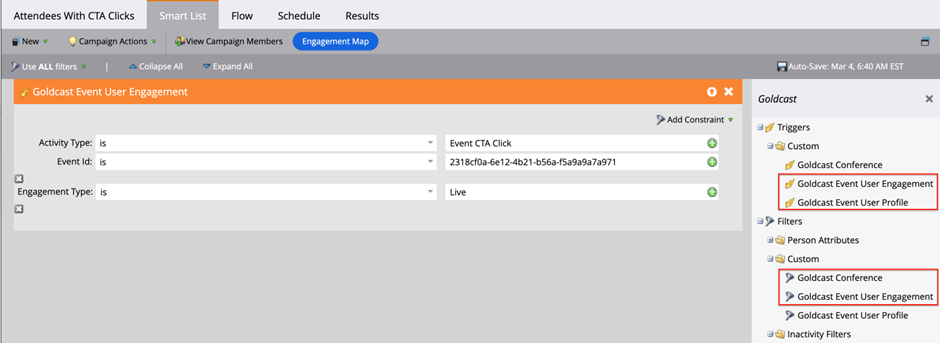
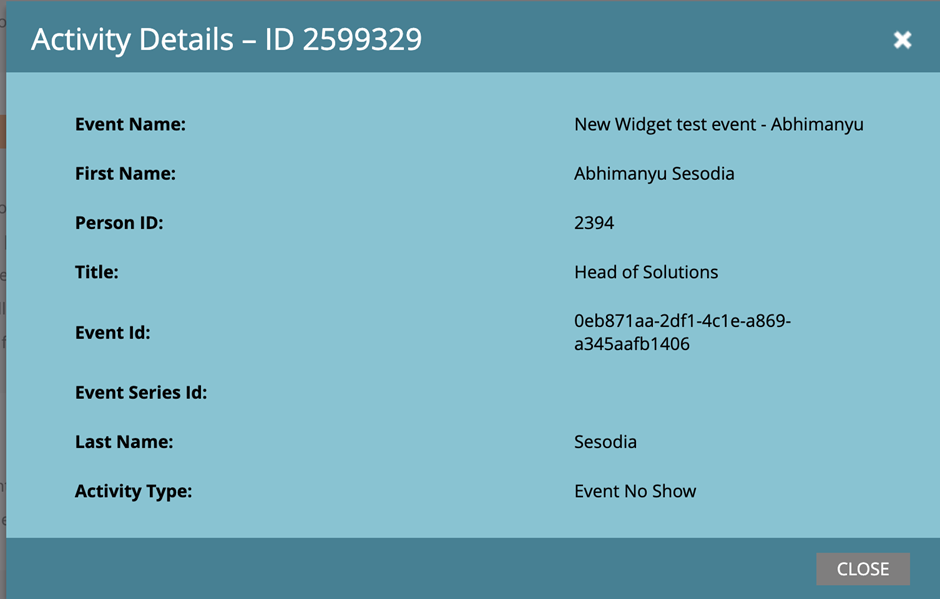
You can utilize the Engagement Type property to filter and automate actions in your Marketo Smart Campaigns and Lists, and other automations to make a targeted marketing effort. Below is an example of how the Engagement Type appears in a Custom Activity in Marketo. 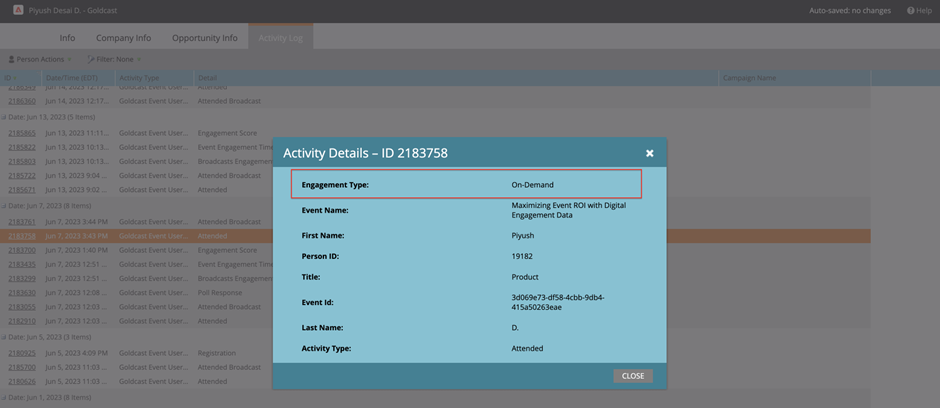
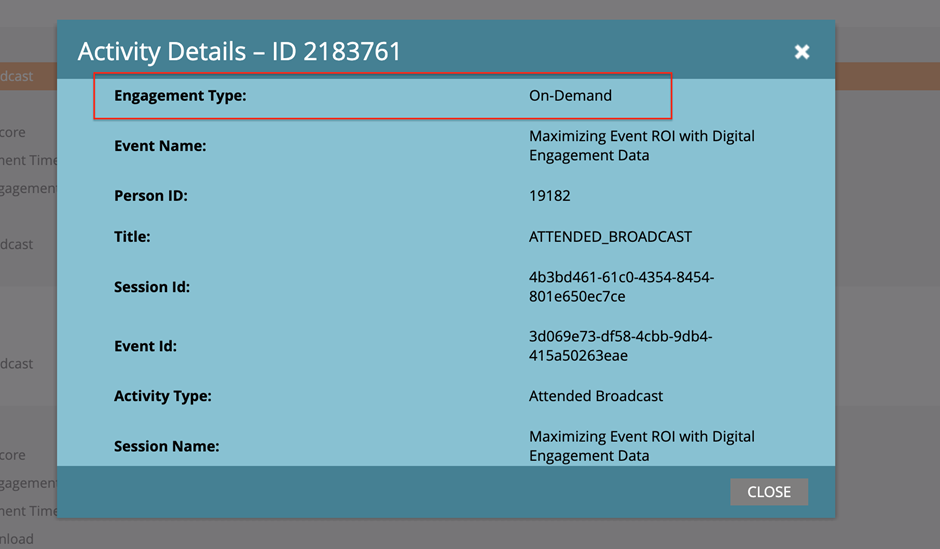
The other mentioned activities above like Attended Session, etc. in the On-Demand mode of your event will include a corresponding parameter as well. You can utilize this property in your workflow and automation filters, as demonstrated in the example below.
- For Attended activity you can use Goldcast Event User Profile Trigger or Filter.
- For Attended Broadcast, Event CTA and Resource Clicked you can use Goldcast Event User Engagement trigger or filter.
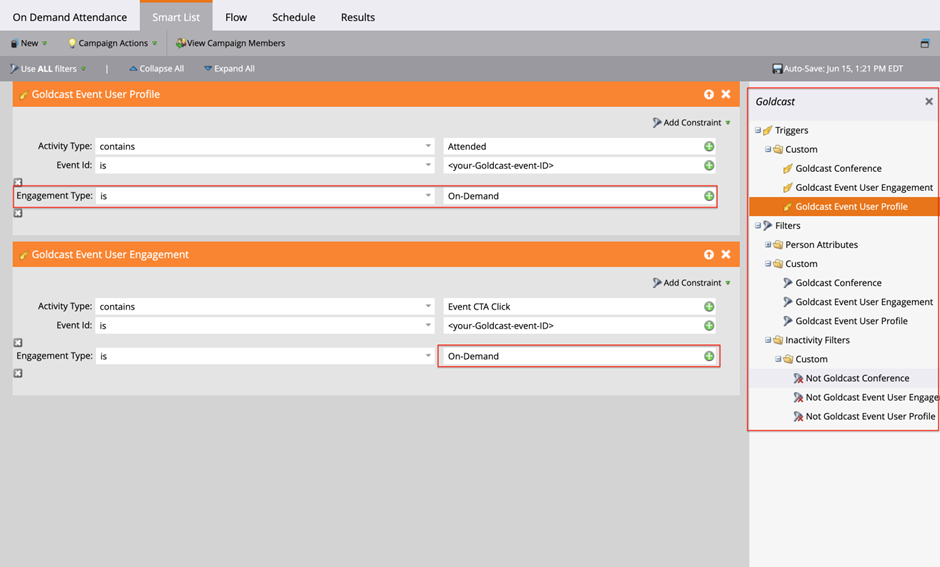
Note: Please ensure that you use the exact spelling of the values to achieve the most accurate results when filtering.
Program Member Status Updates in Marketo
Sample Program Member Status Updates in Marketo - for non-waitlisted events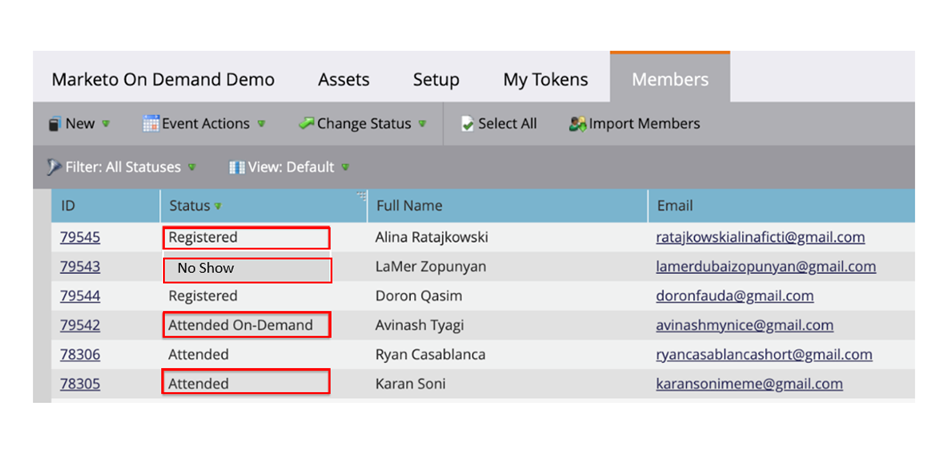
Sample Program Member Status Updates in Marketo - for waitlisted events
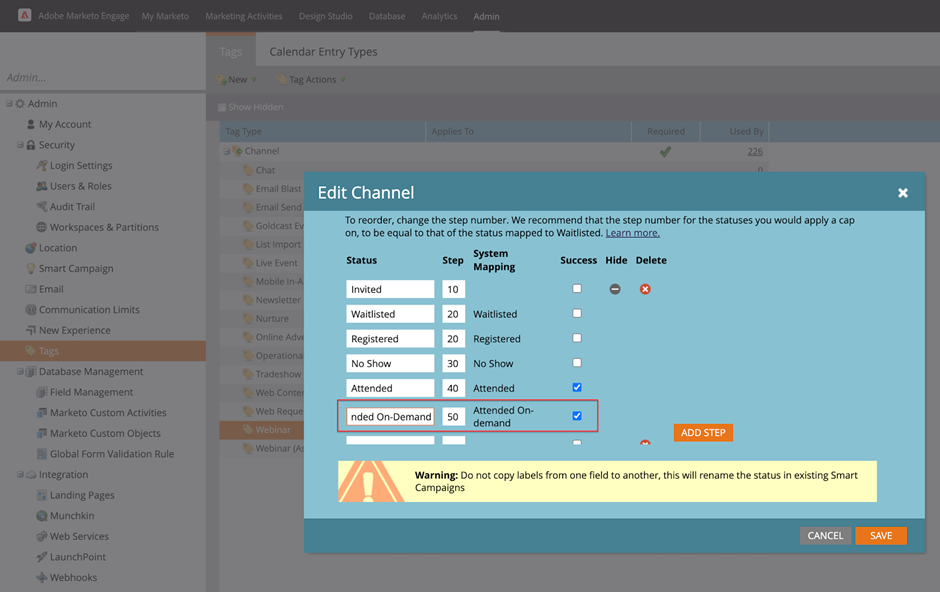
Goldcast updates Program Member Statuses in Marketo to the following pre-defined statuses:
- Registered: When a user registers for an event in Goldcast and status in the Registrants tab is Registered.
- Waitlisted: When a user registers for a waitlisted Goldcast event and status in the Registrants tab is Waitlisted. This is only applicable to waitlisted events.
- Rejected: When an admin/organizer changes the user status to rejected in the Registrants tab. This is only applicable to waitlisted events.
- Canceled: When an admin/organizer changes the user status to canceled in the Registrants tab.
- Attended: When a registered user attends an event in Goldcast.
-
No Show: When a registered event user doesn’t attend the event live or in person (for hybrid and field events).
- Attended On-Demand: When a registered user views the Goldcast event in on-demand mode. This is only updated for Goldcast On-Demand Events.
Important Notes
- Program Member Statuses will be updated in Marketo only if your Goldcast event is connected to a Marketo Program. Hence it is advised that you connect your Program to your Goldcast event ahead of time.
- Please ensure the Program Member Statuses are spelled exactly the same in your Program Channel to ensure accurate updates to your Marketo.
- Add/modify the Attended On-Demand Program Member Status to the respective Program Channel associated with your Program in Marketo.

- If you are unable to change the System Mapping name for certain channel types (e.g., Webinar), it will still function correctly as long as the status label is spelled exactly the same.
- Avoid redundant steps in Marketo Smart Campaigns for changing statuses and ensure appropriate Program Member Status values are assigned during configuration.
- Goldcast does not support Custom Program Member Statuses currently.
By following these guidelines, you can ensure that Program Member Statuses are accurately updated in your Marketo system, allowing you to effectively track attendee engagement in Goldcast events.
Goldcast Event Engagement Activities
You can use Goldcast custom activities to track user engagement and interaction with your event, such as attendance, time spent at the event, and participation in polls, Q&A sessions, and discussion groups.
Below is a list of all engagement activities currently available in Goldcast.
| Registered | Event Polls |
| Waitlisted | Event Q&A |
| Rejected | Event Engagement Score |
| Canceled | Event CTA Click |
| Attended | Booth CTA Click |
| Event No Show | Event Resource Download |
| Attended Session | Event Engagement Time |
| Attended Booth | Event Discussion Room Engagement Time |
| Attended Discussion Room | Event Booths Engagement Time |
| User Profile Updated | Event Broadcast Engagement Time |
For more information about timeline activities and sync times, refer to Goldcast Event Engagement Activities.
Viewing Goldcast Program Tokens in Marketo
Note: Goldcast Program Token data can take up to five minutes to import into Marketo. If you do not see your updated tokens in the My Tokens list, check back in a few minutes.
Once a Marketo Program has been connected to a Goldcast Event, program tokens are automatically imported to it. These tokens capture information about your event, such as Start and End Times and Event IDs that may be useful to you if you plan to:
- Create email campaigns within Marketo to send out to your Event Registrants
- Setup a landing page for your event through your Marketo account
A list of all custom tokens can be found under the My Tokens tab of your program.
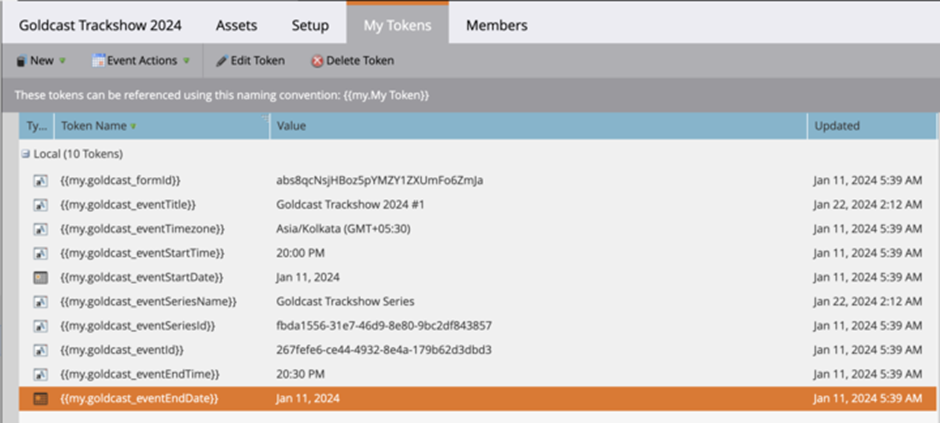
Goldcast Custom Tokens
| S.No | Token Name | Description |
| 1 | {{my.goldcast_formId}} | The Form ID of your Goldcast Event |
| 2 | {{my.goldcast_eventTitle}} | The Title of your Goldcast Event |
| 3 | {{my.goldcast_eventTimezone}} | The Time Zone you've selected for your event |
| 4 | {{my.goldcast_eventStartTime}} | Event starting time |
| 5 | {{my.goldcast_eventStartDate}} | Event starting date |
| 6 | {{my.goldcast_eventSeriesName}} | The name of your event series |
| 7 | {{my.goldcast_eventSeriesID}} | The Series ID |
| 8 | {{my.goldcast_eventId}} | The Event ID |
| 9 | {{my.goldcast_eventEndTime}} | Event ending time |
| 10 | {{my.goldcast_eventEndDate}} | Event ending date |
For additional information on tokens and their application within Marketo, refer to the following documentation:
Accessing Event User Magic Links in Marketo
Magic links are automatically sent out to Event Registrants from the Goldcast platform when they register for an event. However, if you plan on sending promotional emails using an external platform, you may wish to have access to these links yourself in your Marketo Account.
In this section, we will be reviewing how to set up a custom field that will allow you to view magic links for all Program Members who have registered for your event.
Setting up your Custom Magic Link Field
- From the top menu, click the Admin link.
- Expand the Database Management tab and click the Field Management link.
- Select the Field Actions link from the top menu.
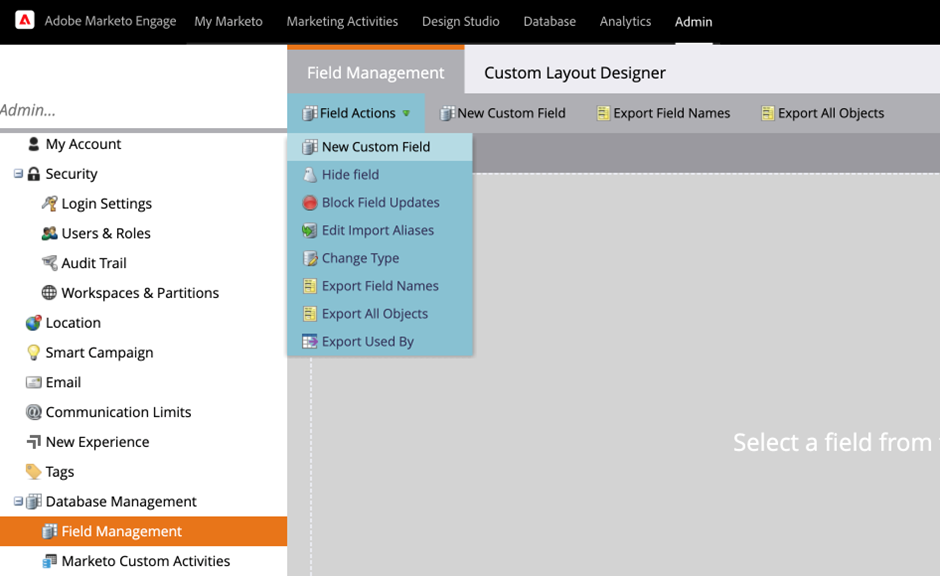
- Select the New Custom Field option from the dropdown. (You can also utilize existing custom or standard fields if necessary).
Review the following instructions carefully.
- From the Object dropdown, select Program Member. Next, from the Type dropdown, select URL.
- While you may enter any name you wish into the Name field, we recommend using goldcast_magiclink or Goldcast Magiclink.
- Enter goldcast_magiclink into the API Name field. This must be entered exactly as written in order for the integration to generate magic links for your registrants.
- Verify that the information you have entered is correct, and then click the Create button.
Once your field has been created, it will appear in the Fields list in your Program Member Field Mapping (Target System dropdown). You need to set up a Program Member Field Mapping(mandatory) to obtain your event user magic links in your Program Field created above.
Viewing Event Registrant Magic Links
Now that you have finished setting up your Magic link field and your Program Member Field Mapping in Goldcast, anyone who has registered for your Goldcast event will have a magic link associated with their Program Member profile. 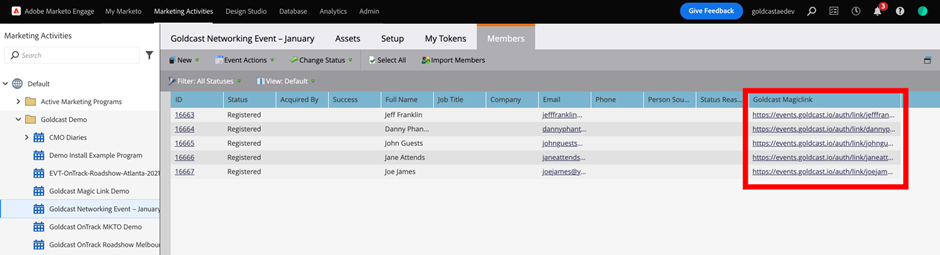
If this column does not appear on your list of Program Members, edit and add the Goldcast Magic link field to the Members list view.
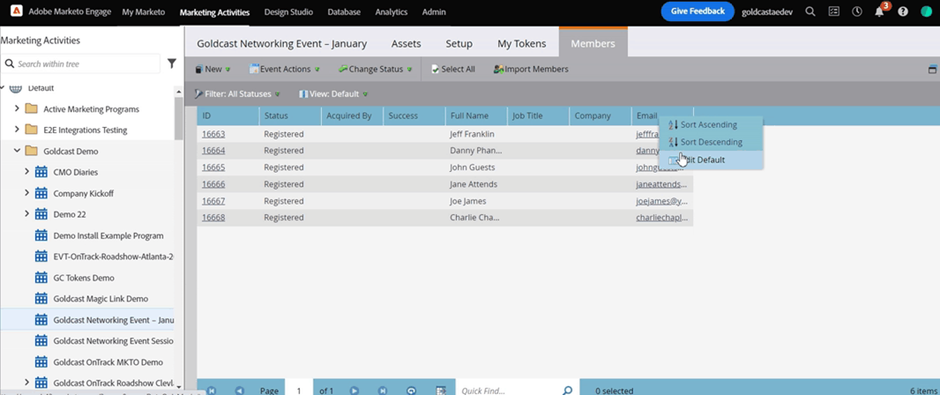
Follow these steps to add the Magic link field:
- Click on any field name in the Members list view and click Edit Default. The Edit Default window appears.
- Type in the field name, select the required field from the resultant search, and click ADD.
- Click SAVE.
Pro Tip: Ensure you configure the Connect a Program to your Goldcast Event, set up the Magic Link field, and configure Program Member Field Mapping before your registrations for the event start. This will help all the data to sync to Marketo seamlessly.