| Plan Availability | Starter | Pro | Premium | Enterprise |
 |
 |
|
|
For customers with contracts starting March 2024 or later, feature availability is based on your pricing tier. If interested, contact your CSM or our Sales Team to discuss pricing options.
Once you’ve created a series and added events, the next step is setting up the series registration page, form, email and customizing the individual events.
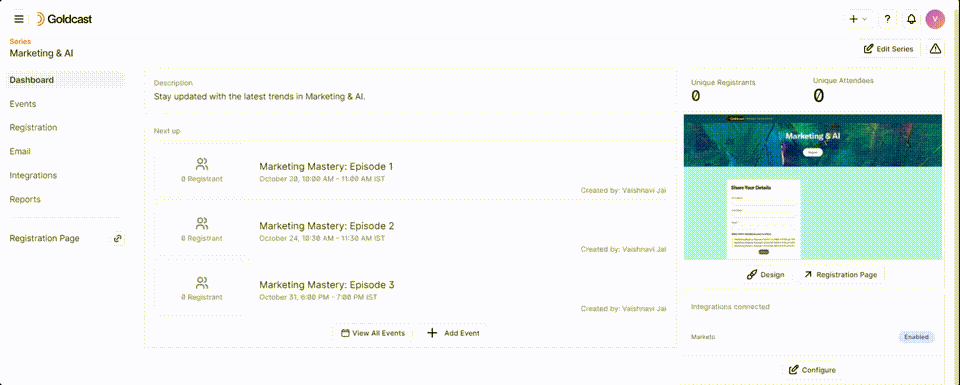
Navigate the series dashboard
The dashboard is your starting point to manage and customize your Series.
Follow these steps to open the dashboard:
- Login to Goldcast Studio using your credentials.
- Click the hamburger icon on the top left and select Series.
- Choose your preferred Series from the list. This brings you to the Series dashboard.
- Click the Edit Series button in the top right to modify the series Title and Description. This drawer also provides info on who created the series and when it was created. You can also Delete a series from here.
- The View All Events button in the center of the screen allows you to view all individual events in the Series. Alternatively, you can also click Events on the left sidebar to get a list of all the events in a series.
- Click the + Add Event button to add a new event to the series.


 Note: Events that are part of a series can be waitlist-enabled. To learn more, refer to our Guide on Waitlists for Events in a Series.
- Alternatively, you can add an event by navigating to the Events tab via the left sidebar and clicking the + Add Events button on the right side of the Events page.
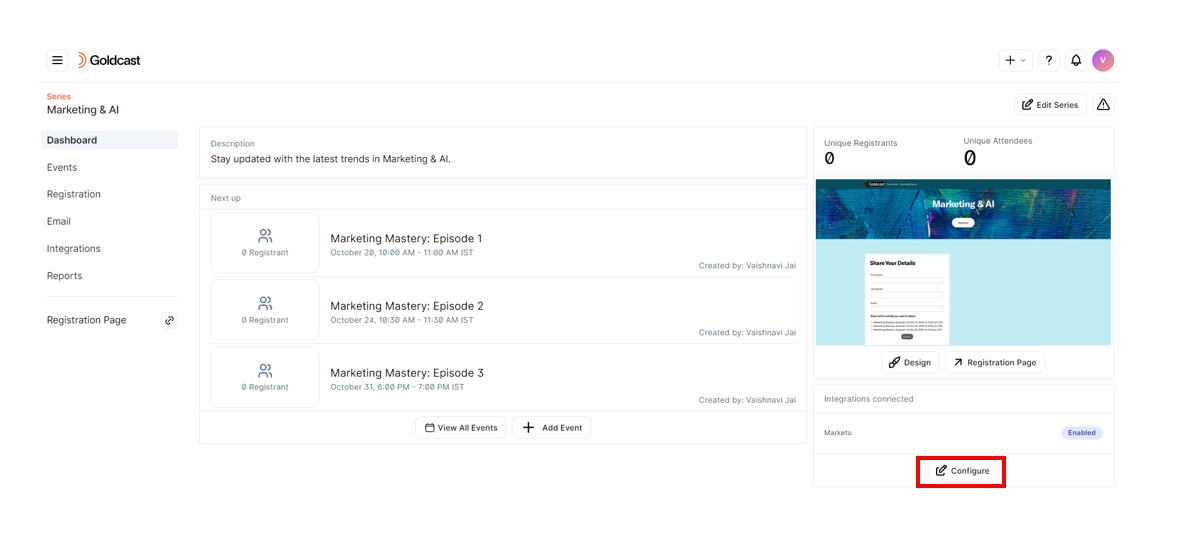
- Click the Configure button on the bottom right to enable/disable third-party CRM and MAP integrations for the series.
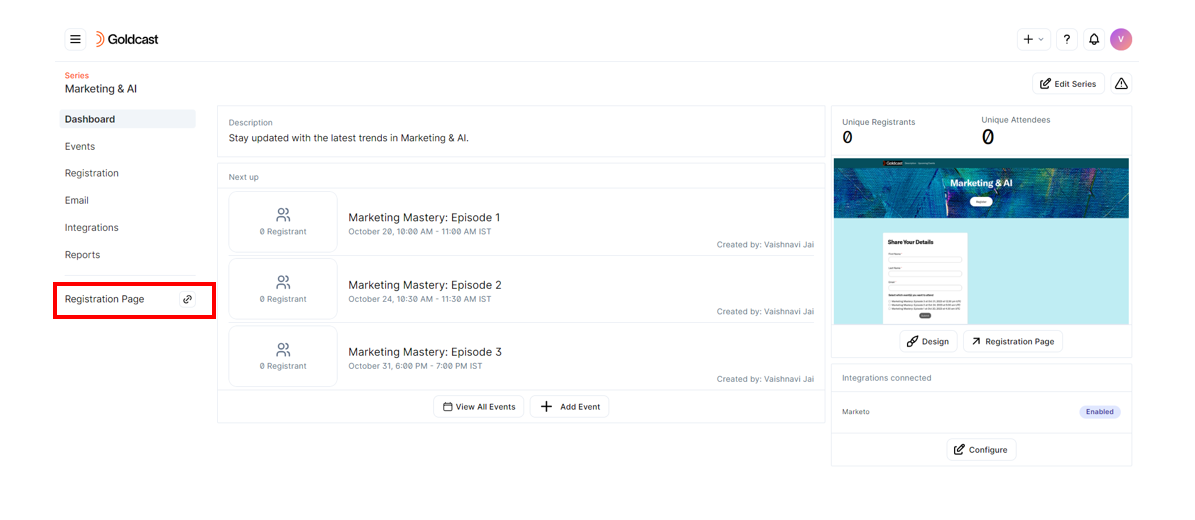
- Use the Registration Page quick link on the left sidebar to quickly preview the registration page of the series.
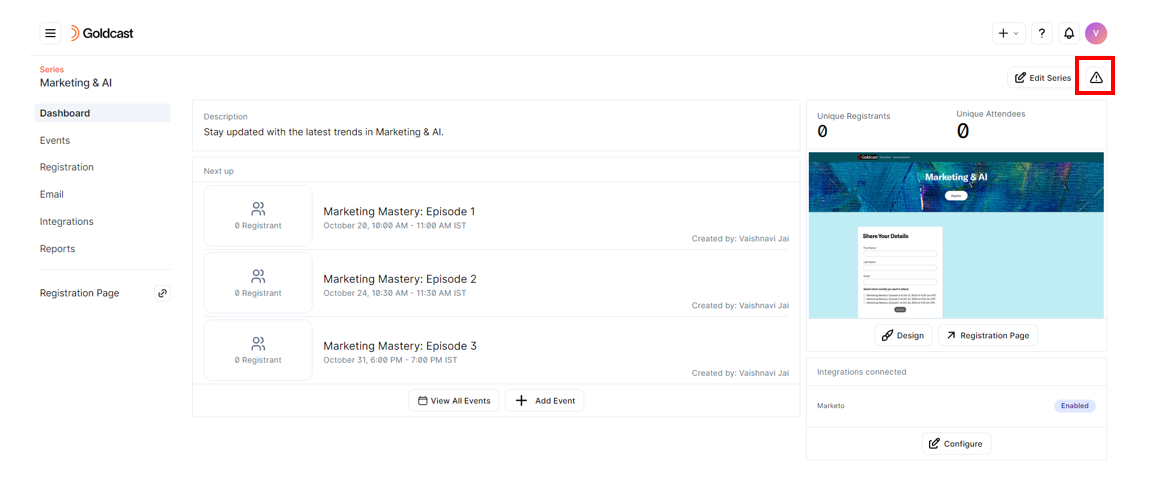
- Click the Alert icon on the top right to open the Alert Center and take remedial actions to rectify them.
Manage individual events
You can create, set up, customize and manage individual events in the series by navigating to the Events tab in the left sidebar.
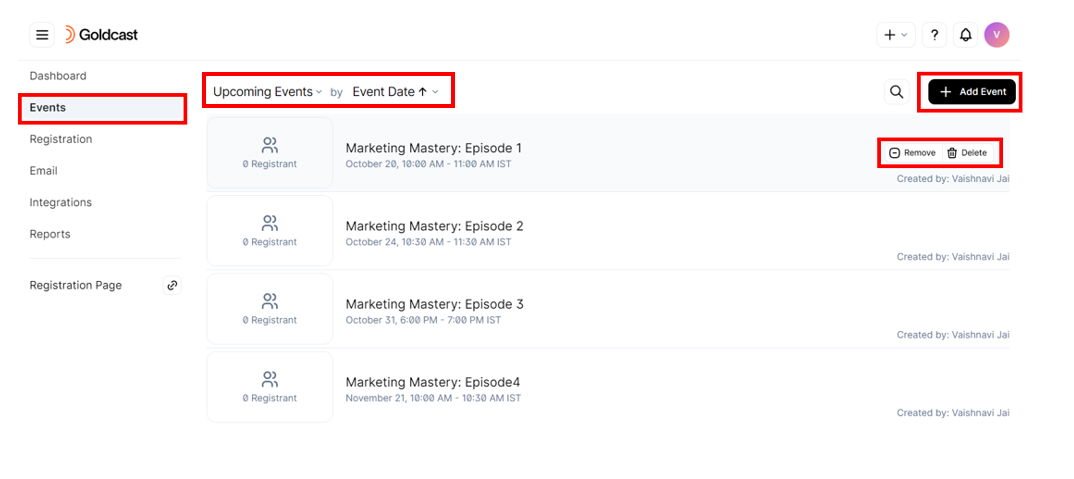
All the events in the series are listed here. You can view past, upcoming, and all events using the dropdowns. Use the Sort Filter to arrange events in ascending or descending order of event date or title.
Use the +Add Event button to add a new event to the Series. The Remove button decouples an event from the Series, while the Delete button permanently deletes the event and its associated data from Goldcast.
Click on an event to open and edit it. In an event in a series, forms cannot be edited individually. All events in a series must have the same form to allow users to register on the series registration page for more than one event at a time.
Users who register through the series registration page will receive a calendar invite for each event they selected in the form. You can turn off this calendar invite within each event:
- Navigate to the event.
- Click Email in the left sidebar.
- Click the Registration email (where it says “Calendar Invite Included”).
- Turn off the toggle next to “Include Calendar Invite Email."
Duplicate and add an event to a series
You can duplicate any existing event and add it to a series. Here are the steps to follow:
- Select your preferred event, and click the Edit Event icon on the top right.
- Scroll down the Edit Event drawer and click the Duplicate Event button.
- Enter the event title, and choose the start time, date, and timezone using the date and time picker.
- Select the Add this event to a series checkbox to make the event part of a series.
- Once you select the checkbox, you can view a dropdown to choose the series to add this event.
- Click Duplicate to complete the process.
This event is now part of the series you selected.
To return to the series dashboard, click the series tag on the event.
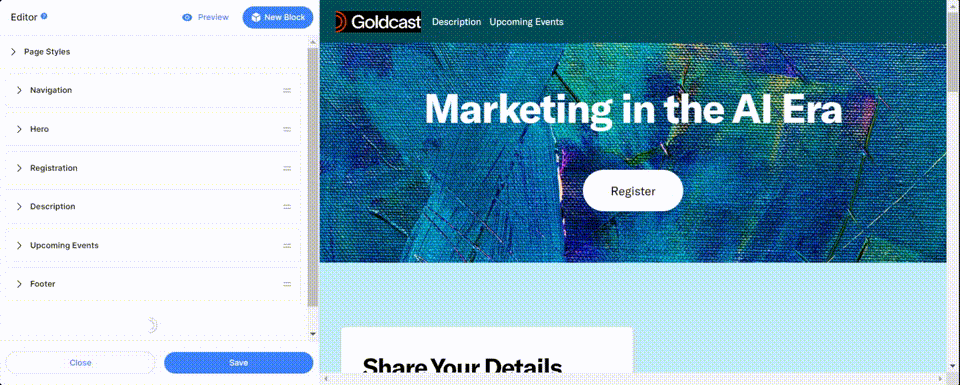
Set up the registration page
A Series has a single registration page and form where attendees can sign up for one, many, or all upcoming events in the series. Irrespective of the number of events they sign up for, they enter their details only once, simplifying the entire registration process.
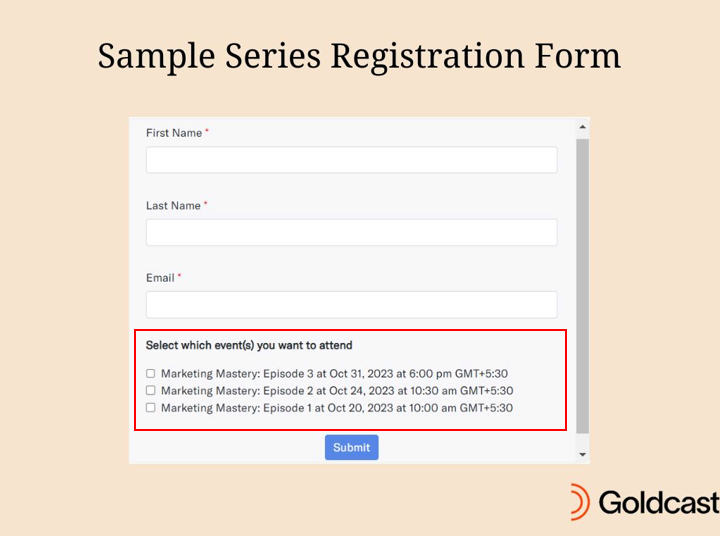
Here’s what a sample series registration page looks like:

Follow these steps to set up the series registration page:
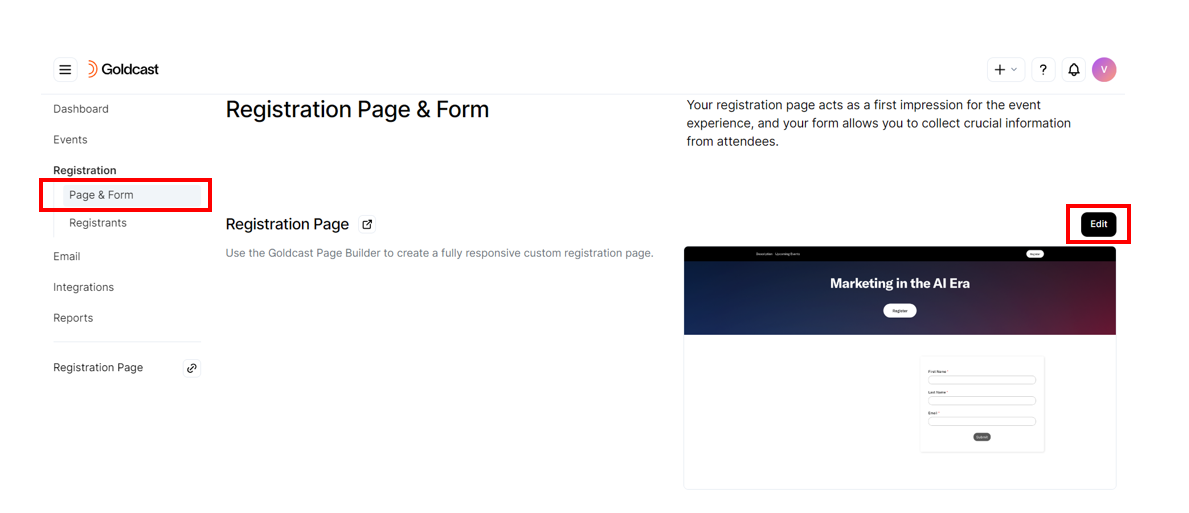
- Choose your preferred Series from the list.
- Navigate to Registration → Page & Form using the left sidebar.
- Click the Edit button in the Registration Page section and use the Page Builder to set up a branded registration page for your series.
Drag and drop the content blocks to configure and style your registration page to suit your specific requirements and branding.
A series registration page includes the following sections by default:
- Navigation: Configure the top navigation bar for the page.
- Hero: Includes the title of the series and the Register CTA. Style this hero by adding a background image, colors, and a logo.
- Registration: Contains the series registration form. You can also add text on the opposite side of the page with more information for your registrants.
 Note: The registration form is configured in the form section of your series.
- Description: This section contains the series description you entered in your series details section above.
- Upcoming Events: This section lists all of the upcoming events of your series that are not “Test” events.
- Footer: Configure the footer of your page.
You can click the New Block button to add additional content blocks to this page. Learn more about using the Registration Page Builder. Once you’re satisfied with the design and style, click Save to publish your page.
Pro Tip: Learn how to configure the series registration page to include past events that are in on-demand mode.
Configure the registration form
By default, the series registration form displays all the upcoming events in the series as a checklist. This allows attendees to sign up for one or more events during the registration process.
Heads Up! Please note that any events in the series that are currently live or past (even when in on-demand mode) will not be visible in the series registration form checklist.
All events in a series inherit the registration form from the series. So, you cannot edit the registration form for individual events in a series.
To learn more, refer to our guide on How to Set up a Series Registration Form.
Emails in series
When attendees register for one or more events in a series, they receive only ONE registration email. This email includes separate magic links for all the events they registered for and a calendar invitation for each one.
However, if a registrant signs up from the regular event registration pages for individual events in the series, they will receive the typical single-event confirmation email.

Schedule emails
By default, only the registration confirmation email is configurable at the series level. All other standard emails, such as time-specific event reminders and post-event follow-ups, are managed at the individual event level.
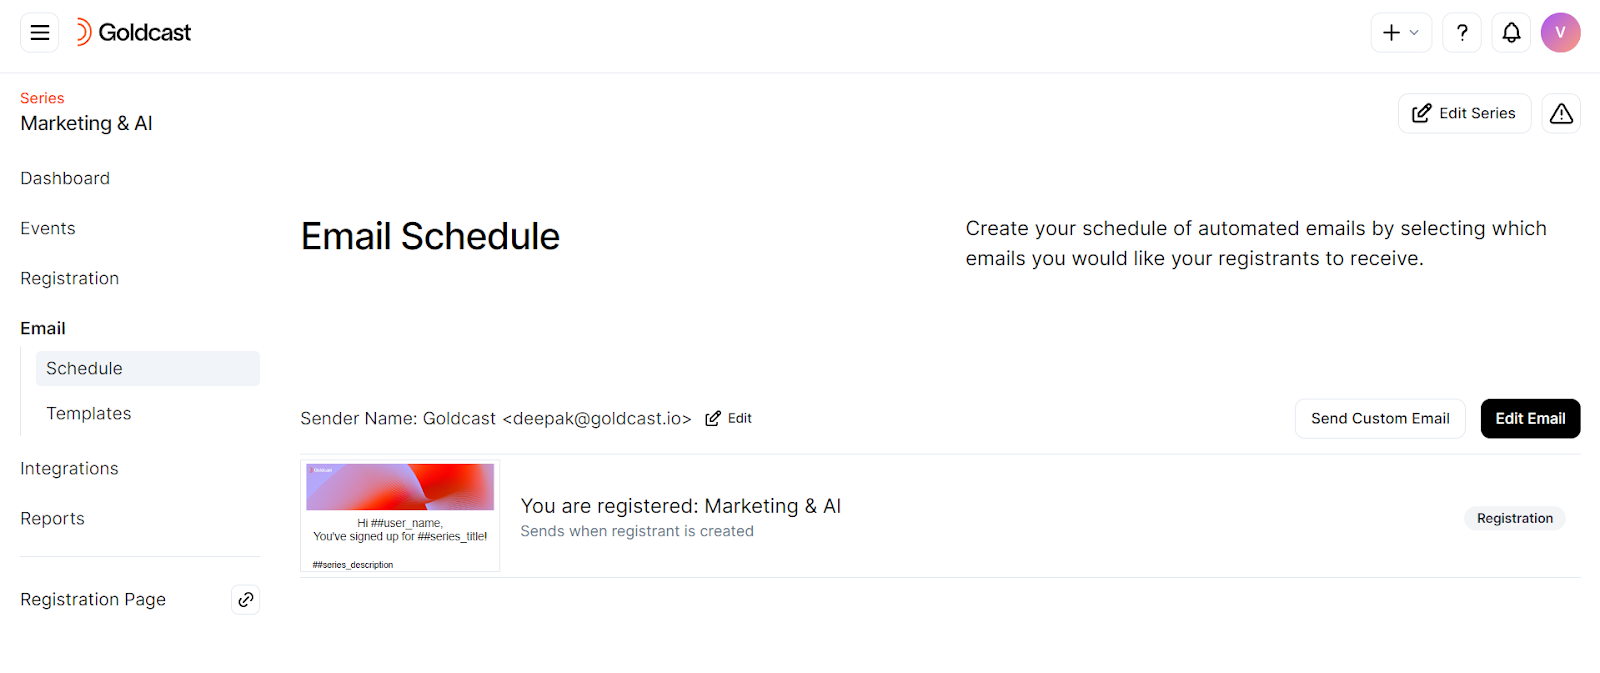
This series registration email is sent whenever a guest registers for one or many events in the series via the series registration page. It's also triggered when you upload registrants manually to the series. Registrants will also receive one calendar invitation per event they sign up for if the calendar invitations are enabled for each event.
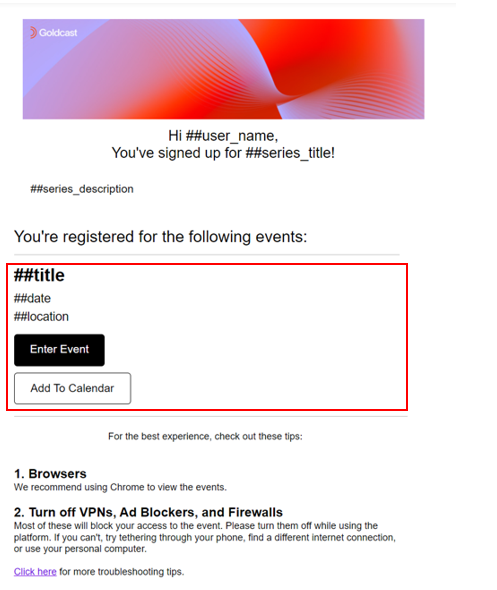
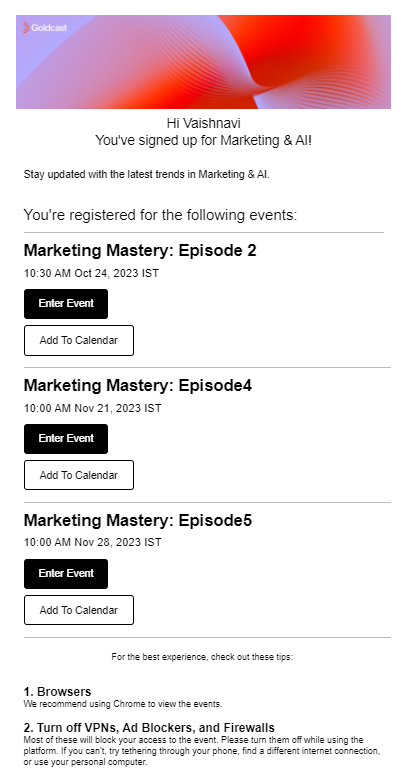
The standard [Series] Default Goldcast Template includes a dynamically populated block specifying the title, date, location (if applicable), magic link/QR code, and calendar CTA for each event the registrant signs up for.
Depending on the number of events the registrant signs up for, they would receive a corresponding number of magic links in the series confirmation email. For example, if the user signs up for three events in a series, the registration email would look like this:
Heads up! All other standard emails, such as time-specific event reminders and post-event follow-ups, are managed at the individual event level.
Event list model row
Goldcast allows you to edit and customize the [Series] Default Goldcast Template to match your branding and other requirements. However, you should NOT delete or modify one specific block in the template.
This is the event list model row that Goldcast uses to populate the email with the corresponding magic links and calendar CTAs for each event the registrant signs up for. This block will be invisible to recipients of this email.
Do not modify or delete it, as it would lead to errors in sending attendee magic links for each event in the series.
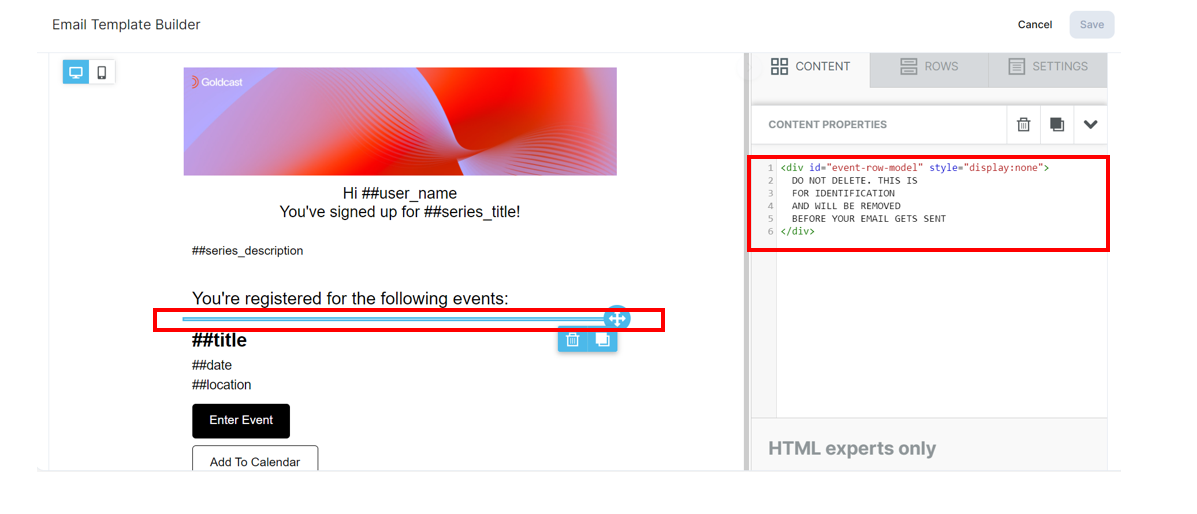
Critical Note: If you delete it, you will see an alert in the Alert Center: “Series Email Template Missing Model Row.” To fix this, jump to the alerts section in this document.
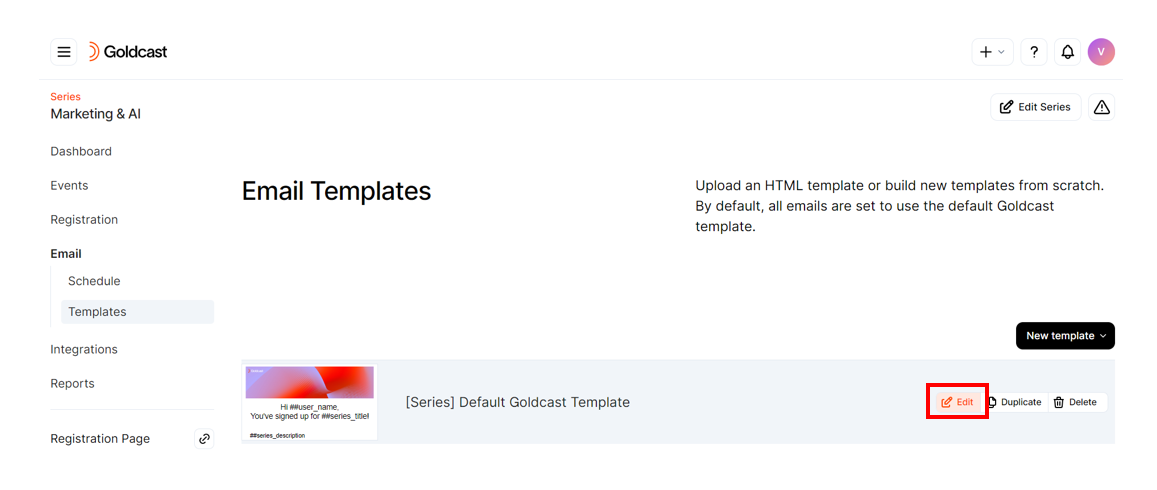
Edit the default series email template
Follow these steps to edit the standard Goldcast template:
- Choose your preferred Series from the list.
- Navigate to Email → Template using the left sidebar.
- Click the Edit button next to the template to open the Email Template Builder.
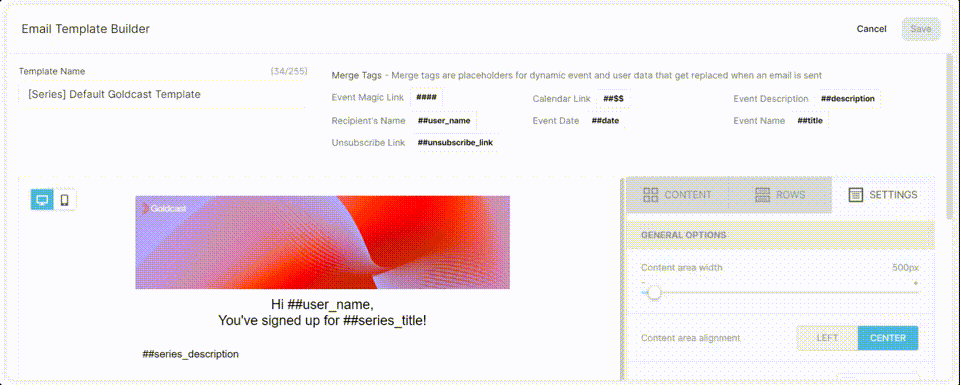
- You can now customize the template using the various content blocks, merge tags, and other design features in the Template Builder. For detailed instructions on using the builder, see these template editor instructions.
- Once done, click Save.
Note: If you’d prefer HTML email templates instead of the default series template, refer to this guide on uploading a custom HTML email template in series.
Alerts
You might have noticed various alerts in the Alert Center as you create and configure your series. This section lists the different series-related alerts and explains how to resolve them.
| Alert | How to rectify it? |
| Registration email is missing event list model row. |
This means there is no row marked as the event list’s model row. To resolve this, you should add an HTML block with the following content to the row they want to be their event list row model: <div id="event-row-model" style="display:none"></div> This HTML has an ID that allows us to locate the row that needs to be duplicated. This HTML will be invisible and can be placed anywhere in your desired row. |
| Registration email has multiple event list row models. |
It means that there are multiple rows with the following marker: <div id="event-row-model" style="display:none"></div> There should only be one. Delete all occurrences except for one. |
| Registration confirmation emails will not be sent. | It means the series registration email is disabled. This is just a warning and is not required to be fixed. To resolve this, navigate to Series → Email Schedule and turn on the Send Registration Email toggle. |
| Email Template X does not include users' event entrance links. | Include the merge tag ##entrance into your series registration email template. It should be placed within the event model row so that the unique entrance link appears for every registered event. |
FAQs
1. Can I have individual registration pages for events in a series?
Yes. You can customize the registration page for individual events. However, all events in a series inherit the registration form from the series. So, you cannot edit the registration form for individual events in a series.
If a user signs up for an event through the event registration page, they will receive a standard confirmation email and a calendar invitation. However, if they sign up for an event through the series registration page, they will receive ONLY ONE Registration email. This email will contain magic links to all the events in the series they signed up for, as well as a calendar invitation for each event.
2. Can I duplicate a series?
Yes, a series can be duplicated. This will copy over everything except the events in the series and the series registrants. (Events can be duplicated one by one and added to the new series.)
To duplicate a series:
- Login to Goldcast Studio using your credentials.
- Click the hamburger icon on the top left and select Series.
- Choose your preferred Series from the list. This brings you to the Series dashboard.
- Click the Edit Series button in the top right.
- In the Edit Series drawer, click the Duplicate Series button.
- Enter the new series title and click Duplicate.
3. How do I delete a series?
Deleting a series will permanently delete all associated settings and data. So, proceed with caution. Follow these steps to delete a series:
- Login to Goldcast Studio using your credentials.
- Click the hamburger icon on the top left and select Series.
- Choose your preferred Series from the list. This brings you to the Series dashboard.
- Click the Edit Series button in the top right.
- In the Edit Series drawer, click the Delete Series button.
- In the next step, choose if you want to
- Delete only the Series (OR)
- Delete the Series along with its events.
4. What’s the difference between removing and deleting an event in a series?
Removing decouples an event from the Series. It’ll continue to exist as an individual event in Goldcast. However, deleting erases the event and its associated data permanently from Goldcast.
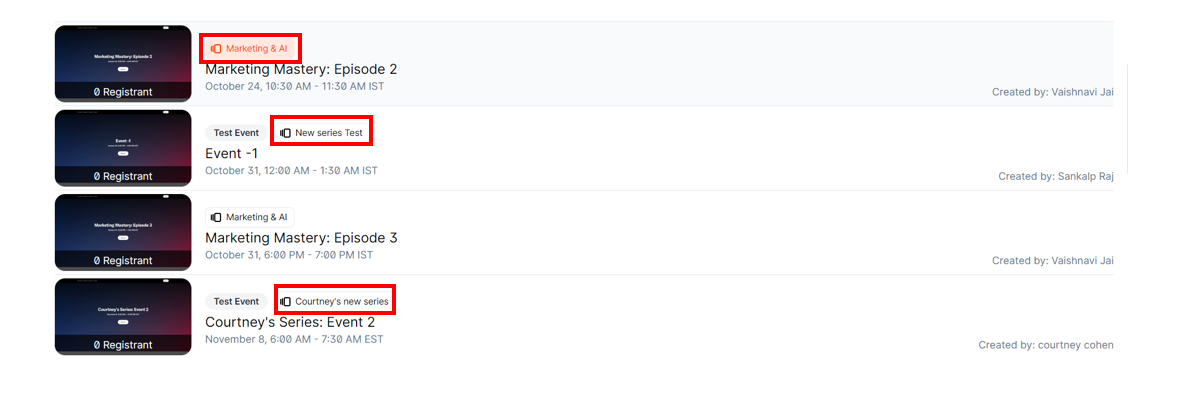
5. How do I know if an event is part of a series?
In your events list in Goldcast Studio, you can notice the series tag next to events that are part of a series. You can click on this tag to navigate to the series dashboard.
6. Can I manually upload registrants to the series?
Yes. You can upload registrants manually by following these steps:
- Open your preferred series, and navigate to the Registration → Registrants menu using the left sidebar.
- Click the Add dropdown button. The dropdown has the following options:
- Choose New Registrant option. Enter the registrant's details and click Create.
- You can also bulk-upload registrants by using the Upload Bulk Registrants option. Use the CSV template to format registrant details correctly. Select the events you wish to register them for and submit the details.

7. Why can't I edit the form on an event inside a series?
All events that are part of a series inherit the registration form from that series. This allows registrants to sign up for multiple events using one single form, and ensures the proper data is collected and aligned between events and your CRMs and MAPs.
Next Reading: Analytics and Integrations for an Event Series.