| Plan Availability | Starter | Pro | Premium | Enterprise |
 |
 |
|
|
For customers with contracts starting March 2024 or later, feature availability is based on your pricing tier. If interested, contact your CSM or our Sales Team to discuss pricing options.
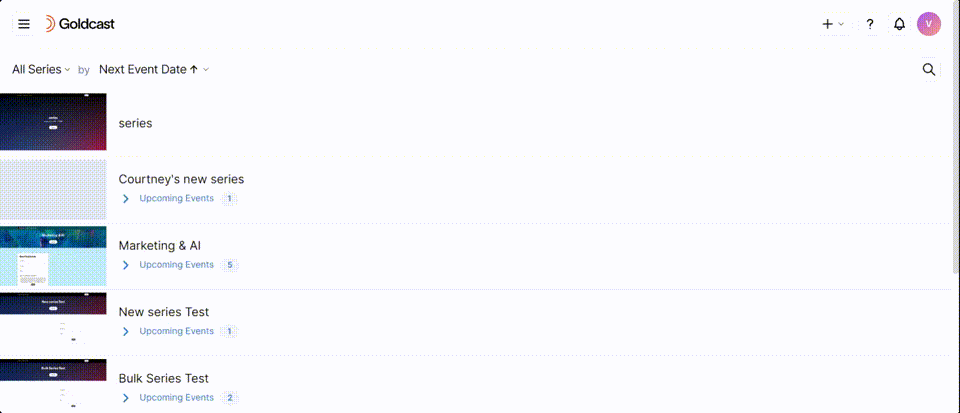
When you host a series in Goldcast, the platform generates a wealth of data and KPIs, which you can view directly within the Studio or integrate with your preferred third-party CRMs and MAPs. This guide teaches how to view, download, integrate and understand each data point.
How to view reports
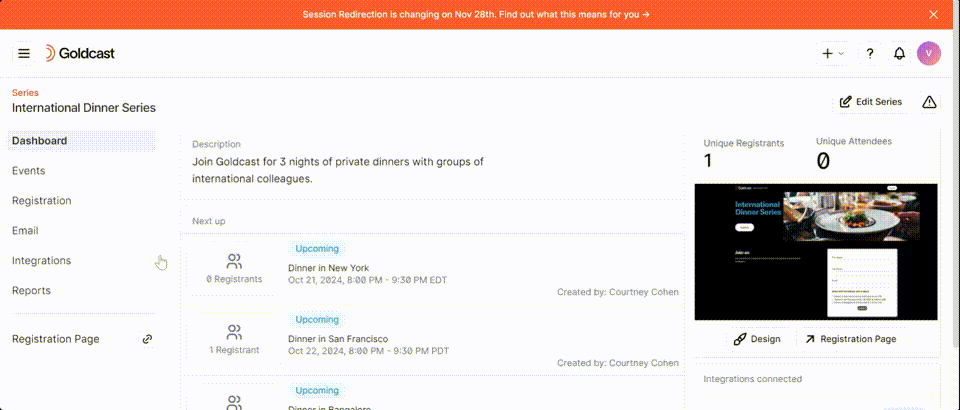
- Login to Goldcast Studio and open your preferred series.
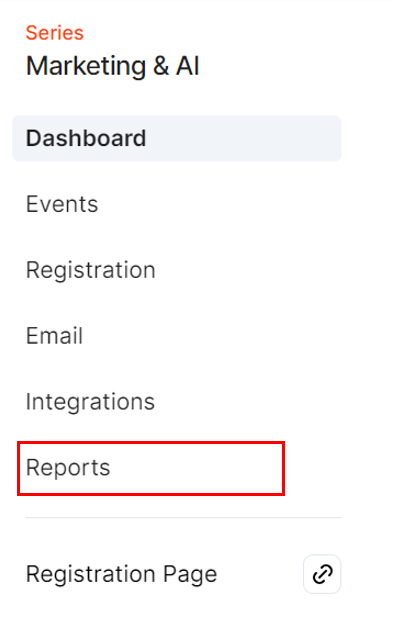
- Navigate to the Reports tab using the left sidebar.
- At the series level, you can access two types of reports:
- Series summary: This cross-event report presents data from all events within the series.
- Event summary: These reports present data on each event within a series.
Let’s take a closer look at each of these report types.
Series summary
Note: If you encounter blank or null data in the dashboard, make sure to adjust the Created Date filter to include the timeframe when your series was created. Additionally, you can consider the event start time to be inclusive, ensuring that relevant data is visible in the dashboard.
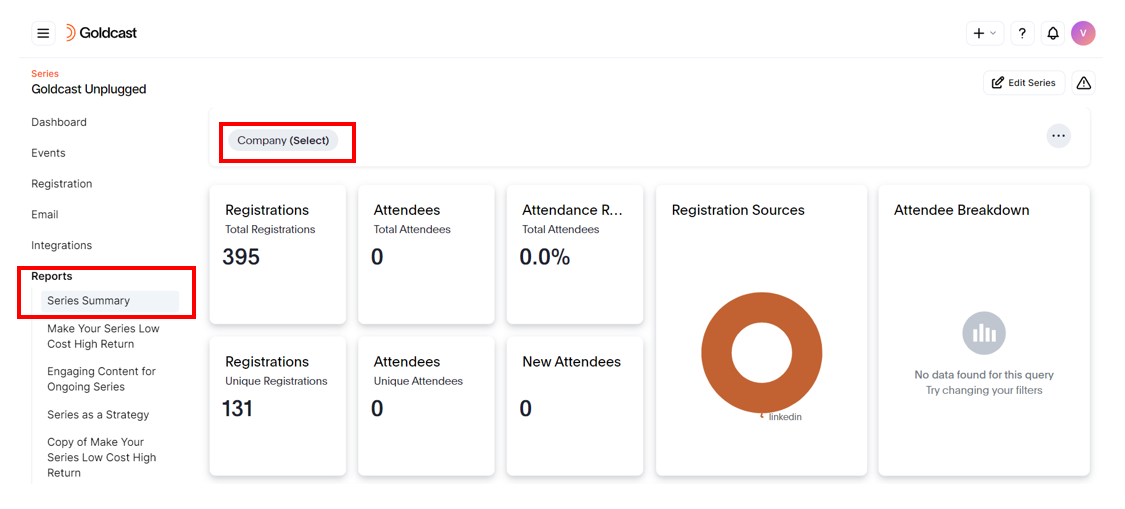
The Series Summary is a centralized report that analyzes the performance of all events within a series.
 Note: By default, this report displays all event data since the beginning of the year. You can change this by using the Event Start Time filter at the top of the page.
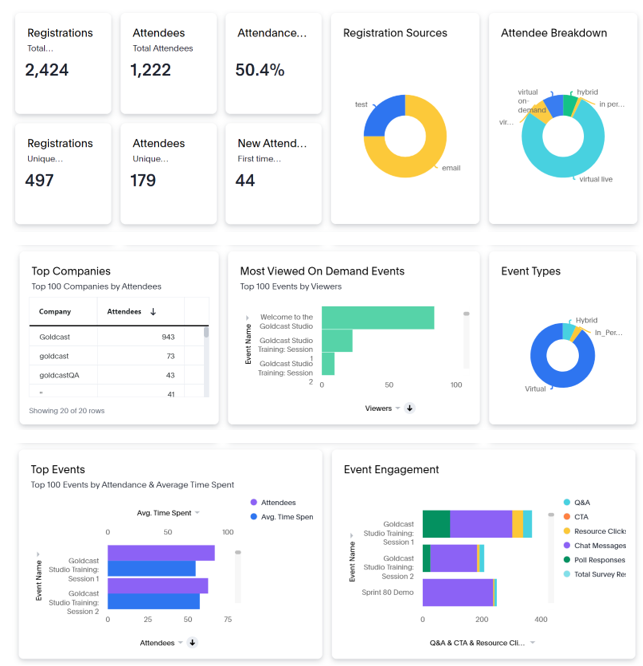
The series summary report presents the following KPIs:
- Registrations - The total number of registrations for the series.
- Unique Registrations - The number of unique individual registrants.
- Attendees - Total number of registrants who attended one or more events in the series.
- Unique Attendees - The number of unique individual attendees.
- Attendance Rate - Percentage of attendance from the total registrations for the series.
-
New Attendees - Number of attendees who came to your event for the first time during the “Event Start” date range selected for the report.Note: Filtering on “Company” will not impact this metric.
Besides the KPIs, the report presents other valuable data in easy-to-visualize charts. They are:
- Registration Sources - It shows the source of registrations (LinkedIn, X (formerly Twitter), Google, etc.). This data is collected via the utm_source parameter. If you don’t send utm_source information to Goldcast, this chart will be empty.
- Attendee Breakdown - It shows how attendees participated in the event, whether virtual live, on-demand, hybrid (in-person and virtual), or in-person (at a field event).
- Event Types - It shows the number of events per event type, such as virtual, hybrid, or in-person.
- Top Events - It shows the number of attendees and the average time spent per event. Data for the Top 100 events in the series by attendance is shown in this chart.
- Top Companies - Lists the top companies from which registrants have signed up for the series.
- Most Viewed On-Demand Events - It displays data on the most viewed on-demand events, with the number of viewers per event. This chart will be empty if you don’t make event recordings available for on-demand viewing on the Goldcast platform.
- Event Engagement - This metric shows the engagement data per event, including CTA, Q&A, Resource Clicks, Chat Messages, and Poll Responses. Engagement data is presented for the top 100 events by attendance count.
Downloading reports
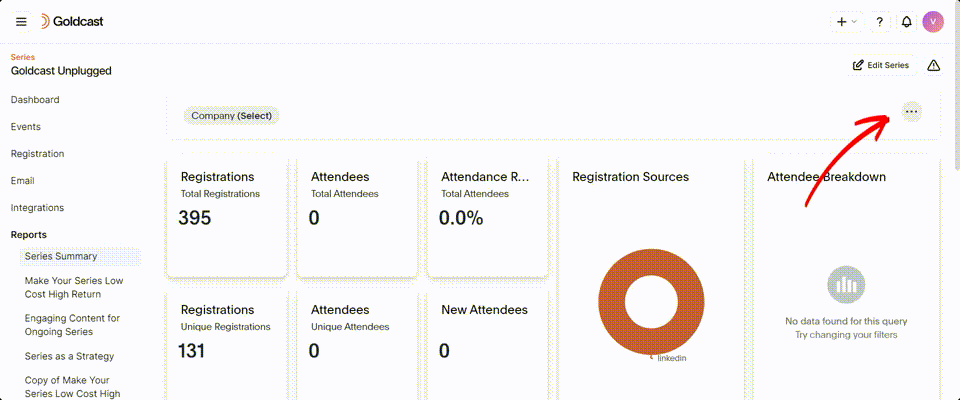
You can download the entire Series Summary report as a PDF to share with your team and other stakeholders. Click the ellipsis icon 
The download popup allows you to customize the downloaded report based on several parameters:
- Format: Liveboard or Visualizations. If you choose Visualizations, you can select the data visualizations you want to download using the checklist.
- Layout: Landscape or Portrait
Click Download to complete the action.
Filtering reports
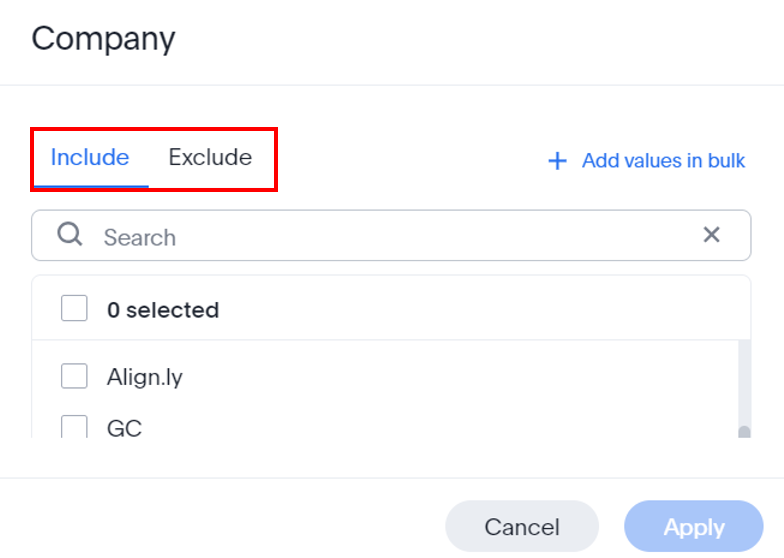
You can further refine the report data by using the Company filter. Here’s a step-by-step guide to using this filter:
- Navigate to the Series Summary page by clicking Reports → Series Summary on the left sidebar.
- The Company Name filter pulls data of registrants from a specific company. You can refine your choices using:
- Use the Include tab to select your preferred companies from the dropdown list. This shows you only registrant data belonging to a specific company. You can scroll the dropdown list to select preferred companies or use the search bar to choose a particular company by its name.
- [Optional] The Exclude tab excludes registrant data of selected companies from the Series Summary Report.
- Click Apply.
Event summary
The Event Summary report displays the prominent metrics and KPIs for each event in the series. You can view or download this information to share with stakeholders.
Follow these steps to access the Event Summary page:
- Login to Goldcast Studio and select your preferred Series.
- Click Reports on the left sidebar and select your preferred event.
- This brings you the Event Summary dashboard.
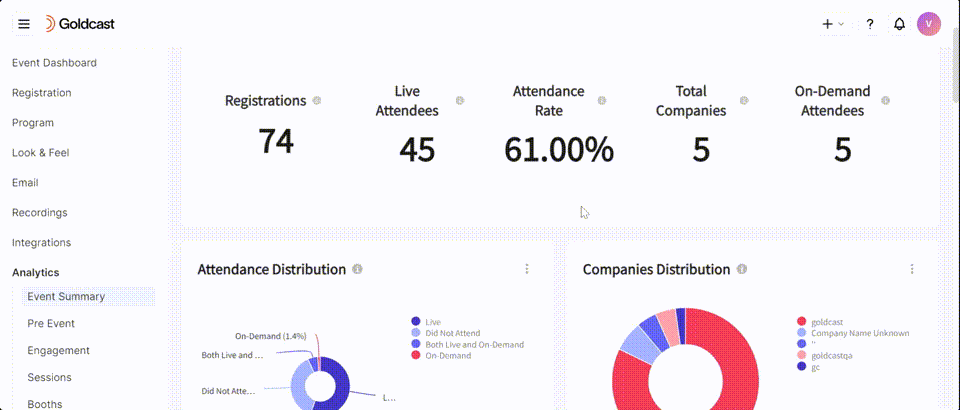
 Note: The data presented on this page varies depending on the event state. If the event has not occurred, the Event Summary report highlights registrant information. Once the event starts, the Summary view will include other data, such as attendee information, attendance rate, engagement rate, etc., via KPIs, charts and tables.
For detailed information on what’s available on this page, refer to our guide on Event Summary.
Integrations
Currently, Goldcast allows you to sync series data with:
- Marketo
- HubSpot
In this section, we walk you through the steps to enable these integrations at the series level.
HubSpot
By default, if you’ve enabled HubSpot integration at the organization level, Goldcast automatically includes the Series ID and Series Name for Goldcast event activities that sync with timeline activities in HubSpot.
The Series ID and Series Name are sent over to HubSpot for events within a series. On the other hand, these fields will remain empty in HubSpot for standard events (those that are not part of any series).
If you want more information, refer to this guide on setting up and configuring HubSpot integration for Goldcast.
Marketo
Setting up your Series with Marketo ensures a seamless flow of series data to Marketo. This can be achieved by using Marketo Programs at a series level. A program serves as a container in Marketo to receive information from Goldcast.
You'll first need to create an appropriate program in Marketo and connect it with your Goldcast Series using the Program ID. Once Program ID is connected with the series, Goldcast will automatically clone the connected Program for newly created events within the series.
Follow these steps to enable Marketo integration for a series:
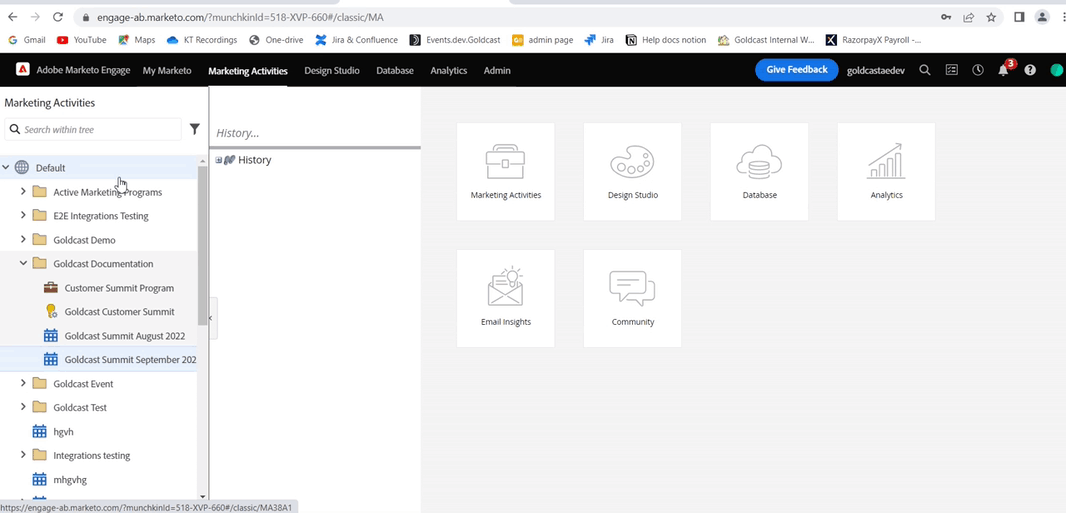
Step 1: Copy the Series Program ID from Marketo
- In Marketo, on the top menu, click Marketing Activities.
- On the Marketing Activities page, select the Program you would like to connect with your Goldcast Series.
- After you've opened the program's page, copy the Program ID. This ID is used to integrate the program with your Goldcast Series. Program IDs contain four numbers and will always be between #ME and A1 at the end of a program's URL.
Ex. https://engage-ab.marketo.com/?munchkinId=877-CID-123#/classic/ME1234A1
In this case, the Program ID is 1234. - Highlight and copy the Series Program ID. We recommend saving it in a note or document so you can use it later.
Step 2: Connect your Goldcast Series with Marketo
- In Goldcast Studio, open your preferred series.
- Navigate to the Integrations tab using the left sidebar.
- Click Marketo, and in the Marketo Settings drawer, turn on the Enabled for Series toggle to enable the Marketo integration for your series.
- Enter the Marketo Series Program ID you copied in the previous step.
- Once the Series Program ID is verified, you can select your preferred Target Folder in Marketo using the dropdown.
- Configure the custom activities. Scroll below and choose activities to be sent to Marketo. Turn the toggle on/off for each activity per your requirements.
- Click Save.
Marketo Integrations for Events within a Series
Once you’ve completed the Marketo integration setup at the Series level, all new events you create within the series are automatically connected to Marketo via a cloned Program ID.
Note: Goldcast sends the Series ID and not the Series Name to Marketo for all events within a series.
Here’s what happens in Marketo integrations for events within a series:
Creation of a clone program in Marketo
A clone Program is automatically created in Marketo for each new event within the series using the format “Event Name (truncated) + timestamp.” If you navigate to Integrations → Marketo for the newly created event in the series, you can see the connected Program ID displayed in the Marketo Settings drawer.

Clone program ID for a new event within the series.
Note: This happens only if you’ve entered the Marketo Series Program ID and selected the Target Folder. So, complete the above steps for the integration to work smoothly at the event level within the series.
Series-level settings are replicated for the new event within the series
By default, Goldcast passes the series-level settings to the newly created events. However, you can change these settings using the custom activity toggles, as required.
Goldcast tokens for events in a series
Generally, Goldcast sends eight custom tokens to Marketo for standard events. For events that are part of a series, Goldcast sends two additional tokens:
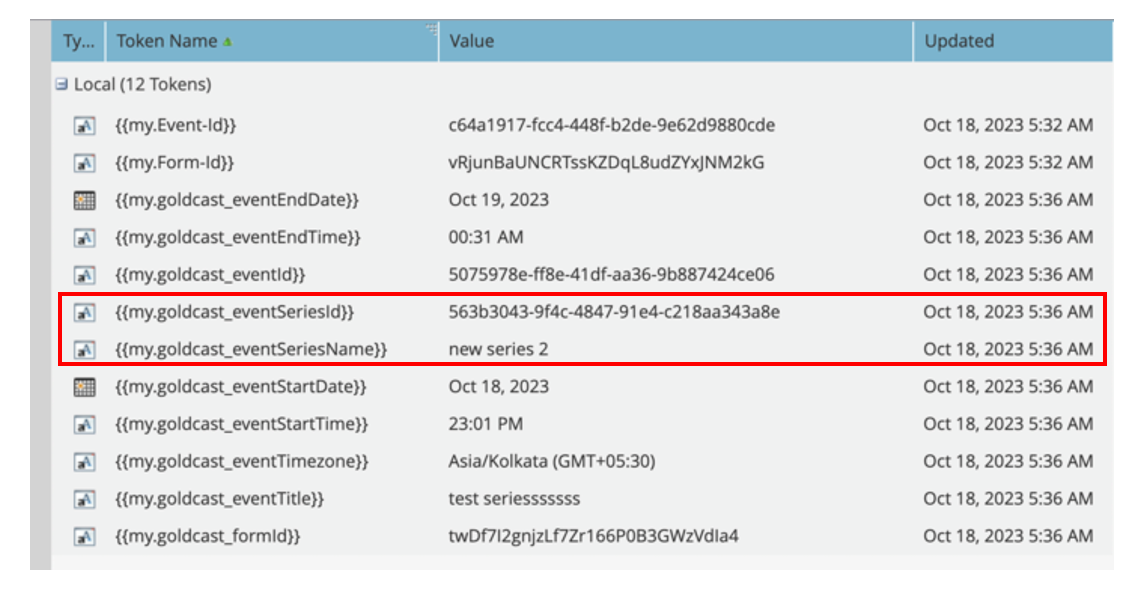
| Token Name | Description |
|---|---|
| {{my.goldcast_eventSeriestId}} | Your Series ID |
| {{my.goldcast_eventSeriesName}} | Name of your series |
For more information on tokens, refer to viewing Goldcast Program Tokens in Marketo.
Note: If you haven’t set up Marketo integration at the series level, you can still integrate each event within the Series individually into your Marketo instance. In this case, you’ll follow the standard procedure to sync Goldcast event engagement activities to Marketo.
FAQs
1. Are the integrations set up at the series level applicable to all events within a series?
Yes. Any integration set up at the series level is applied to all New Events created within the series. This is why, we recommend setting up integrations before adding events to a series.
2. Can I choose the custom activities to sync for an event within a series?
Yes. You have the flexibility to choose the custom activities to sync to your CRM/MAP for each event in a
series.
For example, let's say you have turned on Attendance sync at the series level, but don't want it to be
enabled for Event A within the series. To complete this action:
- Open your preferred Series, and navigate to Event A from the Series dashboard.
- Once you’ve opened Event A, navigate to Integrations using the left side panel.
- Select your preferred integration and turn off the Attendance toggle.