Table of Contents
What is a UTM Parameter?
A UTM parameter is a short piece of code added to the end of a URL. They include information about the placement and purpose of the URL in different campaigns. They are used to measure the success of different campaigns in driving visitors from external sources to one of your web pages.
Standard UTM parameters in Goldcast
Goldcast offers the following standard UTM parameters to include in your registration forms:
| utm_source |
Identifies the source of traffic to your registration page. Examples: Facebook, LinkedIn, X (Twitter), etc. |
| utm_medium |
Identifies the type of marketing medium used to deliver the traffic. Examples: email, organic post, paid post, etc. |
| utm_campaign |
Identifies the specific marketing campaign the traffic originated from. Examples: winter-sale, introduction-webinar, etc. |
| utm_term | Identifies the paid search keyword used to acquire the traffic. It’s generally used for paid advertising campaigns. |
| utm_content | It helps to differentiate between different versions of the same ad or link. It's useful to compare and see which performs better. |
| utm_creative | This is not a standard UTM parameter but can be used to identify the specific creative asset used in an ad campaign, such as a banner image or video. |
| utm_keyword | This is specifically for organic search queries to track keywords that led users to your registration page. |
| utm_region |
This is used to track traffic coming from specific geographic regions. Examples: APAC, LATAM, EMEA, North America, etc. |
How can UTM Parameters be used?
Let's walk through an example UTM parameter use case. Say we're holding an event and want to market the event on X (formerly Twitter) and LinkedIn to drive registrations.
- We plan to make the X (formerly Twitter) campaign with organic posts from the event organizers.
- The LinkedIn campaign will use paid ads to market the event.
To evaluate which campaign resulted in more registrants, we must generate two different registration URLs by adding UTM values.
The URL we include in our X (formerly Twitter) post may look something like this:
https://goldcasttest.registration.goldcast.io/events/737e1e22-372b-4921-9ccd-d5252811e1bd?utm_source=twitter&utm_medium=organic_post&utm_campaign=UTM_Introduction_Webinar
And the URL we include in our LinkedIn post may look something like this:
https://goldcasttest.registration.goldcast.io/events/737e1e22-372b-4921-9ccd-d5252811e1bd?utm_source=linkedIn&utm_medium=paid_post&utm_campaign=UTM_Introduction_Webinar
Notice that the only differences in the two links above are the values assigned to the utm_source and utm_medium parameters.
Generating Registration Links with UTMs
The ? in the above URLs marks the end of the generic event registration URL and the start of the UTM parameter code snippet.
In the UTM code snippet, we have UTM parameters on the left side of each = and values assigned to each UTM parameter on the right side. In the examples above, UTM_source is a parameter, and LinkedIn and Twitter are assigned values.
Each UTM parameter and value pair is separated by an ampersand (&). You can add as many unique UTM Parameters and values to the end of your URL as long as they are separated by &s.
The parameters should stay consistent across all the registration URLs you generate. What varies will be the value assigned to each parameter.
In the examples above, you can notice that the LinkedIn URL has a utm_source value of LinkedIn, but the X (formerly Twitter) has a utm_source value of Twitter. When we track the UTM values during registration, the values will be collected on each registration, and they will categorized together for comparison based on the parameter they are assigned to.
How to enable UTM parameters in Goldcast
Step 1: Generate unique registration links with UTM parameters
The first step is to identify all the campaigns to which you will link your event's registration page. For each of these campaigns, you should generate a unique registration page URL by taking the generic registration page URL and adding a unique UTM snippet with values that will help you distinguish registrations from this particular URL.
 Note: If you’re using a URL with a deep link to a specific part of the registration page, like the registration form, you need to ensure that the UTM parameters follow the EventID after the ? and the deep link URL is added at the end of the UTM parameters with a #.
Incorrect Example:
https://goldcasttest.registration.goldcast.io/events/737e1e22-372b-4921-9ccd-d5252811e1bd#Registration?utm_source=linkedIn&utm_medium=paid_post#Registration
Correct Example:
https://goldcasttest.registration.goldcast.io/events/737e1e22-372b-4921-9ccd-d5252811e1bd?utm_source=linkedIn&utm_medium=paid_post#Registration
Step 2: Set up your registration form to track UTM parameters
The next step is to set up the registration form to collect UTM parameters. To do this:
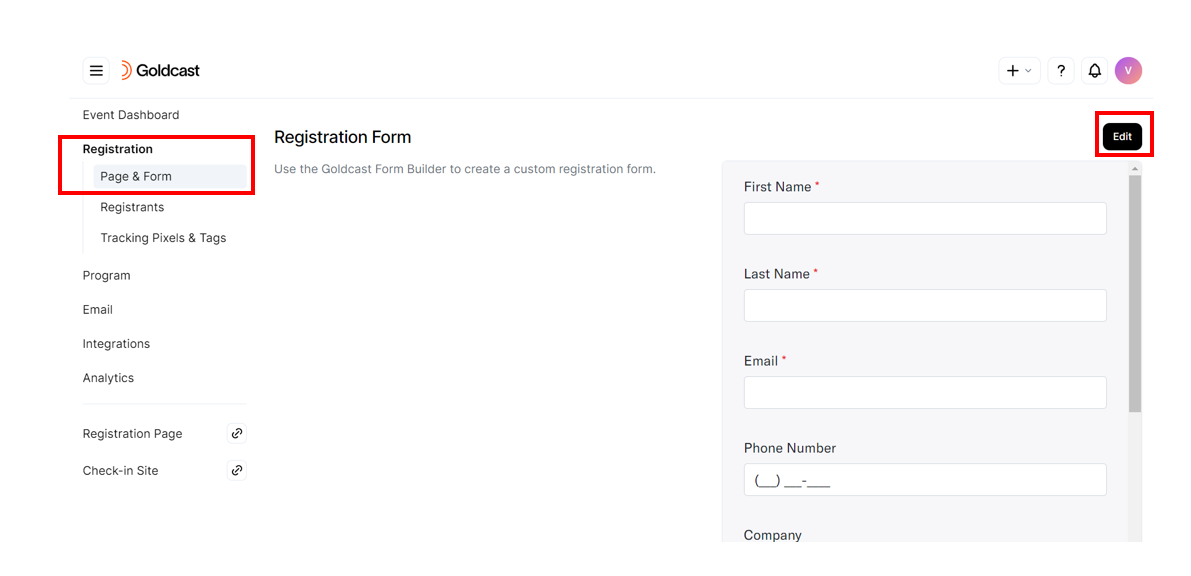
- Log in to Goldcast Studio with your credentials.
- Select the Event you want to edit from the Events List.
- Click Registration → Page & Form on the left side panel.
- Scroll to the Registration Form section and click the Edit button.
- This opens the Goldcast Form Builder. Drag and drop the required UTM fields onto your form. If you are using all the eight standard UTM fields, your form will look something like this:
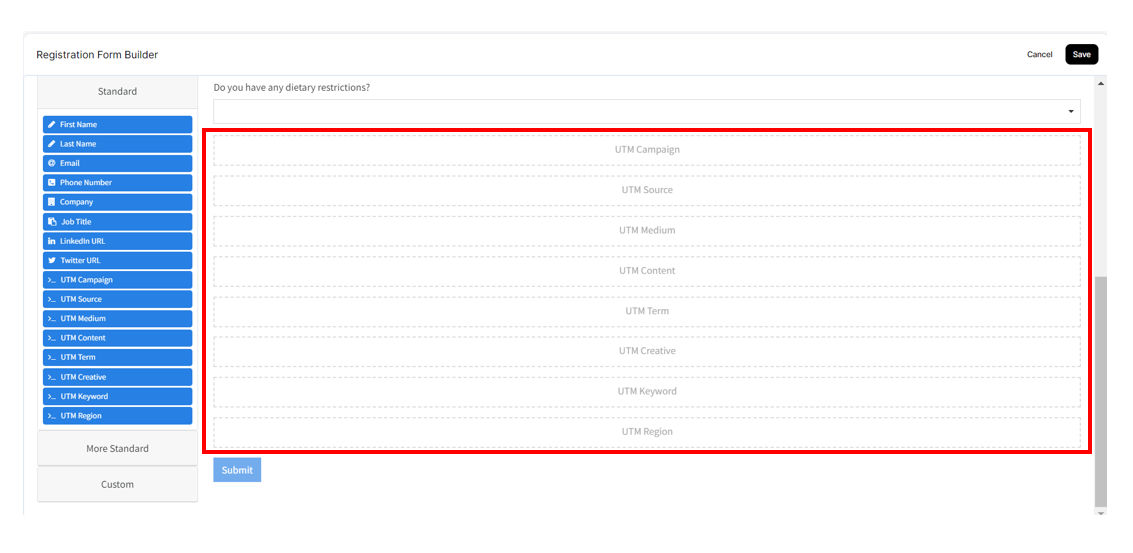
The UTM Fields are hidden and will not be seen by registrants. They will automatically grab the values assigned to each UTM parameter from the URL and submit them with the rest of the user's registration data.
Each UTM parameter you are trying to track needs to have a corresponding hidden field in your form. Once your registration form is set up correctly, you can start your registration campaigns.
How to track UTM data
The UTM data collected during registration is available right within Goldcast Studio. You can track this data in the following places:
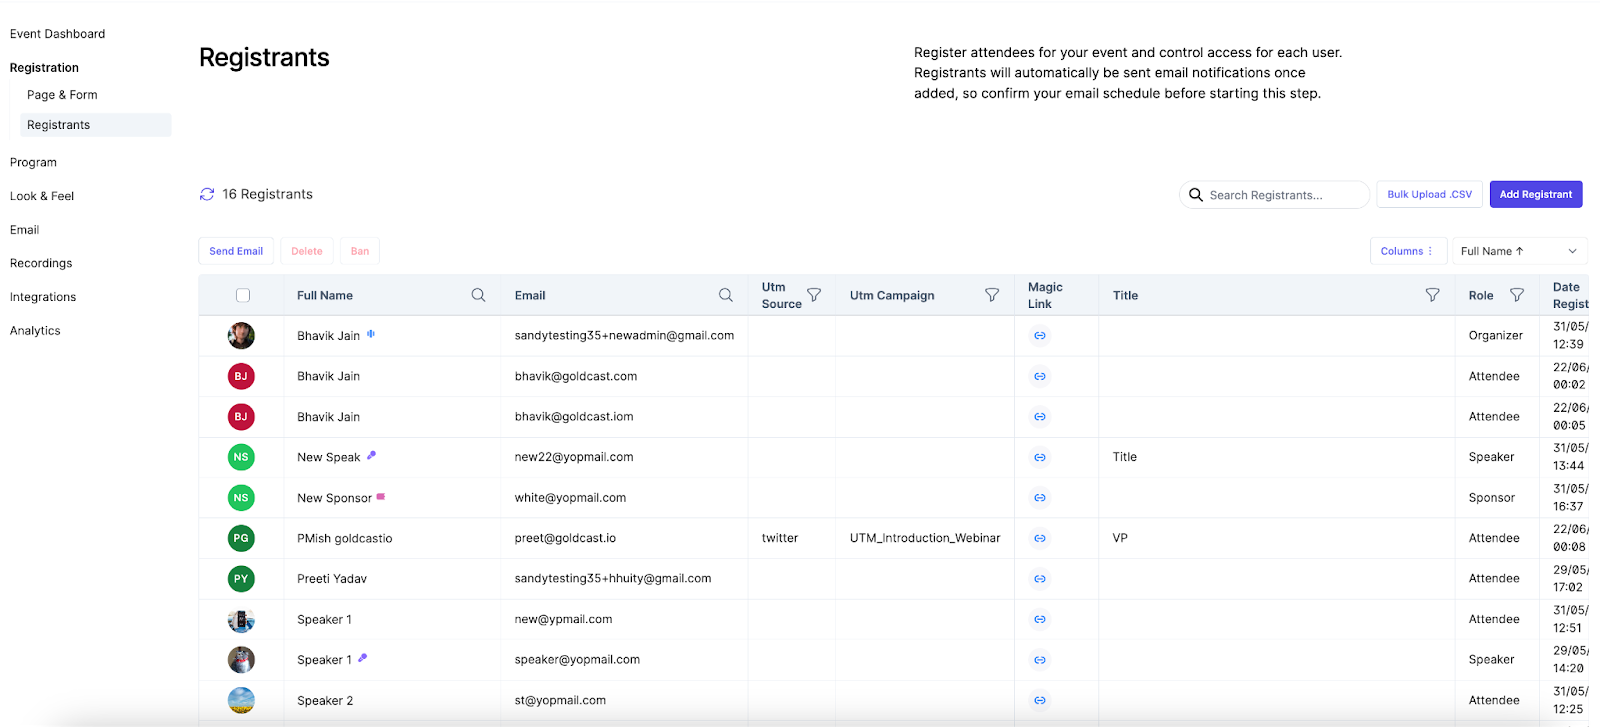
1. Via the Registrants Tab
Log into Goldcast Studio and select the event for which you want to track the UTM data. Click Registration → Registrants on the left sidebar. This brings you to the Registrants tab. Here, you can see all event registrants and the data collected from them during registration, including UTM data.
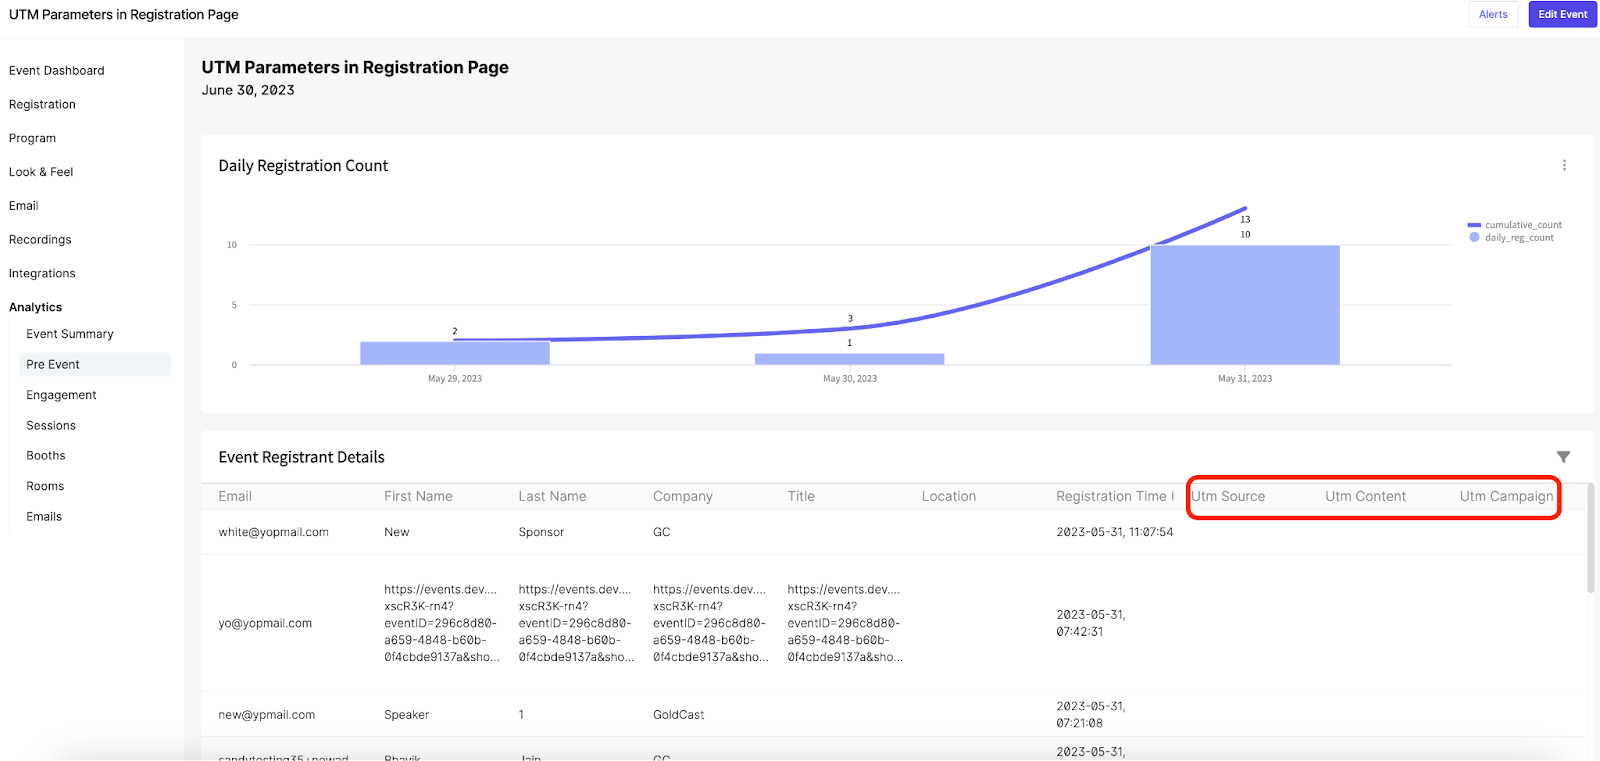
2. Via the Pre-Event Dashboard
To view UTM data in the Pre-Event Dashboard:
- Log into Goldcast Studio and select the event for which you want to track the UTM data.
- Navigate to Analytics → Pre Event via the left side panel.
- Scroll to the Event Registrant Details table. You may have to scroll the table horizontally to see the UTM columns.
- You can also download the registrant data from this table as a PDF/CSV/XLSX using the download button at the top right of the table.
3. Exporting UTM data to Downstream Integrations
Using our field mapping feature, you can also send collected UTM data to your integrations.
For more information, see our help docs on Lead and Program Member Field Mapping in Marketo and Contact Field Mapping in HubSpot.