Table of Contents
| Plan Availability | Starter | Pro | Premium | Enterprise |
 |
 |
|
|
For customers with contracts starting March 2024 or later, feature availability is based on your pricing tier. If interested, contact your CSM or our Sales Team to discuss pricing options.
In this guide, we walk you through the steps to enable a waitlist for your Goldcast events.
For a quick refresher, refer to our Guide on How Waitlisted Events Work in Goldcast.
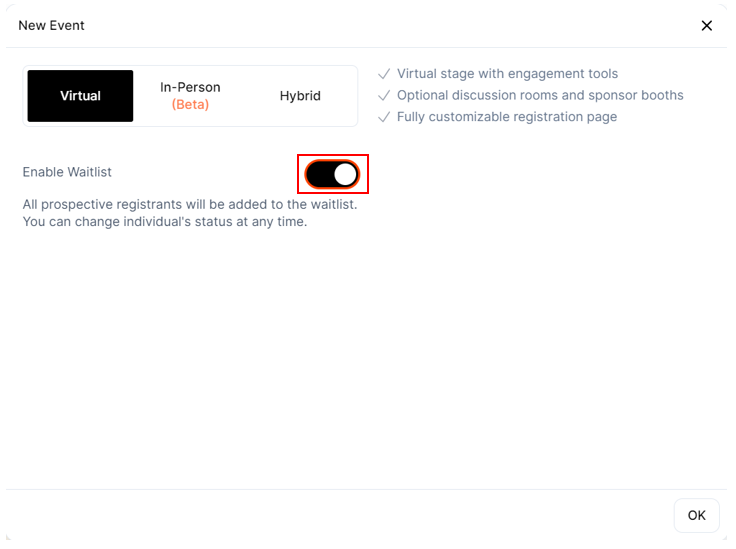
Step 1: Enable waitlist toggle
 Note: Currently, waitlists are available only for virtual and field events. Hybrid events don’t have this feature.
For a new event
Follow these steps to set up a waitlist for a new event:
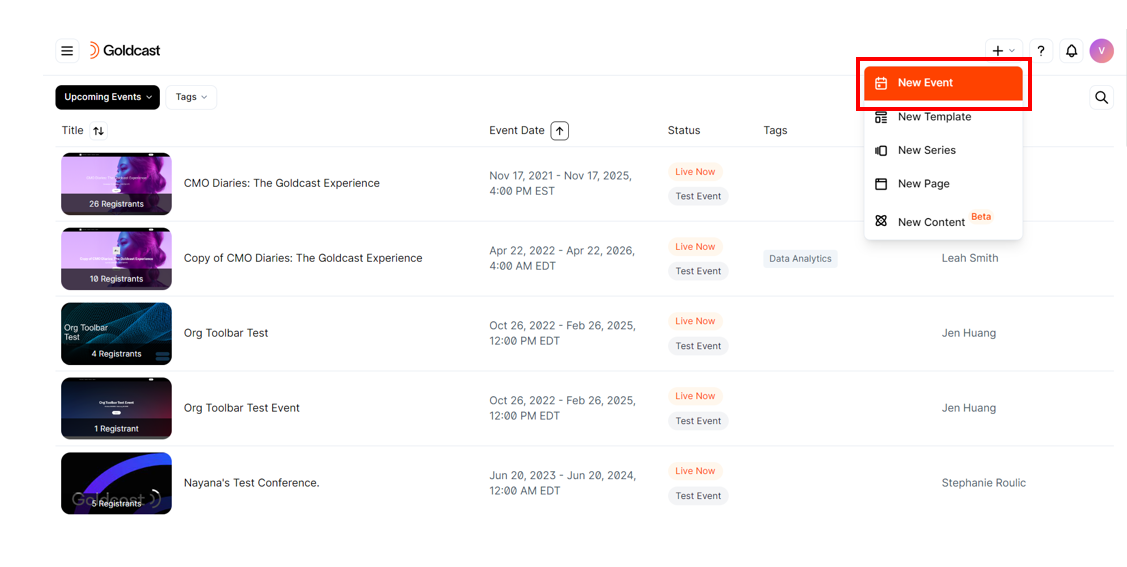
- Log into Goldcast Studio using your credentials.
- Click the +icon on the top right and select New Event.
- In the New Event pop-up, enter the Event Title, Date & Time, select a Template and turn off the Test Event toggle.
- When selecting the Event Type, turn on the Enable Waitlist toggle and click OK.
- The rest of the steps of event creation are the same as usual. For a quick refresher, refer to Getting Started with Goldcast: Setting Up & Running an Event.
For an existing event
You can also turn on the waitlist feature for already-created events.
Note: In this case, all previously registered users will have a confirmed registration. All users who register hereafter will be waitlisted.
Follow these steps to turn on the waitlist feature for an existing event:
- Navigate to the Event list and select your preferred event.
- Click the Edit Event button at the top right.
- Look for the Enable Waitlist toggle and turn it on.
- Click Save.

Step 2: Set up the registration page
Customize the waitlist message
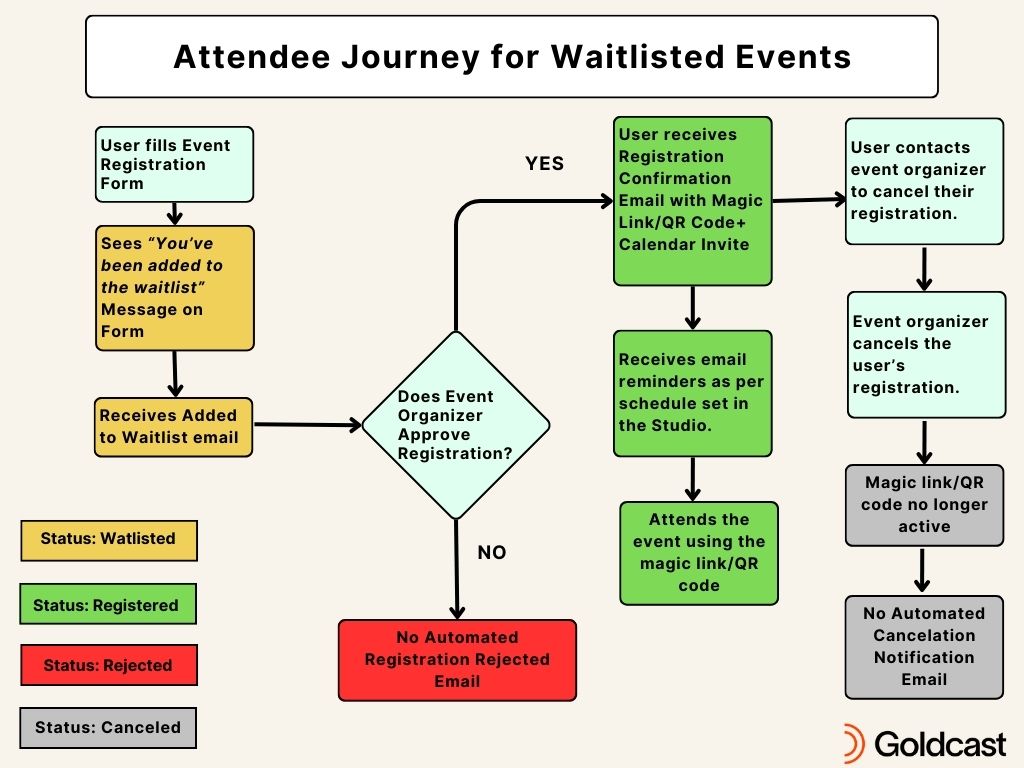
By default, when a user signs up for a waitlisted event, they’ll see the message “You’ve been added to the waitlist" on the registration form.
To customize this message:
- Once you’re in the event dashboard, click Registration → Page & Form on the left sidebar.
- Click the Edit button in the Registration Page section to open the Page Builder.
- Open the arrow next to the Registration block in the left sidebar.
- Change the Form Submission Success Message per your requirements.
- Click Save at the bottom.
Customize the Register CTA
By default, the registration page for a waitlisted event includes the Register CTA in the hero section. To customize this button:
- Once you’re in the event dashboard, click Registration → Page & Form on the left sidebar.
- Click the Edit button in the Registration Page section to open the Page Builder.
- Open the arrow next to the Hero block in the left sidebar.
- Change the Register button’s label per your requirements.
- Click Save at the bottom.

To learn more about customizing the registration page, refer to Building a Goldcast Registration Page.
Step 3: Set up email schedules and templates
The next step is to set up the emails that a registrant would receive when they sign up for the event. By default, all users who sign up for a waitlisted event receive an email saying they’ve been waitlisted.
The waitlist notification email doesn’t contain the magic link/QR code or calendar invite. These are included only in the registration confirmation email that Goldcast sends when you change the registrant's status from waitlisted to registered.
Note: The waitlist notification email is turned on by default. If you don’t need it, you can turn it off by navigating to Email → Schedule, clicking the Edit Schedule button and turning off the toggle.
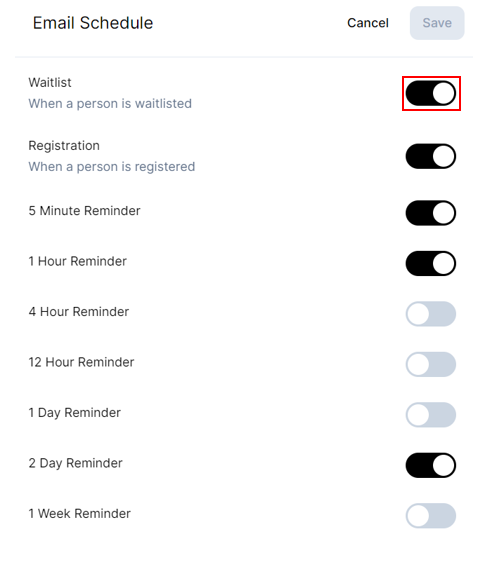
Email notifications for waitlisted events
Here’s a quick summary of the different standard emails that Goldcast offers for waitlisted events:
| Recipients | |
|---|---|
| Waitlist notification | All users who submit the registration form for a waitlisted event |
| Registration confirmation |
Only users whose status is Registered in Goldcast |
| Calendar invite | |
| Reminder emails (1-day, 5-minute, etc.) | |
| Attendee follow-up | Only users who attended the event |
| Non-attendee follow-up | For users who didn’t attend the event and whose status is Registered in Goldcast |
| Standard custom email | Only users whose status is registered in Goldcast |
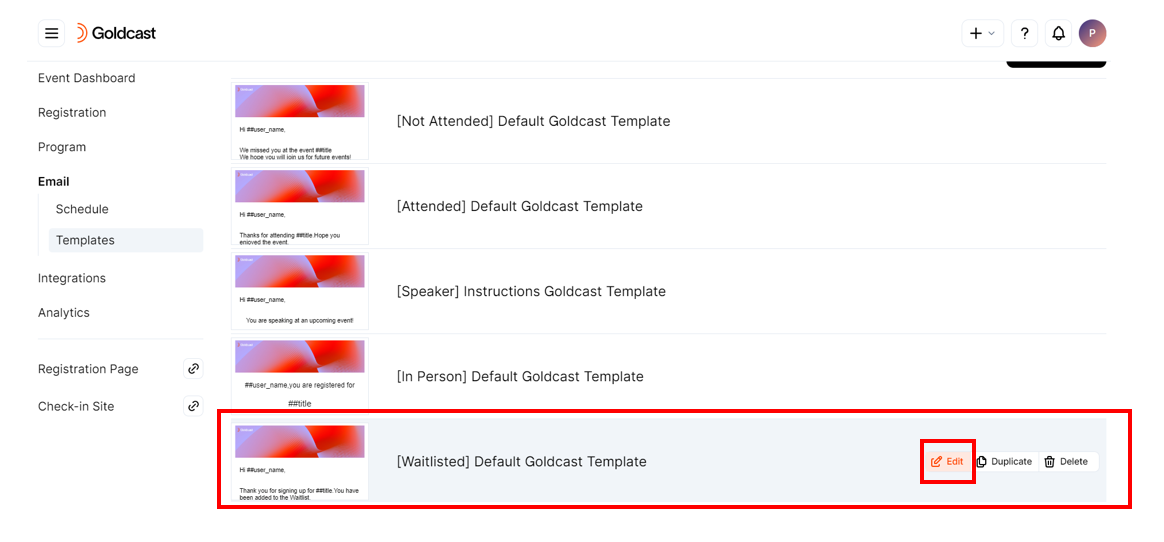
How to customize the waitlist notification email
You can customize this email template to align with your branding:
- Open the Event list and select your preferred event.
- Navigate to Email → Template using the left sidebar.
- Click the [Waitlisted] Default Goldcast Template and select the Edit button to customize it.
- For detailed instructions on using the drag-and-drop email template builder, refer to this article.
- You can also upload an HTML template to align with your branding requirements.
- Alternatively, you can duplicate an existing email template and use it for specific scenarios. For example, you can duplicate the [Waitlisted] Default Goldcast Template, modify the text and design and use it to send notification emails to rejected users.
All other email functionalities and features remain the same as those of non-waitlisted events. For more information, refer to Crafting and Scheduling Emails.
Step 4: Configure integrations
For waitlisted events, you can sync the registration statuses of users to connected MAPs, CRMs including:
- HubSpot
- Marketo
- Pardot
- Salesforce
- Webhooks
- Eloqua
Note: Currently, we do not support syncing waitlist registration statuses to Slack and Slack + Salesforce. You won’t receive additional notifications on your Slack channels when a user is waitlisted, rejected or canceled.
How to sync waitlist status to connected integrations
Once you’ve created and set up the event, follow these steps to send registrant statuses for a waitlisted event to your preferred CRM or MAP.
- In Goldcast Studio, open the Event list and select your preferred event.
- Navigate to Integrations using the left sidebar.
- Select your preferred integration (like Marketo, Salesforce, etc.) and scroll to the Custom Activities list in the Settings drawer.
- Turn on/off individual custom activities using the toggle buttons.
- For waitlisted events, besides the registered user status, you can also sync waitlisted, rejected or canceled statuses to your CRM/MAP.
After the event, you can view these registrant statuses synced to connected CRMs and MAPs. We recommend referring to the respective integration documentation for more information on how and when these activities sync to your integrated platforms.
Step 5: Manage registrant statuses
For waitlisted events, the registration status for each prospective attendee can be one of the following:
- Registered
- Waitlisted
- Rejected
- Canceled
To learn more about these statuses, refer to Registrant Statuses for Waitlisted Events.
How to view waitlisted registrants
To get a detailed view of each registrant and their current status:
- Open the Event list and select your preferred event.
- Navigate to Registration → Registrants using the left sidebar.
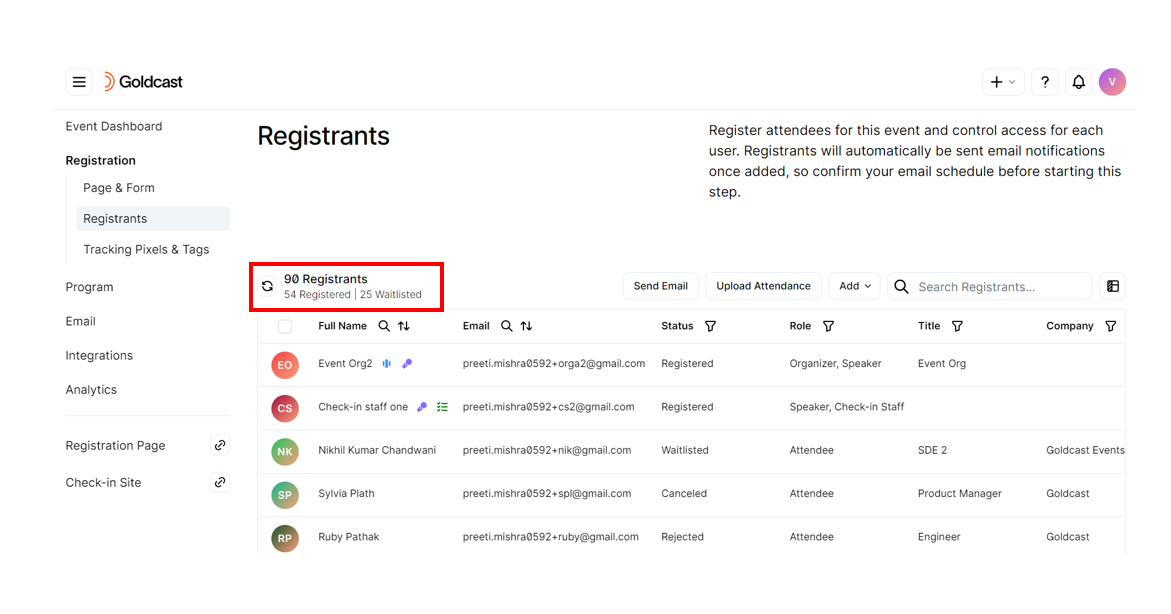
- The notification at the top of the registration table lists:
- Total registrants
- Waitlisted users
- Registered users
- The registrants table gives a detailed view of each registrant, such as their full name, email, magic link, title, status, role, date of registration, country, company, etc.
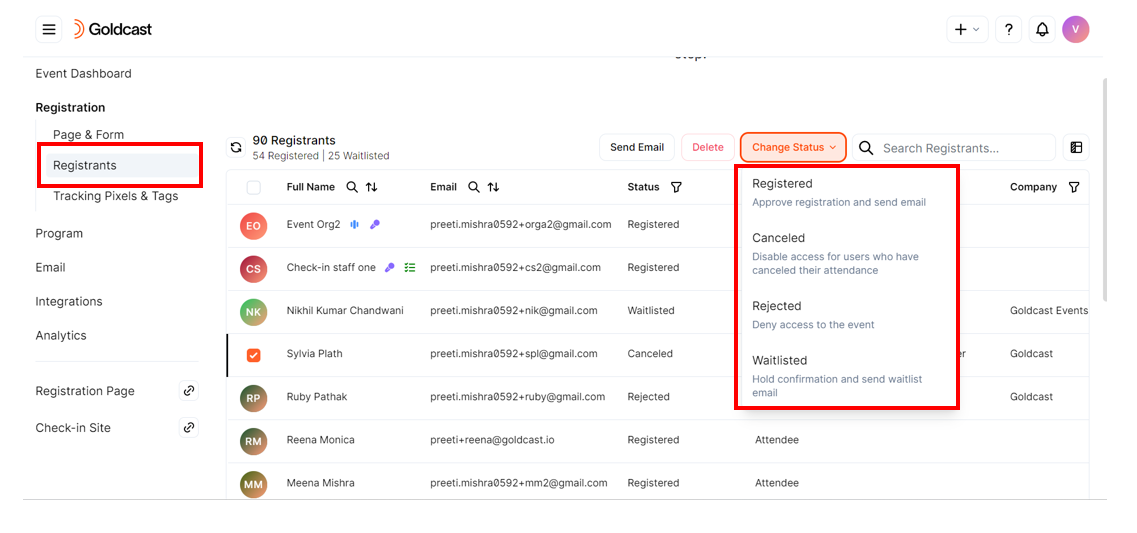
How to approve registration for waitlisted users
Currently, you’ll need to manually approve the registration for waitlisted users.
Note: Moving a user from waitlisted to registered triggers the registration confirmation email + calendar invite (if those emails are enabled for this event). Moving a user back to Waitlisted will trigger the waitlist confirmation email & no calendar invite.
However, moving a user from waitlisted to rejected or canceled doesn’t send any automated emails.
To approve registration:
- Open the Event list and select your preferred event.
- Navigate to Registration → Registrants using the left sidebar.
- Select the user(s) you want to approve registration and click the Change Status button.
- Select Registered to confirm their registration.
- Alternatively, you can also select these statuses if you do not want to approve one's registration. Learn more about each of these statuses here
- Canceled
- Rejected
- Waitlisted
Next Reading: Analytics for Waitlisted Events