Congratulations on being invited as a speaker at a Goldcast event! We are thrilled to have you on board. This guide will help you become familiar with Goldcast's enhanced stage controls.
Step 1: Join with Your Magic Link
The event organizer will share a magic link inviting you as a speaker at the Goldcast event. Click it to open the tech check page, with no sign-in required.
Note: This link is unique to you as a speaker. Do not share it with anyone.
Step 2: Complete the Tech Check and Enter Backstage
Goldcast performs a quick speaker tech check to ensure your microphone, camera, and speaker are connected and working as required.
Optional: You can also select a virtual background and test the screen share feature on this page.

Once everything is checked, click Enter Event to land on the backstage.
Step 3: Get Ready Backstage

The backstage area is a private space where you can meet and greet the event organizer and other speakers. This area is accessible only to speakers and organizers. Attendees cannot see you while you’re backstage.
The backstage area has several tools and features to aid your presentation. Here’s a quick run-through of the different components:
Event Status
A status bar at the bottom of the screen indicates the current event status.

When you enter the event before it goes live, the status displays as NOT LIVE. We recommend joining the event before the scheduled time to familiarize yourself with the various controls.
The status changes to LIVE when the event goes live.

Heads up! In automatic redirection, the LIVE tag will stay visible for 30 minutes after the last/single session ends. This indicates that speakers or any content shared on stage after the session's end time will be visible to the audience and will be captured in the recording. So, make sure to Leave Stage and remove any content shared onstage to avoid capturing any unintended content.
Audio and Video Controls

The audio and video controls are at the bottom left of the screen.
- Hide: Hide and show the backstage area.
- Mic: Mute/unmute yourself.
- Camera: Hide/show your camera feed.
- Stage volume: Increase, decrease, or mute the stage volume.
- B’stage (Backstage) volume: Increase, decrease, or mute the backstage volume. (Note: Attendees never hear the backstage feed.)
-
Chevron icon: Click the Chevron icon
 next to B'stage (Backstage) volume button to open speaker settings and change your virtual background or connected audio and video devices.
 - Prompter: Present with confidence by keeping your talking points directly in front of you. Read more about prompter here.
Backstage Video

The left panel shows the video feeds of all speakers and organizers who are currently backstage.
Heads Up! This video feed is only for backstage members; the audience cannot view it. The audience can see and hear you only when your session is live, and you Go on Stage.
Backstage Chat

The backstage chat is a private channel just for speakers and organizers. Attendees can't view it. So, feel free to use this chat for real-time conversations with the rest of the event team.
You can also send alerts on stage using the bell icon next to each message in the backstage chat. See the video below for more information.

Status Indicator

The right panel shows your status during the event. A green dot is displayed next to speakers and organizers online. This panel also indicates whether a particular speaker is on stage or backstage at any moment.
Dark and Light Modes
 |
 |
| Dark Mode | Light Mode |
Click the sun/moon icon at the bottom left of the backstage to toggle between dark and light modes.
Step 5: Go Live on Stage

When you’re ready, hit Go on Stage. You can go on stage before or after the session goes live. When you are on stage and the session is live, the audience can see and hear you.
Heads Up! Even when your session is live, attendees will not be able to see you until you proactively join the stage.
Step 6: Start Presenting
Welcome to the stage! You’re live, and the audience can see and hear you. While on stage, use the camera and microphone icons at the bottom of the screen to mute or hide your video, as required.

- By default, Goldcast mutes the backstage (B’stage) volume when you join the stage. This is handy, as it helps you focus on your presentation without being distracted by backstage conversations.
- Use the volume buttons to increase/decrease the stage and backstage volumes according to your comfort level.
- While you’re on stage, keep an eye on the backstage chats and notifications from the organizer so you’re aware of any real-time instructions.
Pro Tip: After getting on stage and unmuting your microphone, wait two to three seconds before speaking. This gives Goldcast's streams time to fully connect, ensuring that your audience can hear you.
Sharing Content on Stage
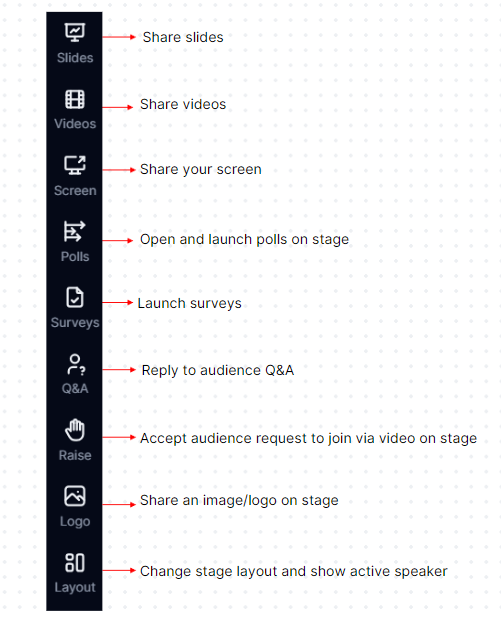
Use the presentation tools to the left of the stage to:
- Share preloaded slides, videos or your screen with the audience.
- Open and launch polls, surveys.
- Respond to audience Q&A and accept video Q&A requests.
- Share a logo onstage.
- Change the stage layout.
Pro Tip: If you plan to play an audio/video file, make sure to check the Share Tab Audio toggle while you share your screen. This allows you to broadcast the file's sound during your presentation.
Note: Depending on permission levels, you may also have access to additional elements such as the Run of Show and the Ticker.

Using Run of Show (ROS), you can stay on track with stage directions, cues, and optional notes. Read more about ROS here.

You can use this ticker to share announcements, links to external surveys, or any other URLs on the stage.
Interacting with the Audience

- The engagement panel on the right allows you to view and participate in audience chat. Also, upon hovering, you can Reply to thread for any message in the chat window.
- To respond to audience queries, you can use the Q&A icon on the left panel. Use the Raise icon to accept or dismiss video Q&A requests from the audience. If accepted, the attendee shares the stage with the speaker(s).

- You can also hover over emoji reactions on a message to see who reacted.
Step 7: Leave the Stage

Once you’ve finished presenting, click Leave Stage to remove yourself from the stage.
Heads Up! When you’re on stage, attendees can see and hear you even after your session ends. So, click the Leave Stage button to go backstage and connect with the organizer and other speakers. Alternatively, you can close the browser tab to quit the session entirely without going backstage.
Quick Tips
- Do a practice run while your session is in rehearsal mode to get comfortable with stage controls. Practice starting and stopping your video, muting and unmuting your microphone, going on and off stage, sharing your screen, videos, slides, messages, tickers, and images, changing the stage layout, and starting and ending sessions.
- Make sure you join from a noise-free environment. A good headset with a microphone is recommended for audio clarity, though it’s not mandatory.
- For the best audio and video results, ensure that your internet connection is stable and fast. If your device is connected to Wi-Fi, moving closer to the router can improve internet speed and stability. Alternatively, connecting your device to the router directly via an Ethernet cable can resolve speed issues.
- Join from your laptop/desktop via the Chrome browser.
- Sometimes, ad-blockers and anti-virus browser extensions can interfere with your Goldcast sessions. Disabling these extensions temporarily might help.
- Close all other apps and browser tabs on your computer, and turn off all notifications that might interrupt your presentation.
Voila! You’re ready to present and engage the audience on the big day!
Need more help? Contact gc.support@cvent.com or reach out to your event organizer.