Table of Contents
This guide covers everything you need to know about adding and managing speakers in your Goldcast event.
Pro Tip: We highly recommend that you schedule speaker emails before adding a new speaker to your event. This way, whenever a new speaker is added, they will automatically receive their magic link and calendar invite.
Add a speaker
There are two ways to add speakers to your event.
Method 1: Via the Speakers section
- Login to Goldcast Studio using your credentials.
- From the Events list, click the event you would like to add speakers to.
- Click Program → Speakers to navigate to the Speaker section.
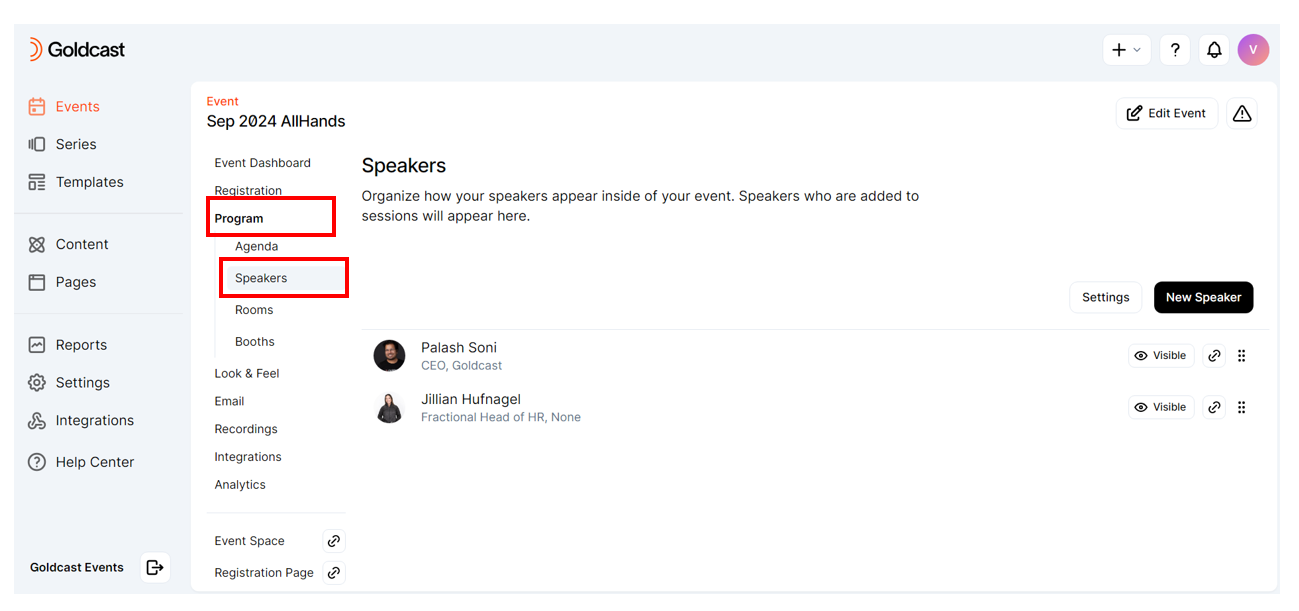
- Click the New Speaker button on the right.
- This opens the Create Speaker popup.
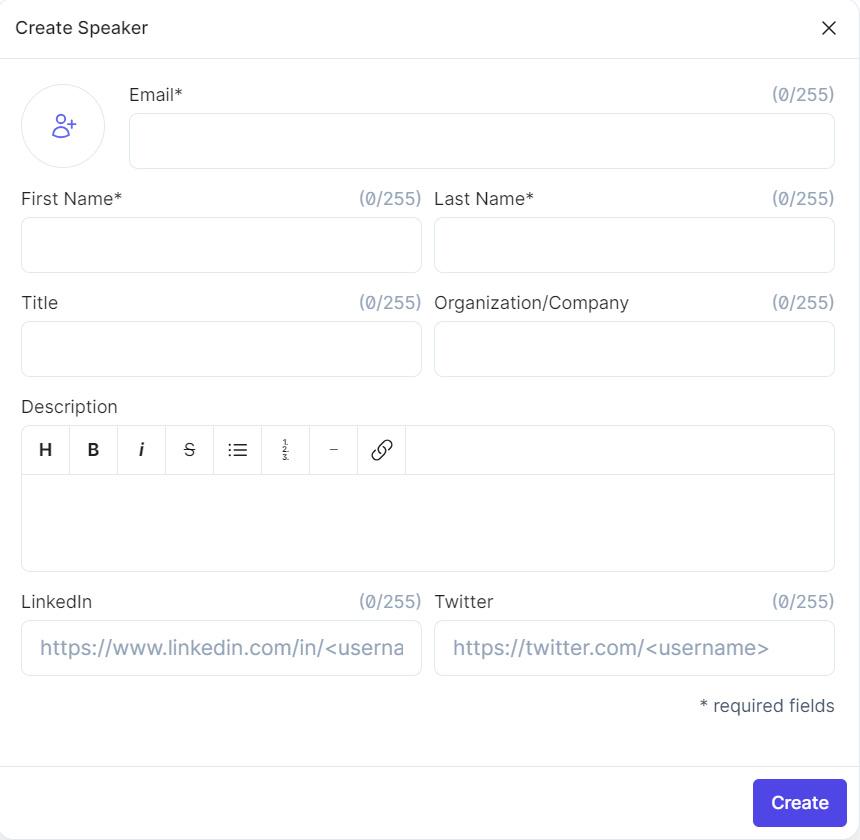
- Add the details for the required fields: email, first and last name of the speaker.
- If your speaker has been added to another Goldcast event before, their information will automatically populate when you enter their email.
- You can also include other optional details about the speaker, such as the speaker’s headshot (display picture), title, organization/company, description, LinkedIn and X (formerly Twitter) profiles.
Pro Tip: For more details on creating a great speaker profile, refer to Best practices for creating speaker profiles at the end of this article.
- Click Create.
- You’ll be taken to a pop-up that allows you to assign your speaker to a specific session.

- If your event has a single session, you’ll be prompted to add the speaker to that session. However, if your event has multiple sessions and/or tracks, you can use the dropdown button to select your preferred track and the checkboxes to select the sessions to which you want to add the speaker.
- Click Add to complete the action.
- Watch out for the “Speaker added to the session successfully!” message.

Note:
- Uncheck the session checkbox if you don’t want to add the speaker to a specific session immediately.
- However, if you do not add a speaker to any session, you’ll see a warning alert indicating the speaker doesn’t have access to any sessions.
- A speaker who is not added to a session will not have access to the backstage area of that session.
- You can change speaker assignments anytime by navigating to the Program → Speakers tab.
Method 2: Add a speaker directly to a session
Follow these steps to add a speaker directly to a session:
- Login to Goldcast Studio using your credentials.
- Select your preferred event, and navigate to your preferred session using the Program → Agenda menu on the left navigation panel.
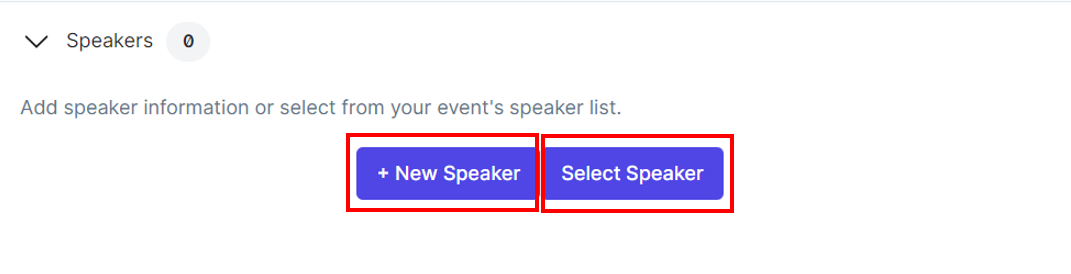
- Click on the session to which you want to add a speaker. This opens the Edit Session Details window.
- Scroll to the Speakers section and click the arrow next to it. Use the +New Speaker button to add a new speaker to your session. Alternatively, you can use the Select Speaker button to choose an existing speaker from your list.
You can add a speaker to as many sessions, as required.

Quick actions
Navigate to Program → Speakers to perform the following:

#1: Make a Speaker Invisible
You may want to hide a speaker's name from appearing in your event because the speaker is a surprise guest, or you'd like to give speaker privileges to a staff member, volunteer, or assistant. To do this:
- Click on the speaker's name to open the Edit Speaker drawer.
- Toggle OFF the Show Speaker in Event toggle and click Save. This will hide the speaker from displaying on your event’s event registration page, landing page, agenda, and speakers section inside the event.

Pro Tip: Instead, of making a staff member as an invisible speaker, you can consider adding them as a coordinator. To know more, refer to our guide on user roles and permissions.
#2: Reorder Speakers
You can reorder your speakers by dragging the three lines on the right. The order in which your speakers appear in the Speakers section will affect the order in which the speakers list appears on your registration page and in the Speakers tab in your event.

Share speaker magic links
Heads up! The magic link is unique to each speaker. Do not share it with others.
There are three ways to share speakers’ magic links:
Method 1: Schedule automated speaker invites
Goldcast offers a Speaker Instructions email you can send to speakers at scheduled times. By default, this email template includes the speaker's magic link and calendar invite.


To schedule these, head to Email → Schedule and toggle on the required speaker emails. For detailed instructions, refer to Sending Invites to Speakers.
Method 2: Share magic links manually with speakers
Open your event and use the left navigation bar to go to Program → Speakers. The Magic Link column has the magic link for each speaker. Copy the link and share it with your speakers via email/Slack.

Method 3: Using Goldcast’s bulk email send
To share all speakers’ magic links via bulk email:
- First, review and confirm the Speakers Instructions template is set up as you like:
- Navigate to Email → Templates using the left navigation panel. Select the [Speaker] Instructions template from the list and click the edit icon.
- Note the template must include the magic link macro (####) to give the speaker access to the backstage area of the event.
- Edit the template, then hit Save.
- After adding your speakers, navigate to Program → Speakers using the left navigation panel.
- Select the speakers you want to send the magic links to and click Send Email.
- Turn on/off the calendar invite toggle.
- Click Send Email in the top right corner of the drawer.
Speaker section settings
The list of speakers is available in the Program → Speakers tab.
To update settings for this page:
- Log into Goldcast and open your event.
- From the event dashboard, navigate to Program → Speakers using the left sidebar.
- Click the Settings button in the Speakers section.

- Turn off the Show Speaker Tab toggle to hide the Speakers tab from your event.
- Use the Rename Speakers Tab text box to rename the Speakers tab in the event space.
- Use the description field to enter a short description for the Speakers tab.
- Click Save.

Best practices for creating a speaker profile
Here are a few tips for creating a great speaker profile:
- For the profile image, ensure the photo is square and the person’s face is centered. (If not, a section of the photo may not align properly).
- For the speaker's description, write 50 words or fewer (any more will get cut off).
- For the speaker title, try to keep the words to a minimum (again, it may be cut off).
- For the speaker’s company/organization, try to keep the word count to a minimum.
- The LinkedIn Profile link will appear as a small round icon on the Meet Your Speakers page. If you choose to leave this out, it will not appear.
- The X (formerly Twitter) link must be the full link (including https://www.twitter.com) rather than just the handle.