Table of Contents
As part of your event, you may have tracks that you'd like to give access only to a specific group of attendees. This restricted access can be set up by your CSM/Support team - we'll walk you through the information you need to provide them in order to get this set up.
Heads Up! These instructions are for events that have multiple tracks and are not made for events which only have one track. If you wonder whether your event should have multiple tracks or not, please visit When and How to Create Tracks help doc.
In this example, let's say you have a group of "customers" and a group of "VIPs" at your event and you want only your VIP attendees to have access to a special track of content at your event.
Step 1: Separate your sessions
Groups of attendees can be given restricted access to Tracks in Goldcast events. In order to restrict access to your sessions, these sessions must be part of a separate track.
| Track 1 | Track 2 | Track 3 (VIP) |
| 11-12 Opening Session | 11-12 Opening Session | 11-12 Opening Session |
| 12-1 Speaker Number 1 | 12-1 Speaker Number 2 | 12-1 Speaker Number 3 |
| 1-2 Time to Visit Booths | 1-2 Time to Visit Booths | 1-2 VIP Meet & Greet |
In this example, all customers who attend the event will join the Opening Session at 11am, and then have a choice between Speaker 1 and Speaker 2 at 12pm. However, attendees with VIP access will have the extra option to attend Speaker Number 3's session (though all 3 speaker sessions will be open to them), and a VIP Meet & Greet at 1pm, while the rest of the attendees visit sponsor Booths.
Goldcast recommends that Tracks do not have windows of time without content. You can speak to your CSM for more guidance on setting up your Tracks for your specific use case.
Step 2: Define your Groups
NOTE: Groups must be provided to Goldcast no later than 3 business days prior to your event start.
Identify the groups you'd like to create for this event. Send Goldcast a list of the name of each group, the tracks that should be available to each group, and identify which group is the "default" group - or the group that attendees who do not have an assignment should be given access to.
In our example above, the groups would look like this:
- Customers (Default): Track 1, Track 2
- VIPs: Track 1, Track 2, Track 3
In this example, attendees who are in the "Customers" group can choose to attend sessions in either Track 1 or Track 2.
"VIPs" will have access to all three tracks, and can attend sessions in any of them. If an attendee in the "Customers" group attempts to click to join a session that is only listed as part of "Track 3" (Speaker 3's session, or the "VIP Meet & Greet" in this example), they will not be able to enter.
Step 3: Assign registrants to their appropriate groups
Once your groups have been defined, there are two methods for assigning registrants to each group.
Group Assignment Method 1: Share a list of registered email addresses & their group assignments with your CSM.
NOTE: Registrants must be provided to your CSM at least 72 hours prior to the event start time.
72 hours before your event begins, send your CSM a list of your registrants you would like to have access to your "VIP" group. (You do not need to include the attendees assigned to the Default group, in this example "Customers.") If your event has multiple restricted groups (for example, a VIP group and a Platinum group), list each assignment:
| Group | |
| jane@abccompany.com | VIP |
| andrew@xyz.com | VIP |
| pratik@pov.com | Platinum |
| ivan@university.edu | Platinum |
Any of your attendees not listed here will be assigned to the "Default" group you identified above (in this example, the "Customers" group).
Updating a Registrant’s Assignment
If you need to add or remove registrants to a restricted group, you must send a new list listing ONLY the additional/changed email addresses and their group assignments to support@goldcast.io.
Assignments that need to be made during your live event may have up to a 10 to 15 minute turnaround time. In order to reduce this time, send as many registrants at the same time as possible (instead of sending one email at a time).
Heads Up! If a new person registers and they have not been given a group assignment yet, they will be part of the Default group until you send their group assignment to Goldcast. If the attendee is already inside the live event, their new group assignment will not be reflected until they refresh their event page.
Group Assignment Method 2: Let registrants self-select their groups when registering
In this method, you'll add a dropdown component with each group as a dropdown choice to your event's registration form. Users will be able to self-select their group when they register.
Pro Tip: Check out our creating and editing registration forms help document for a quick refresher on setting up your registration form.
After finishing step 2, each group you've defined will have a Group Code in Goldcast. Ask your CSM to send you each group's code. The codes will usually resemble the group names you've decided on, but they won't necessarily, so keep track of which code is for which group. In our example above, the groups might have the following codes:
| Group Name | Group Code |
| Platinum | platinum |
| VIP | vip |
| Normal | default |
NOTE: Group codes are case-sensitive. Make sure to use the group code exactly as provided by your CSM.
In the registration form builder, add a select custom field to your event's form. When the field is dropped into your form, the field editor will automatically open. Enter an appropriate label for your dropdown field and any other display configurations. Check out our Editing a Registration Template guide to get more details on configuring a form field.
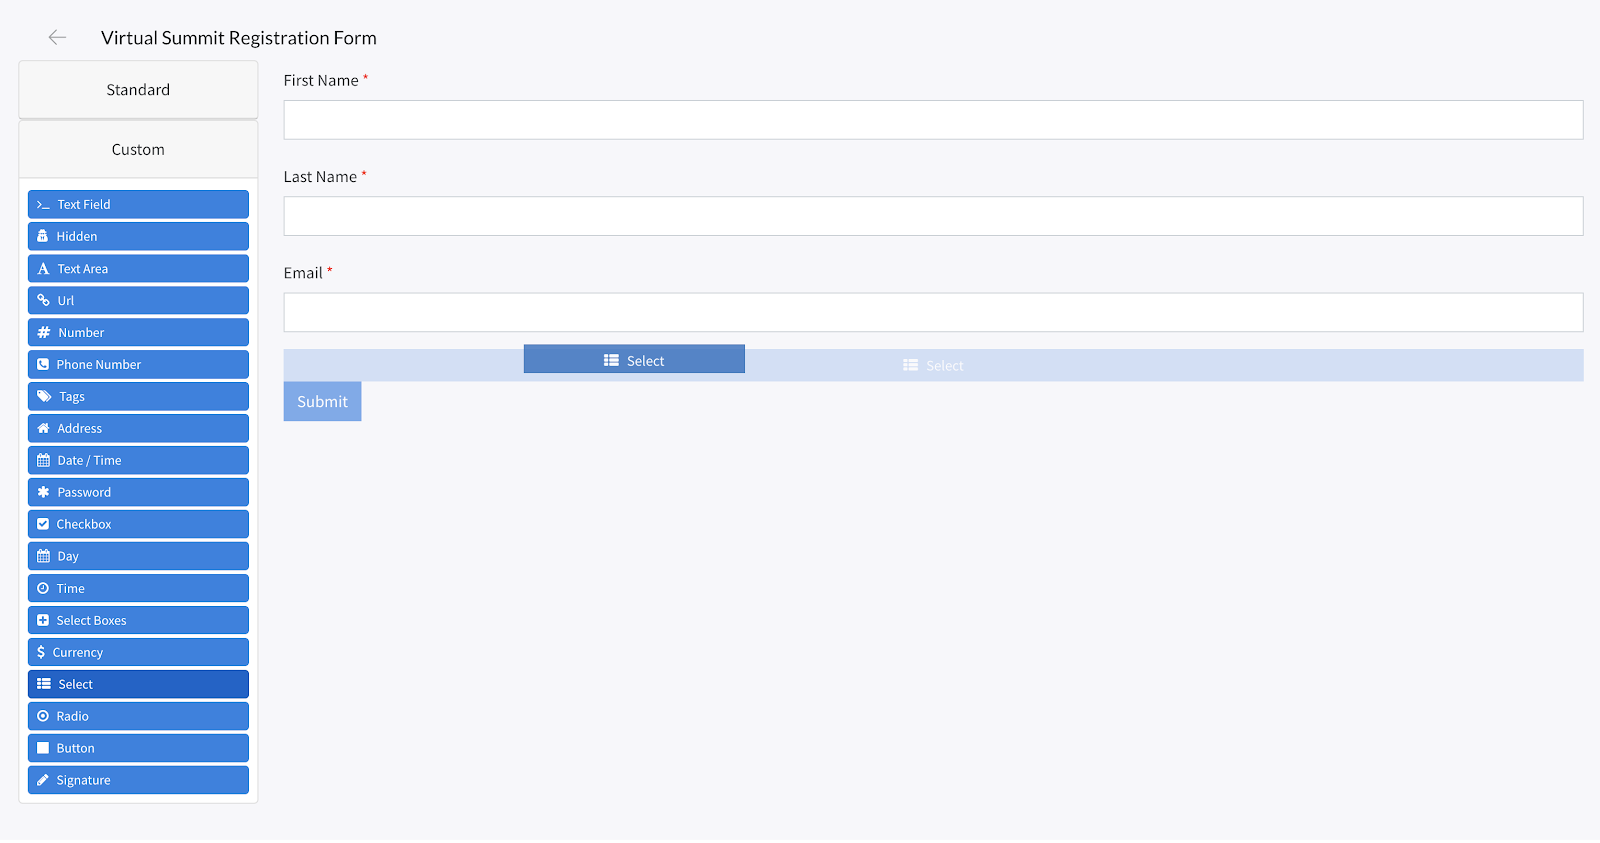
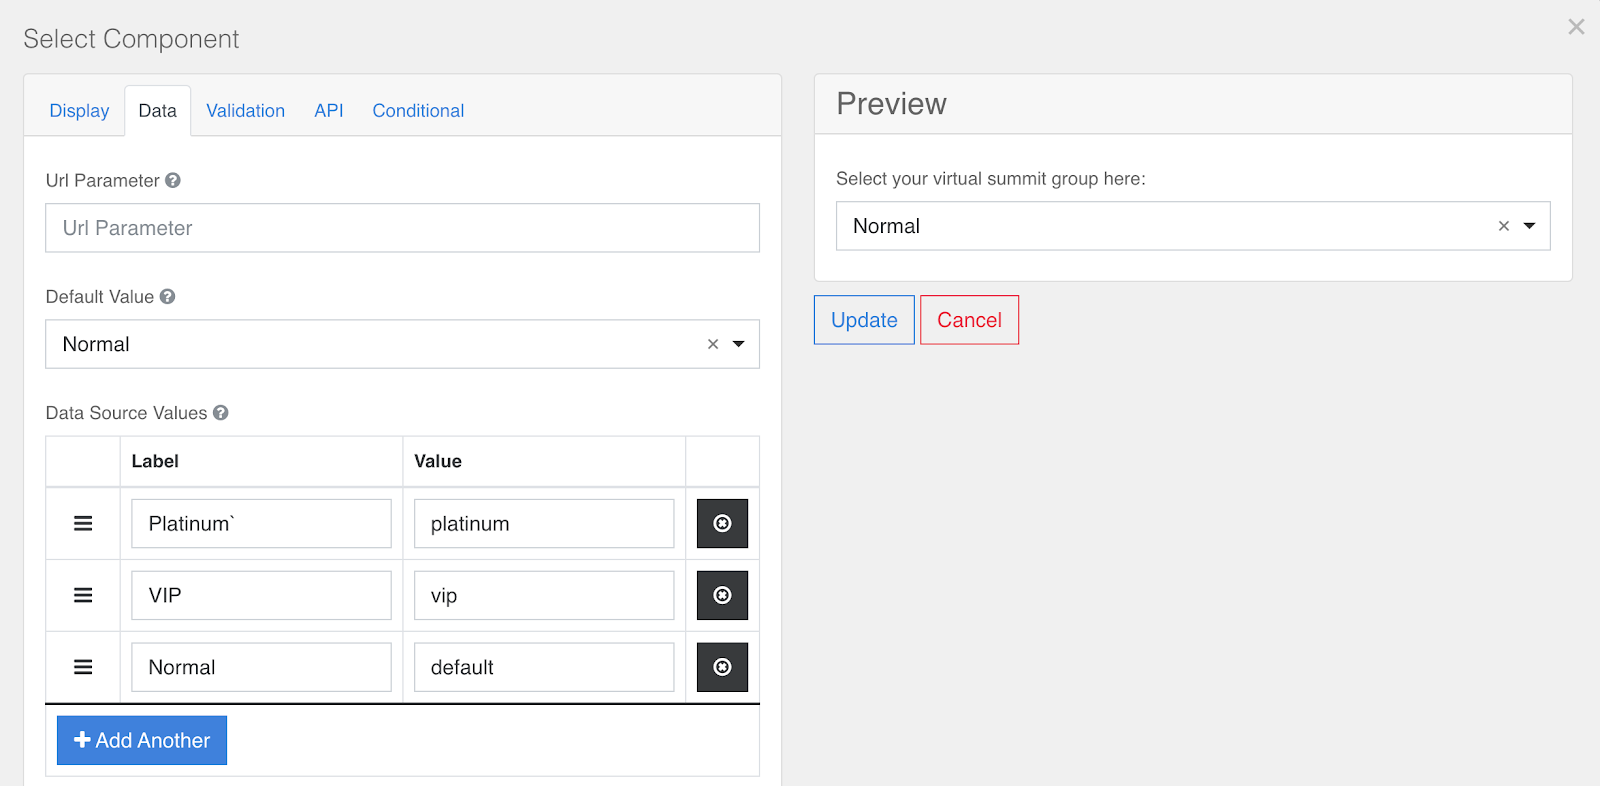
Navigate to the Data tab. You'll see a section labeled Data Source Values. This is where you'll create the options in your dropdown component. Each row corresponds to an option in the dropdown. The Label is what a user sees for each form option. The Value is what's submitted when a user selects one of the Labels from the dropdown.
For this use case, the Group Names will be Labels and the Group Codes will be Values. When a registrant selects the Platinum group, their form submission will use the Platinum group's code to place the user into the Platinum group.
Using the example above the field editor would look like this:
Next, go to the Validation tab and make this field required. This is a necessary step because if a user registers but doesn't select a group then the registration will fail.

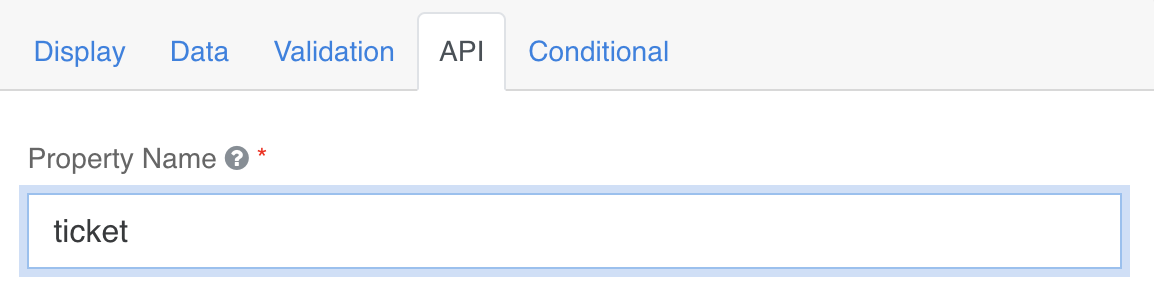
Next, navigate to the API tab and enter "ticket" into the Property Name field.
This will connect the submissions of this form question to the Goldcast logic that places users into the groups they select.
Heads Up! The property name field is case-sensitive and needs to match exactly with the "ticket" for the group assignments to work properly.
Lastly, click Update in the field editor to add this new ticket field to your form. Then click Save in the upper right corner to save the form changes you've made.