Table of Contents
| Plan Availability | Starter | Pro | Premium | Enterprise |
 |
|
|
|
Goldcast offers an easy way to convert your existing events into Webinars powered by Smart Event Tech. However, this feature will work only if your event meets certain criteria, which this article will explore in detail.
How to convert an existing event to a smart webinar
- Log into Goldcast Studio and open your preferred event.
- Click the Edit Event button on the top right and scroll to the bottom.
- Click the Convert to Webinar button.
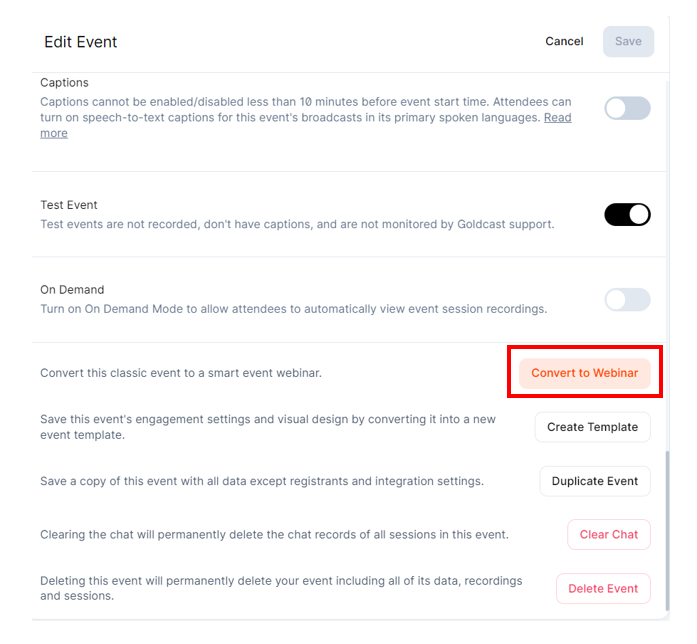
Heads up! The Convert to Webinar button will be enabled only if your event meets the following conditions:
- Is an upcoming event with only one session and has no scheduled breaks in the agenda
- Doesn't start within one hour of the current time
- Doesn't have rooms or booths
- Has no pre-recorded session test running; if the session type is pre-recorded
- Has no RTMP channel test running; if the session type is RTMP
If your event meets the above-mentioned conditions, you can use the Convert to Webinar button and change its type.
Note: If the event that you're converting uses the basic (old) registration page, please note that the branding and other settings of the registration page will not be copied, as webinars by default use the Custom Registration Page Builder, and do not support the basic registration page.
Workaround
If your event doesn't meet the abovementioned conditions, you cannot use the Convert to Webinar button. However, you can use the workaround mentioned here to generate post-event assets or use the standalone on-demand page.
Note: Do NOT make any changes to your events while it’s live. Follow the instructions given below only after your event is over.
Follow these steps:
- Log into Goldcast Studio and open your preferred event.
- Navigate to Program → Agenda, and click on your preferred session.
- In the Session Details drawer, navigate to the on-demand section and download the recording.
- Next, create a new smart webinar and set the broadcast type to pre-recorded.
- To upload the downloaded recording, click the Edit Event button, select the Assets tab, navigate to the Videos section, and click +Add Video.
- Upload the video and click Save.
- Make sure the Test Event toggle is turned off.
- Modify other event settings, such as speaker, title, date, time, etc., as required.
- If required, you can bulk-upload registrants of the previous event to this smart webinar.
- If you’re adding registrants, turn off all other emails besides the on-demand one. Users will receive the on-demand email, which they can use to access the assets you’ve shared on the standalone on-demand page.
Once you’ve set up the pre-recorded webinar, it will run as scheduled. After the event is over, Goldcast will automatically create post-event assets using Content Lab. You can showcase these assets on the standalone on-demand page. Share the URL of the on-demand page on your socials, email, and other channels to drive traffic.