Table of Contents
| Plan Availability | Starter | Pro | Premium | Enterprise |
 |
 |
|
|
For customers with contracts starting March 2024 or later, feature availability is based on your pricing tier. If interested, contact your CSM or our Sales Team to discuss pricing options.
What’s a tracking pixel, and how does it help?
Marketing tags (or tracking pixels) are code snippets that, when placed on your Goldcast page, allow you to gather information about site visitors - which site they come from, which marketing campaigns are driving visitors to your pages, how they browse, what they click on, etc.
These snippets enable your marketing team to better understand how guests interact with your Goldcast pages. It can provide accurate insights into
- Source of visitor traffic
- Time spent on the page
- Link clicks
- Button clicks
- CTA performance
- Form submissions
- Engagement patterns (scroll behavior, scroll depth)
- Advertising ROI (efficiency of your paid ad campaigns)
- Conversion rate (number of visitors who complete event registration), etc.
Your marketing team can leverage these data points to drive more page visits, optimize the page design to improve conversions, and increase event attendance rates.
 Note: By default, Goldcast doesn’t collect the insights mentioned above. However, we support tracking pixels & tags from third-party marketing automation platforms (MAPs), tag managers, and social media networks.
Where to add tracking pixels in Goldcast?
You can add tracking pixels to your Goldcast registration and event hub pages. Most tracking pixels require you to place code snippets on all the pages you want to track. We enable you to do this by providing flexible code area inputs that place the code you add into them onto your registration and hub pages.
Inserting Code into the HEAD and BODY of your page
We provide both a code area that injects its content into the HEAD of your page and a code area that injects its content into the body of your page. Your tracking pixel’s embed instructions should explicitly state the code that needs to be added to the HEAD and/or BODY of your page.
Event Hooks
We provide additional code areas that allow you to run custom Javascript on different events a visitor might trigger while on your registration or hub page. These code areas allow you to send the events back to your tracking software, giving you more granular details about your page visitors’ actions.
Below are the different events that have code areas you can hook into:
| Event | Trigger |
|---|---|
| Form Submission |
This function fires when a page visitor successfully submits a form. This custom event can be used to track registration conversions.
|
| Add to Calendar |
This function fires when a page visitor adds a session from the agenda to their calendar.
|
| Register CTA Click |
This function fires when a visitor clicks a register CTA.
|
| Custom CTA Click | This function fires when a visitor clicks a custom CTA. A custom CTA redirects the visitor to a custom URL set on the CTA. |
How to add tracking pixels and tags in Goldcast
Goldcast offers you the flexibility to add tracking pixels and tags at three levels:
1. At the organization level
Any tracking pixel you add at the org level applies to ALL event registration and hub pages within your Goldcast organization.
Follow these steps to add a marketing tag at the org level:
- Log into Goldcast Studio using your credentials.
- Navigate to Integrations → Javascript Embeds → Tracking Pixels & Tags using the left sidebar.
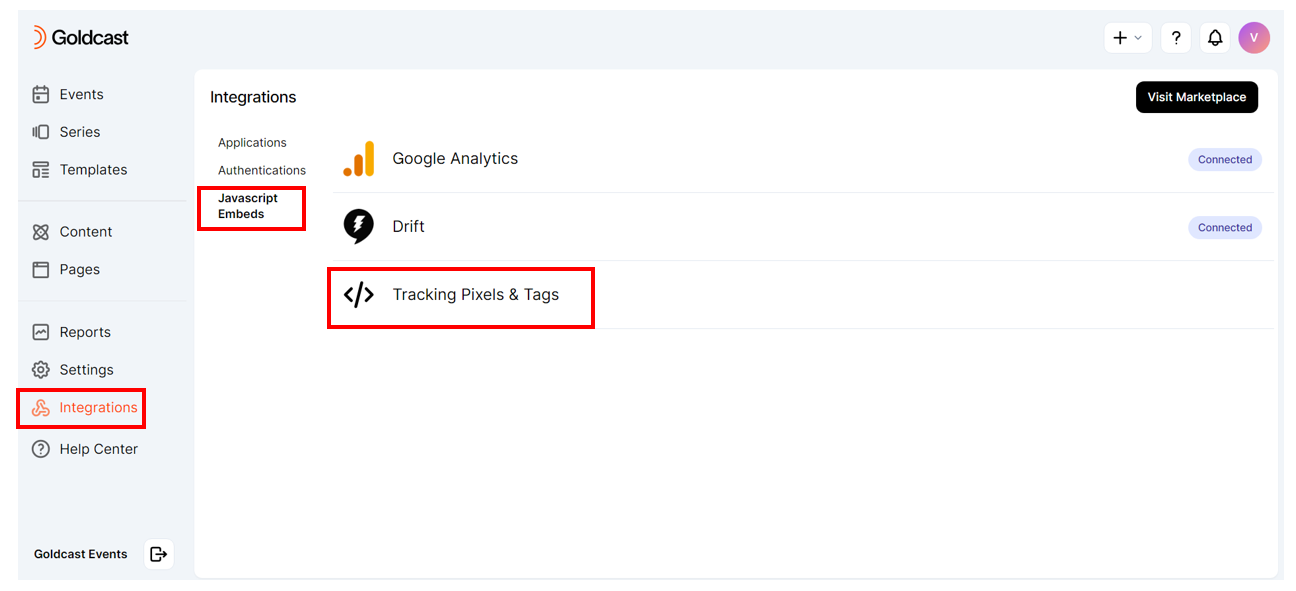
- Decide the location/activity to add the marketing tag and click the Edit button below the relevant section.
- Copy-paste the tracking pixel embed snippet from your provider.
- Click Save.

2. At the event level
You can also add tracking pixels and tags to the registration pages of individual events. Any pixels you add here apply only to that specific event.
Heads up! Tracking pixels and marketing tags are not compatible with basic registration pages. If you plan to use this feature, make sure you're using the Registration Page Builder to create your registration page.
Follow these steps to add a marketing tag at the event level:
- Log into Goldcast Studio using your credentials, open the events list, and select your preferred event.
- Click Registration → Tracking Pixels & Tags on the left sidebar.
- Decide the location/activity to add the marketing tag and click the Edit button below the relevant section.
- Copy-paste the marketing tag from your provider.
- Click Save.


Pro Tip: If you use Goldcast forms on your registration pages and want your tracking pixel to track registrations or identify visitors (when possible), you’ll need to use our onFormSubmission event hook.
The onFormSubmission event hook can be used to manually send registrations to your tracking tool as custom events, which can be used to track conversions. The hook also gives you access to the visitor’s email, which can be used to identify the visitor.
Your tracking tool should have a code snippet you can place in the event hook to leverage this important page event. Some examples are:
- Hubspot’s Identify function
- Meta Pixel’s fbq track function with the Complete Registration event
-
Marketo Measure collect Lead Information - See Case Study 2
Heads Up! If you have both organization- and event-level tracking pixels, please note that Goldcast will execute both. So, we highly recommend removing the event-level scripts to avoid loading them twice.
3. To hub pages
You can also add tracking pixels and tags to Goldcast event hub pages. Any pixels you add here apply only to the particular hub page to which you have added it.
Follow these steps to add a marketing tag to hub pages.
- Log into Goldcast Studio using your credentials, navigate to your Pages list, and select your preferred hub page.
- Scroll down to the Tracking Pixels & Tags section.
- Decide the location/activity to add the marketing tag and click the Edit button below the relevant section.
- Copy-paste the marketing tag from your provider.
- Click Save.
Case Study 1: Google Tag Manager
Google Tag Manager is a tag management system that allows you to quickly and easily update any tracking pixels and tags in Goldcast. In this case study, we assume you want Google Tag Manager installed on all your Registration and Hub pages.
Prerequisites: Installing Google Tag Manager
First, you must ensure your Google Tag Manager is properly installed on all the pages you want to track registrations. Google Tag Manager provides unique scripts to be placed in the HEAD and BODY of your pages.
You can find your account embed scripts by following Google Tag Manager’s Installation Guide. Once you’ve gotten the embed tags, navigate to your organization-level Tracking Pixels and Tags page and paste the code snippets into their respective code areas.
Scenario 1: To track successful first-time registrants using Google Tag Manager
To track first-time registrants, we’ll leverage the onFormSubmission function to hook onto the form submission event and the dataLayer.push(...) function from Google Tag Manager to push the form submission as a custom event back to Google Tag Manager. The result of your onFormSubmission function will look like the below:
function onFormSubmission(submissionData, isReRegistration) {
  if (isReRegistration == false) {
    dataLayer.push({'event': 'first-time-registration',     'submissionData': submissionData})
  }
}
We use the isReRegistration parameter in a conditional if statement to ensure that the first-time-registration custom event only gets triggered the first time a visitor fills out a form for a particular event.
Now, you’ll want to create a trigger in Google Tag Manager on the first-time-registration custom event so you can fire your tags when the custom event occurs.
Scenario 2: To track each time a session is added to a visitor’s calendar
Tracking when visitors add sessions to calendars helps your marketing team gain further insights into user behavior. The example below sends an event to GTM every time visitors add a session to their calendar. It includes the session name and the calendar type to which they added the session.
function onSessionAddToCalendar(sessionName, sessionId, calendarType) {
dataLayer.push({'event': 'addToCalendar', 'sessionName': sessionName, ‘calendarType’: calendarType})
}
Scenario 3: To track visitors who clicked the register CTA
The register CTA event hook is a good way to track visitors’ intention to register. You can use the Register CTA Click event hook to return the Register CTA Click activity to your tracking tools. The example below will send an activity to GTM each time a user clicks a register CTA button, along with the name of the event for which the CTA is directing the users to register.
function onRegisterCtaClick(eventId, eventName, blockType, blockId, pageType) {
dataLayer.push({'event': 'registerCtaClicked','eventName': eventName})
}
If you have multiple register CTAs on your pages and want to compare click rates across them, you can use the blockType and blockId data points to pinpoint the exact register CTA clicked.
If you are setting up this event hook at the organization level, it’ll trigger on both your event hubs and register pages. Therefore, you might want to differentiate between register CTA clicks on each page using the pageType data point. Your event hook code might look like the following:
function onRegisterCtaClick(eventId, eventName, blockType, blockId, pageType) {
If (pageType === ‘Hub’) {
  dataLayer.push({'event': 'hubRegisterCtaClicked','eventName': eventName})
}
} else if (pageType === ‘Registration) {
dataLayer.push({'event': 'regPageRegisterCtaClicked','eventName': eventName})
}
Case Study 2: Marketo Measure (Formerly Bizible)
Step 1: Install Marketo Measure
Installing Marketo Measure is straightforward; just follow Marketo Measure’s Setup Guide. To add it to all your hub and registration pages, navigate to your organization-level Tracking Pixels & Tags section and add the Marketo Measure embed script into the appropriate code areas. It’ll look like this:
<head>
<script type="text/javascript" src="https://cdn.bizible.com/scripts/bizible.js" async=""></script>
</head>
Step 2: Tracking Form Submissions
If you are embedding a Marketo form on your Goldcast registration pages, the Marketo script added in Step 1 should automatically track form submissions. If you use a Goldcast form, you must manually send form submission data to Marketo Measure using the onFormSubmission event hook. We’ll use scenario two from Marketo Measure’s setup guide.
Your onFormSubmission function will look like the following:
function onFormSubmission(submissionData, isReRegistration) {
window['Bizible'] = window['Bizible'] || { _queue: [], Push: function (o, p) {this._queue.push({ type: o, data: p }); } };
Bizible.Push('User', {
  eMail: submissionData.email // required
});
}
Step 3: Make sure your pages’ domains will be tracked by Marketo Measure
Marketo Measure Javascript is domain-based, so it only collects data on pages with a recognized domain. If your registration and hub pages use custom URLs with the same root domain as the one used to set up your Marketo Measure account, then you shouldn’t have to do anything here. If not, you must manually add the domain to your Marketo Measure account. You should reach out to your Marketo Measure consultant to help configure this.
Key points to remember when using the Marketo Measure script in Goldcast:
- Avoid adding the script both at the event and organization levels to prevent it from loading twice, which could lead to errors.
- Ensure the touchpoints data flow is enabled in the Marketo Measure (Bizible) dashboard.
- Add
account nameas a query parameter in the Marketo Measure (Bizible) script.
Tag provider documentation
We recommend copying and pasting the tracking code from your marketing automation tools or social media analytics pages to Goldcast. For more help, refer to your tag provider’s documentation.
- Adobe Marketo Measure (Previously Bizible): Adding Marketo Measure script
- Adobe Marketo Engage: Add Munchkin tracking code
- Adobe Analytics: Implementation guide for tracking
- HubSpot: Install the HubSpot tracking code
- LinkedIn Insight: Add the LinkedIn Insight tag
- Meta (Facebook) Pixel: Install the Meta Pixel
- Twitter Pixel: Conversion tracking for X (Previously Twitter)
- Google Tag Manager: Install Google Tag Manager
- Google AdWords: Deploy Google Ads and Install the Google Tag conversion tags
- Google Analytics: Install Google Analytics
Heads up! Every third-party MAP and social media analytics platform is set up differently. So, you might require additional assistance copying the tag from your preferred platform. Contact your IT department, webmaster, or developer if you face any challenges in generating the marketing tags to embed in Goldcast.
FAQs
1. What’s the difference between using UTMs and marketing tags in Goldcast?
In Goldcast, you can use UTMs to track and analyze the traffic sources of only visitors who register for an event. In contrast, you can use marketing tags to collect insights about both visitors who register for an event and those who don’t sign up. You can also configure marketing tags to provide easily readable reports of UTM data.
To summarize, marketing tags offer a more holistic view of the engagement of your registration and hub pages.
2. How many tracking pixels or marketing tags can I add to a Goldcast registration page?
The text field where you can add marketing tags in Goldcast has a pre-set character limit. So, ideally, you can add two to three tags at each level.
3. Do tracking pixels and tags slow down page loading times?
Tracking pixels and marketing tags are lightweight scripts and would not cause any noticeable changes to page loading times. Here are a few tips to optimize your marketing tags for better loading times:
- Use a tag manager: This helps you organize, manage, and remove unnecessary tags.
- Less is more: Use only the tags you need to track data that matters.
4. Do marketing tags fire multiple times?
Tags added to the Head and Body fire only once on page loading, but code added to the event hook functions can trigger as many times as the event occurs during a page visit.
5. Can I add both organization and event-level tracking pixels?
Yes, you can add both organization-level and event-level tracking pixels. However, it's important to keep in mind that both will be executed. This means that the event-level pixels won't overwrite the settings established at the organization level. Instead, both sets of tags will be executed.
Need further assistance with tracking pixels and tags? Get in touch with us at gc.support@cvent.com, and we’d love to help you out.