The Engagement Panel provides attendees with an interactive event experience. They can use the various features in this panel to interact with each other and the speakers during the event. This panel has multiple configurable features such as chat threads, direct messaging, polls, Q&As, and downloadable resources.
In this article, let's explore the different features of the engagement panel.
How To Chat With Attendees
Overview
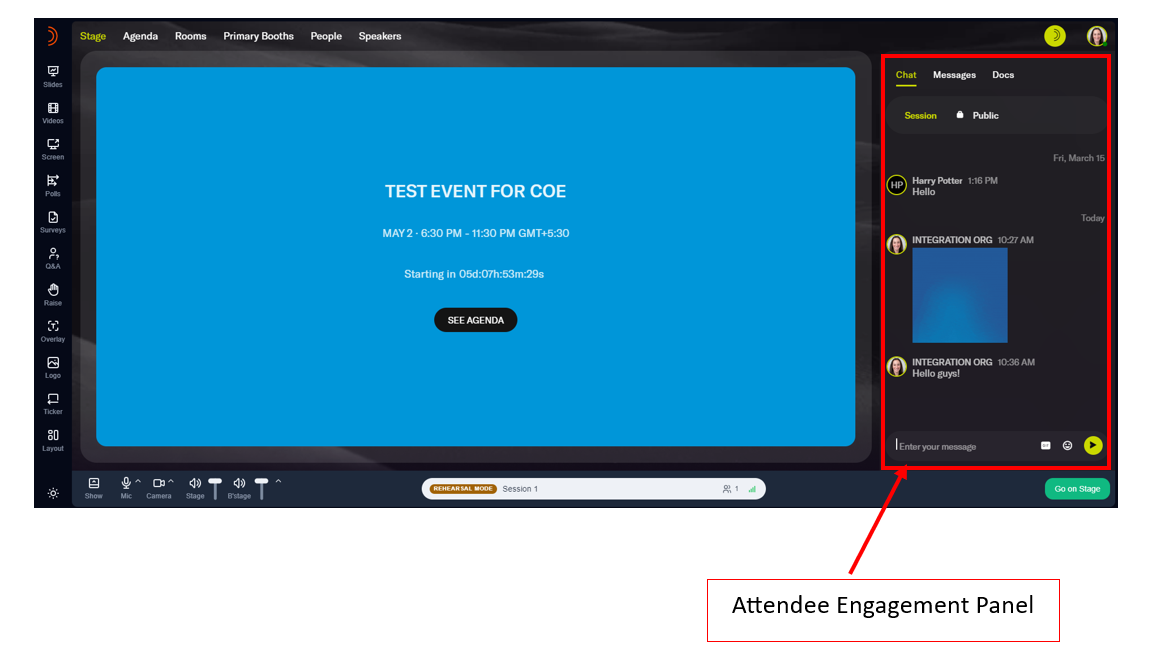
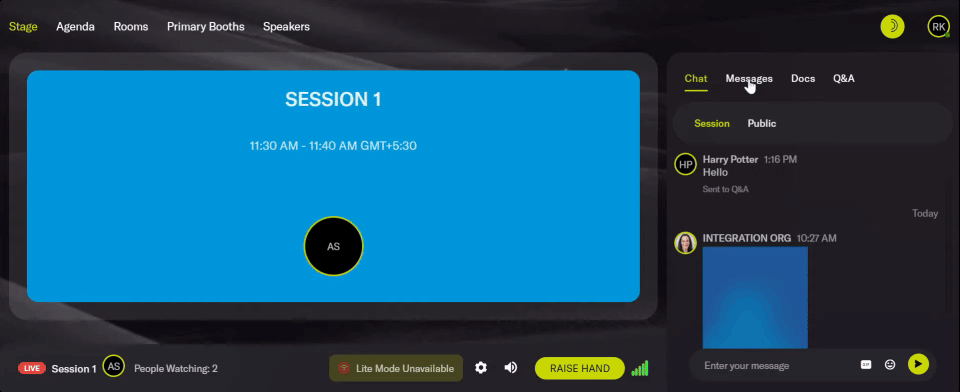
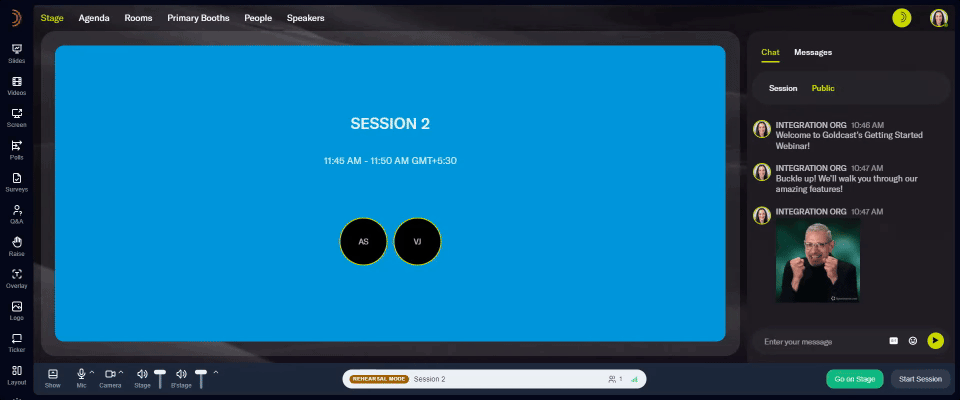
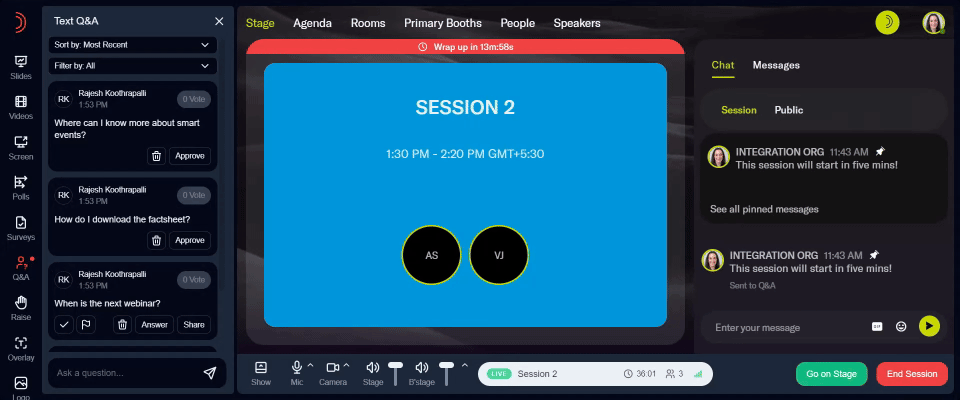
The engagement panel to the right of the stage is your primary point of contact with attendees. This panel displays the chat messages sent in by the audience. All attendees have access to the chat tab and can send in messages, respond to other chats with emojis, or share GIFs (if you’ve enabled it) anytime during the event. Organizers and speakers can also use this tab to interact and communicate with the audience.
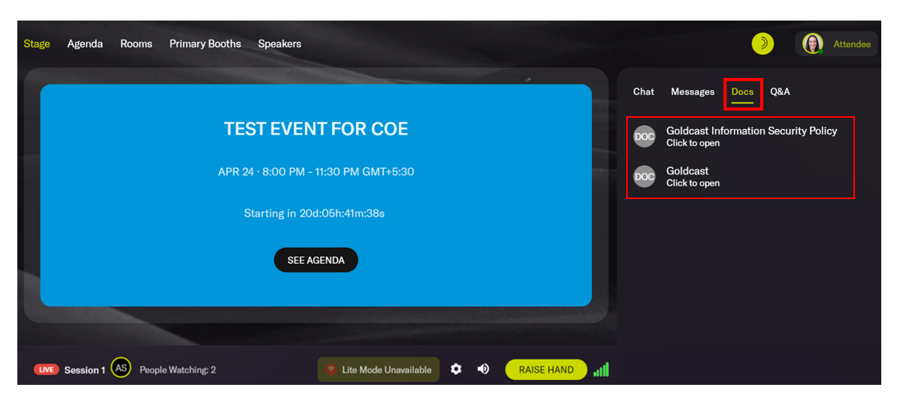
Heads Up! Attendees can also view and download any resources you upload to the session via the Docs tab in the engagement panel.
Chat types
In Goldcast, we offer the following separate chat threads that serve different purposes:
| Chat Type | What is it? | Who can view it? |
| Public | Common across the event | All event attendees, speakers, and organizers |
| Session | A separate chat thread for each session | Session attendees, speakers and organizers |
| Backstage | A private backstage chat thread |
Only session speakers and organizers. Attendees cannot view it. |
| Booth | A separate chat thread for each booth | Booth attendees, sponsors, and event organizers |
| Room | A separate chat thread for each room | Room attendees, sponsors, and event organizers |
| Direct message | Private one-on-one text chats | Attendees, speakers, and organizers |
| Video message | Private one-on-one video call | Attendees, speakers, and organizers |
Note: Messages posted in all these chat threads are recorded and shared with organizers after the event. You can view all chat messages in the Engagement Analytics dashboard.
Chat Message Availability After Events
- Chat messages will remain accessible in the event interface for 90 days after an event ends.
- After this period, messages will no longer be visible within the event's on-demand view. However, all chat data is securely archived in accordance with Goldcast's retention policy.
- Please note, chat data is not deleted. It can be retrieved upon request, though it will no longer be directly accessible through the on-demand event experience.
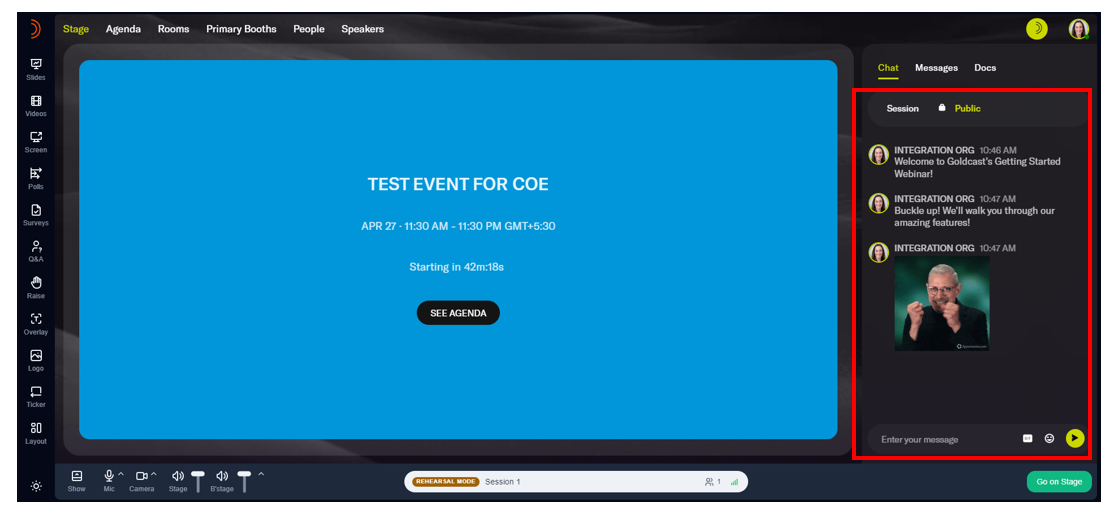
Public chat
This chat is shared across all sessions of your event. You can use it to chat and interact with attendees, irrespective of the session they attend. It’s visible throughout the event. If you turn off public chat, only organizers and speakers can post announcements, notifications or other messages for attendees on this thread. If public chat is enabled, all attendees can view and post messages on it throughout the event.
Heads up! Disabling/Enabling Public chat does not update for attendees in real time. If this change is made after attendees have joined, the current chat visibility will remain active unless they manually refresh. Alternatively, Session chat does update in real time .
Session chat
Each session in Goldcast has a chat specific to it. You can use this to share links, notes and other information relevant to the session. Attendees can use this chat to interact with other session attendees and share their thoughts with the speakers in real time. You can turn session chat on/off during the event, and the change will be updated for the audience in real-time.
Note: Once the session is over, attendees cannot view this chat thread, as it refreshes with each new session.

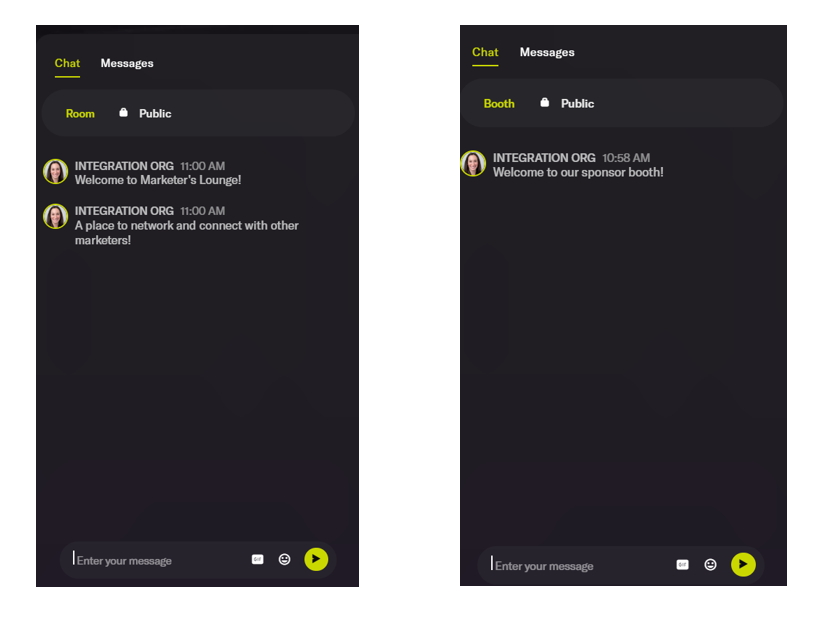
Booth and Room chat
Like the session chat, booth and room chats are specific to a particular room or booth. You can use them for networking purposes.
Room chat Booth chat
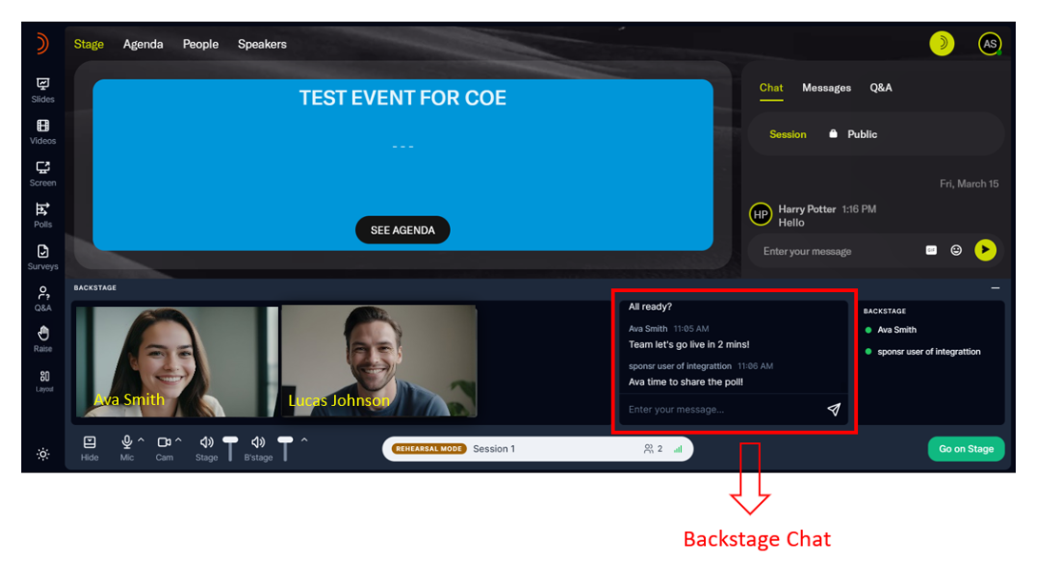
Backstage chat
Session speakers and event organizers (admins) can access a private backstage chat thread. You can use this chat panel to communicate with other speakers and organizers while you’re backstage or onstage. This chat is not visible to attendees and speakers who aren’t part of the session.
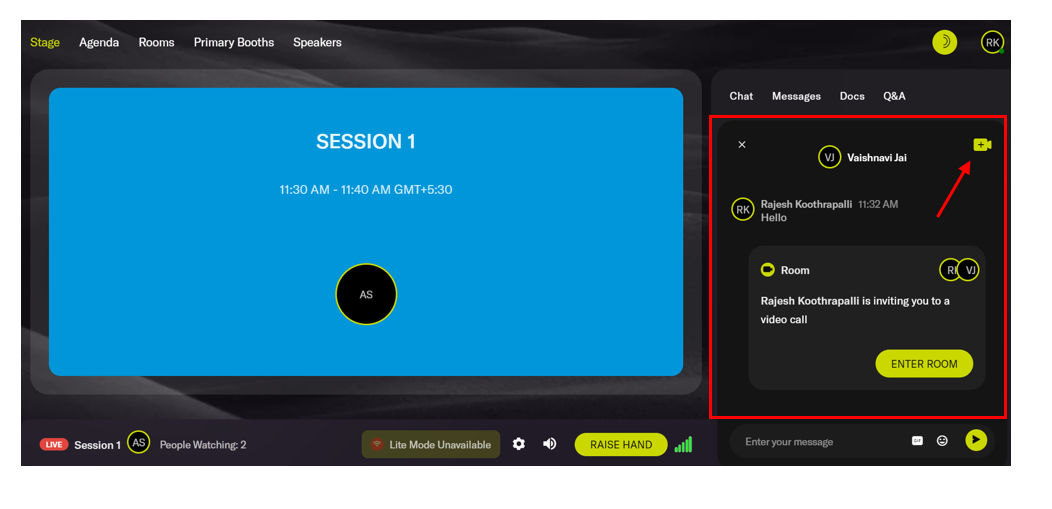
Direct message
Goldcast makes it easy for your audience, speakers, and organizers to connect one-on-one. Attendees, speakers, or other organizers can use direct messages to communicate with a specific person.
Follow these steps to send a direct message:
- Go to the Messages tab in the engagement panel.
- Click the name of the person you want to send a direct message to.
- Enter your message in the text field to begin the conversation.
Video message
Besides private texts, organizers, speakers, and attendees can also video call one-on-one. Select the Video Call button next to the person’s name in the Messages tab to begin the video call. This notifies them that you would like to video chat. The recipient can accept or decline your request.
Share a chat message onstage
You can publish chat messages on the stage in real-time. This is a great way to encourage audience participation and provides real-time feedback to speakers so they can address audience questions or reactions.
Pro Tip: Publishing funny or interesting audience comments on the stage can add to the overall event enjoyment and increase audience engagement and participation.
To publish a chat message onstage:
- Hover over the message you want to present onstage
- Click the Share icon
Things to know:
- To publish a chat message onstage, you must be an organizer or speaker for the session and be inside the session.
- You can publish chat messages while onstage or backstage.
- You can share the message during the session or breaks.
- Organizers and speakers can share public and session chats onstage.
To remove the chat message from the stage, click the X button in the upper right corner of the chat window.
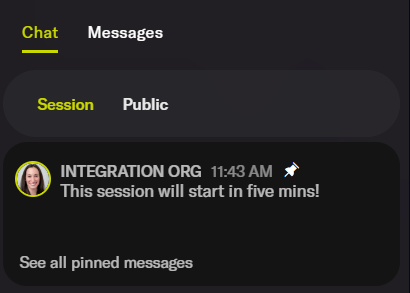
Pin a message to the top
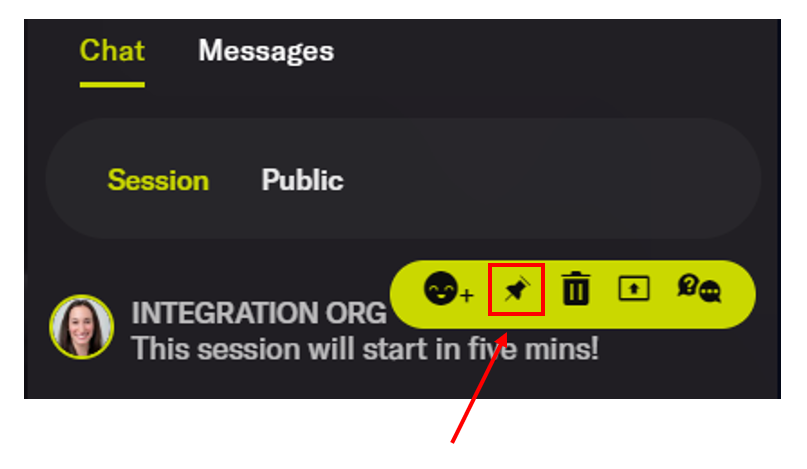
Click the pin icon next to a chat message to pin it at the top of the thread.
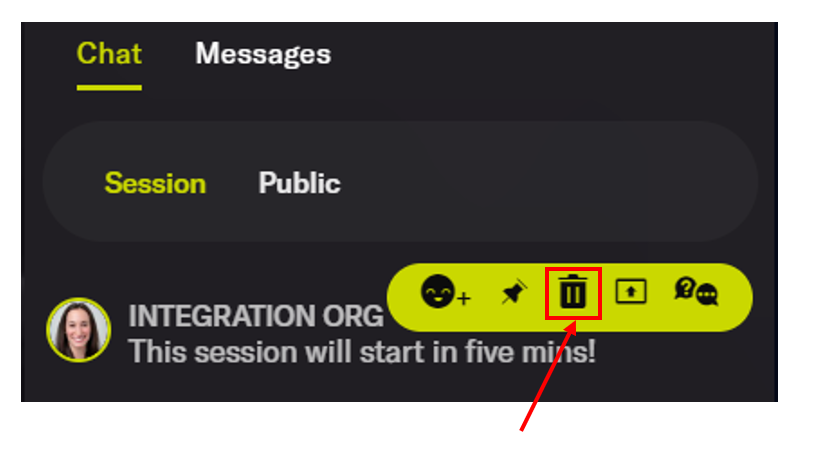
Delete a chat message
Click the delete icon next to the chat message to remove it. Deleted messages are no longer visible to the audience and other speakers and organizers.
Send a chat message to Q&A
Sometimes, attendees might ask questions in the chat tab. You can move these over to the Q&A tab by clicking this icon. Note: When you move a chat message to the Q&A tab, it's no longer visible in the chat thread.
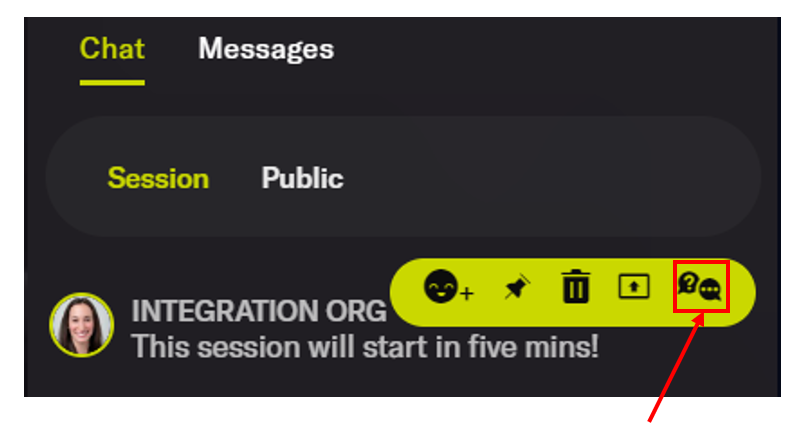
Heads up! For multi-session events, you can only send session chats to the Q&A tab of that specific session. Public chats cannot be moved to Q&A.
React with emojis
Click this icon to react to specific chat messages with emojis.
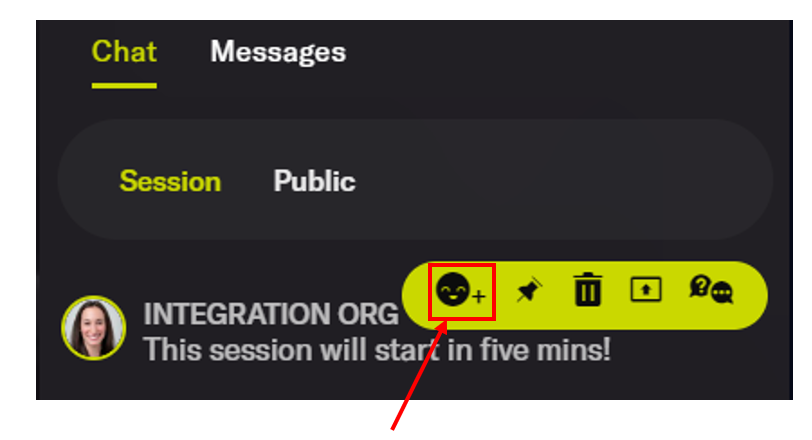
Pro Tip: Learn how to block inappropriate and offensive emojis from chats.
Turn chats & GIFs on/off
Goldcast offers you the complete flexibility to turn on/off each chat thread per your requirements.
Follow these steps to turn on/off different chat threads:
- Log into Goldcast Studio and open your preferred event.
- Navigate to Look & Feel using the left side tab.
- Scroll to Engagement & Communication → Chat Experience in the menus on the right.
- Turn on/off the public chat, session chat, room chat, booth chat, private chat and GIFs using their respective toggles.
- Click Save.
Things to know:
- You cannot turn off speaker chat. It’s available for all sessions.
- If you turn off GIFs, attendees cannot post gifs in the chat boxes.
- If GIFs are enabled, attendees can search and share Level 1 G-rated GIFs from Giphy. Only non-offensive content is permitted.

Clear Chat
If you've used the event for a trial run, you might prefer to clear all chats and start afresh before the event. To do so:
- Log into Goldcast Studio and open your preferred event.
- Click the Edit Event button on the top-right, and click Clear Chat.
Note: This action permanently deletes all session chats, backstage (speaker) chat and public chat in the event.
How To Manage Audience Q&A
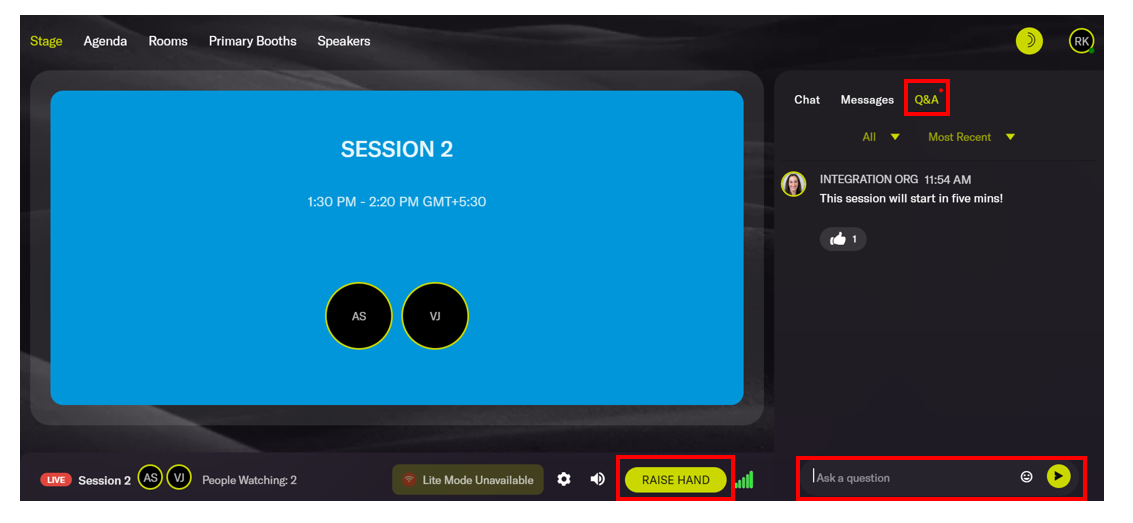
The Q&A is a popular engagement feature in Goldcast. During a Goldcast session, attendees, speakers, coordinators, and producers can submit questions via text or video, depending on the settings enabled in Studio.
Attendees can use the Q&A tab in the engagement panel on the right to submit text questions and click the Raise Hand button at the bottom to submit a video Q&A request. A red dot next to the Q&A tab indicates a text or video question has been submitted.
Turn on/off Q&A at the session level
Follow these steps to turn on/off text and video Q&A for each session in your event:
For Events
- Log into Goldcast Studio and open your preferred event.
- Navigate to Program → Agenda using the left side tab and click your preferred session to open the Edit Session Details window.
- Scroll to Q&A, and turn on/off Text Q&A and Video Q&A using their respective toggles.
- Click Save.
Heads up! You can enable or disable Q&A for each session in your event. This feature is useful if you want Q&A for Session 1 but not for Session 2, and so on.
For Webinars
- Log into Goldcast Studio and open your preferred webinar.
- Click the Edit Event button on the top-right, and navigate to the Settings tab.
- Turn on/off the toggles for Text Q&A and Video Q&A, as required.
- Click Save.

Event-level Q&A settings
Heads up! These settings apply to all sessions in your events.

Goldcast offers the following event-level Q&A settings:
1. Moderated vs. Unmoderated Q&A
Goldcast allows you to view and approve text questions before allowing all attendees to view and upvote them.
![]() Pro Tip: When moderation is enabled, you can respond to a question without needing to approve it. This means only the attendee who submitted the question will see your reply, allowing you to privately address sensitive or low-priority questions without displaying them to the wider audience.
Pro Tip: When moderation is enabled, you can respond to a question without needing to approve it. This means only the attendee who submitted the question will see your reply, allowing you to privately address sensitive or low-priority questions without displaying them to the wider audience.
2. Assign Q&A to Speaker
Turning this toggle on allows producers and coordinators to assign incoming questions to a specific speaker, producer, or coordinator for them to answer.
3. Anonymous Text Q&A
Attendees can ask questions anonymously. All questions will include the attendee’s name if you've turned off this setting.
4. Show the answerer’s identity
Show the name of the person who answered each question. If you’ve turned off this setting, responses will not have the name of the organizer/speaker who answered them.
5. Answerers’ alias
Sometimes, you might want to use an alias like “Team Goldcast” or “Events Team,” etc., as the answerer to audience questions.
Configure event-level Q&A settings
For Events
- Log into Goldcast Studio and open your preferred event.
- Navigate to Look & Feel using the left side tab.
- Scroll to Engagement & Communication → Chat Experience in the menus on the right.
- Turn on/off Moderate Q&A, Assign Q&A to Speakers, Anonymous Q&A, and Answerer’s Identity using their respective toggles.
- Use the Answerer’s Alias text box below the Answerer’s Identity toggle to add an alias.
- Click Save.

For Webinars
- Log into Goldcast Studio and open your preferred webinar.
- Click the Edit Event button on the top-right, and navigate to the Settings tab.
- Scroll to the Text Q&A Settings section, and turn on/off Moderate Text Q&A, Assign Q&A to Speakers, Anonymous Text Q&A, and Answerer’s Identity using their respective toggles.
- Use the Answerer’s Alias text box to add an alias.
- Click Save.

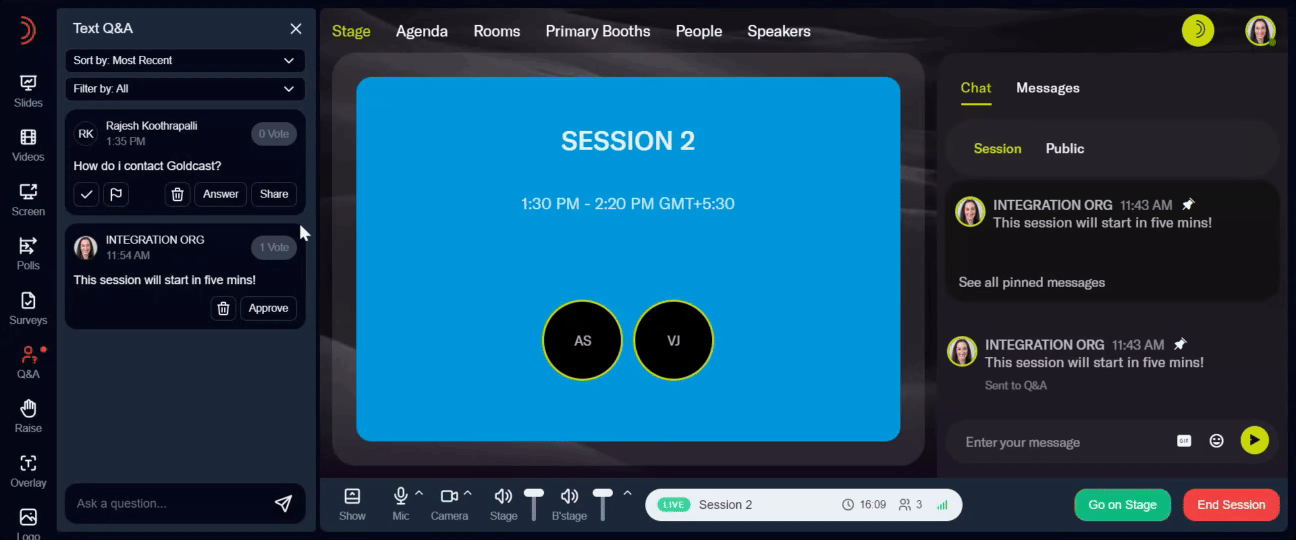
How to respond to audience questions
Producers, coordinators, and speakers can answer audience questions during the session. Use the Q&A icon on the left panel to respond to text queries and the Raise icon to accept or deny video Q&A requests.
Approve
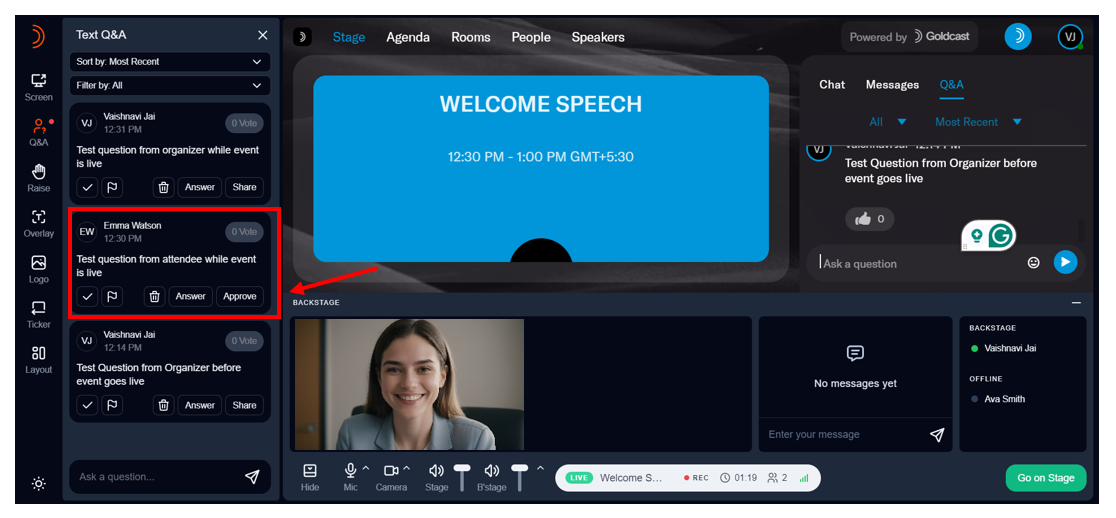
When a text or video question has been submitted, you can notice a red dot next to the Q&A and Raise icons. If you’ve enabled the Moderate Q&A parameter, you must click the Approve button to make the question visible to other attendees under the Q&A tab.
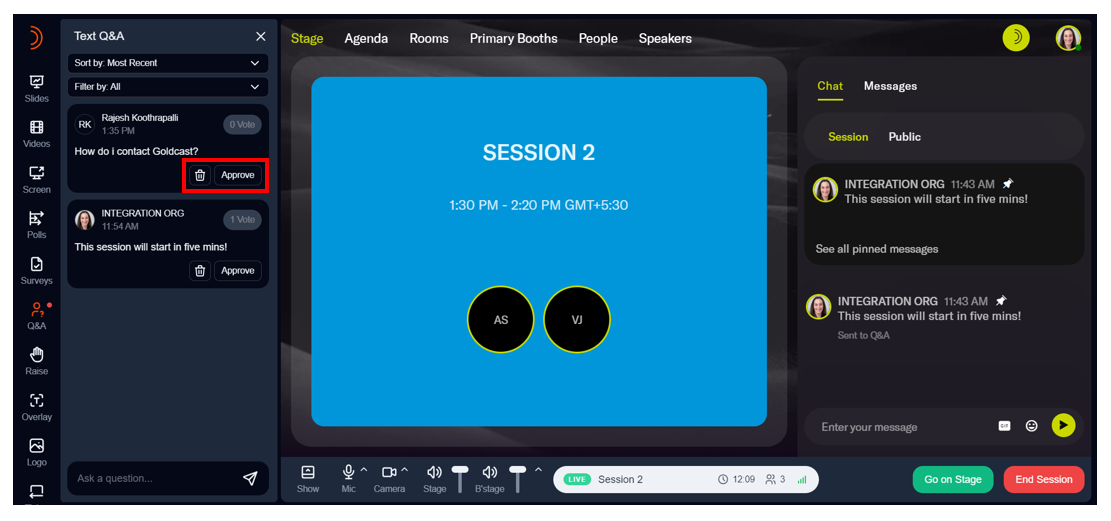
Heads up! The Approve button is available only for questions asked by attendees. Questions from speakers or organizers are automatically approved. Take a look at the screenshot below.
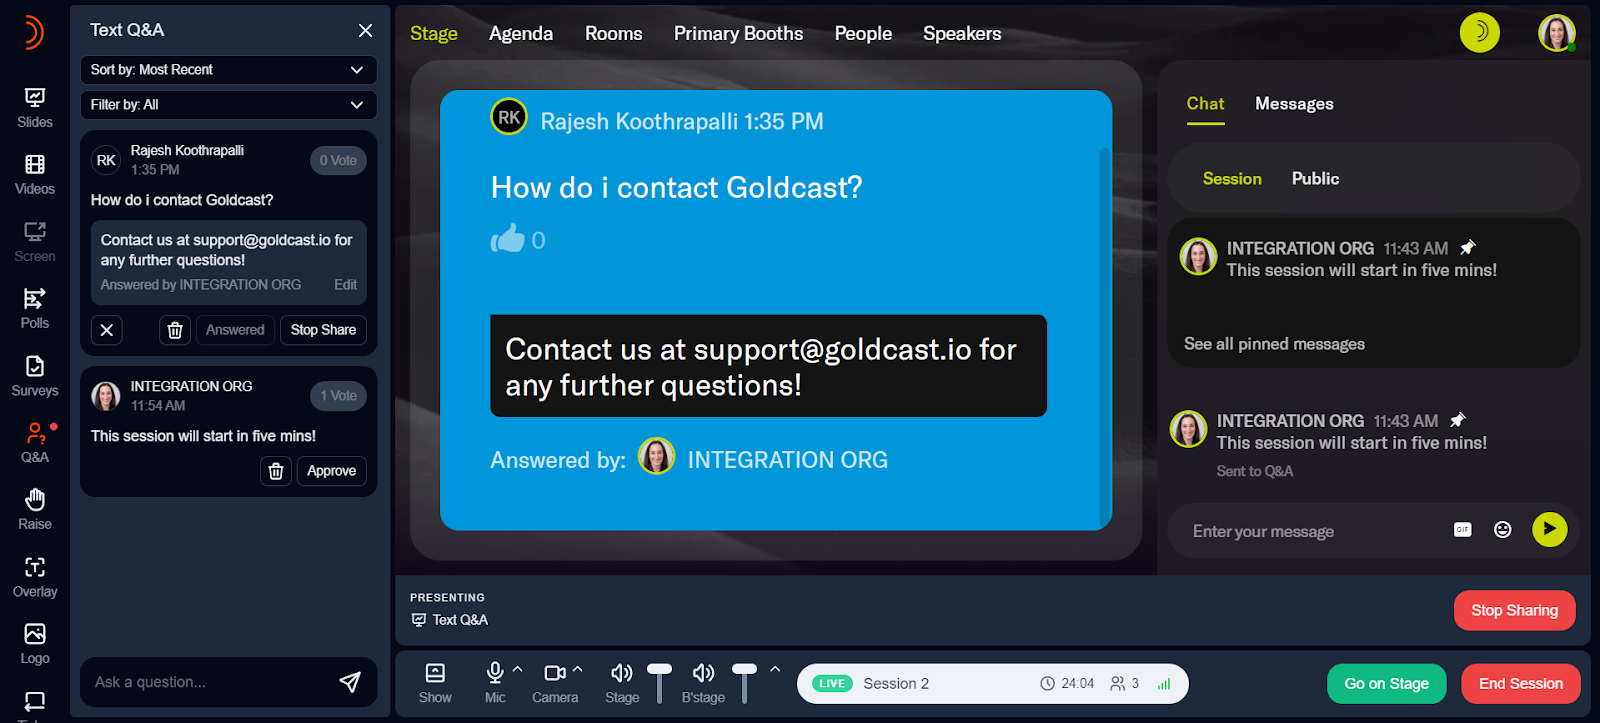
Share onstage
Once a text question has been submitted (and approved if Q&A is moderated), you can share it onstage by clicking the Share button. Click Stop Share on the left panel or the bottom right to remove the question from the stage.
Assign questions to a speaker or staff member
Producers and coordinators can manage Q&A sessions effectively by assigning questions to a specific speaker or staff member (producer/coordinator). This is particularly helpful when you have multiple speakers and staff at your event, as it ensures better coordination among the event team and helps speakers and staff quickly identify which questions they should address.
Heads up! You can turn on/off the event-level setting “Assign Q&A to Speakers” in Studio while the event is live, and Goldcast will reflect the changes in the Event space in real-time.
For Producers & Coordinators

- Click the Q&A tab in the Event Space.
- Click the Assign Question dropdown and select the speaker, producer, or coordinator to whom you want to assign the question.
- Note: Producers and coordinators can also assign questions to themselves.
- To reassign a question, click the Assign Question dropdown and select a different speaker or staff member.
- To unassign a question, click the
 button next to the Assign to speaker dropdown.

For Speakers
 |
 |
- Click the Q&A tab in the Event Space.
- The Assigned to dropdown at the top of the panel is, by default, set to you, listing all the questions earmarked for you.
- Click the Answer button to submit your answers via text.
- Click thebutton to remove a question from your queue. This action removes the question from your queue, and the producer/coordinator can assign it to another speaker or staff member.

- Select All in the Assigned to dropdown to view all questions assigned to all speakers.

Answer via text
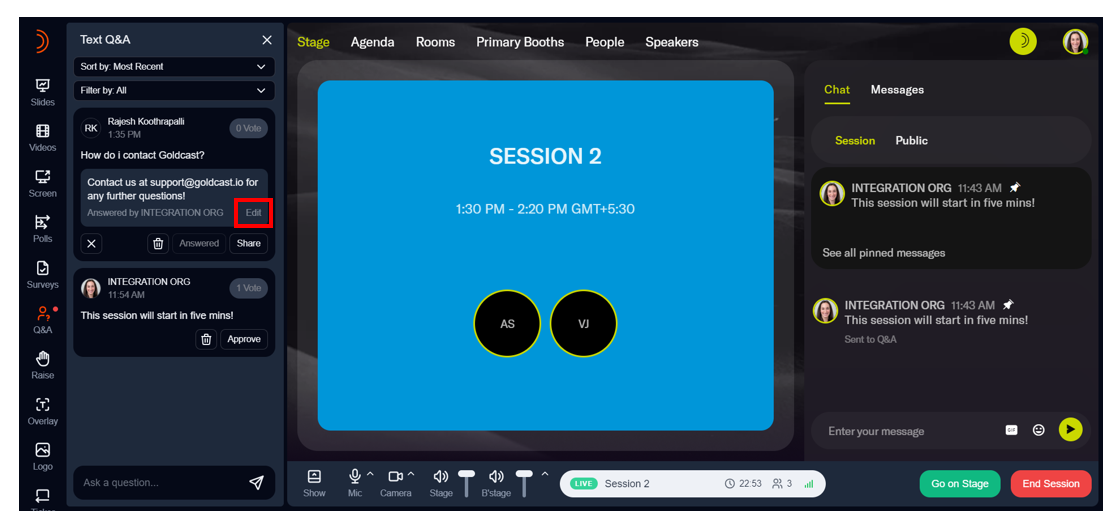
You can also respond to submitted questions via text by clicking the Answer button beneath the question. Your reply will be visible to all attendees directly under the question.

Note: You can submit only one response per question. If you typed a wrong response, you can modify it by clicking the Edit button. Both organizers and speakers can respond to questions and edit them.
Once you post a response to a question, it’ll be automatically marked as Answered, and attendees can view the reply. You can also share answered questions on the stage. However, it can no longer be upvoted.
Delete a question
Delete a question by clicking the delete (trash) icon next to the question.

When you delete an attendee's question, Goldcast will remove it from the Q&A tab visible to attendees.
 |
 |
Mark as priority
If you have multiple questions from the audience, you can mark the ones that must be answered on priority. Speakers, coordinators, and producers can use the Filter By dropdown in the left panel to quickly filter questions.
Filter & Sort Q&A
During the event, use the Sort By and Filter By dropdowns to sort and filter audience questions.
Sorting options:
- Most recent
- Most upvotes
Filtering options:
- All
- Prioritized
- Approved and unapproved (in moderated Q&A)
- Answered and unanswered
- Unassigned questions
- Questions assigned to specific speakers
To clear applied filters, click “All.”
Video Q&A
Besides text Q&A, Goldcast also offers video Q&A for live sessions. If any attendee submits a video Q&A request, you will notice a red dot next to the Raise icon on the left panel. You can either approve or decline the request. If approved, the attendee will join the stage live and ask the speaker their question directly onstage.
Heads Up: Attendees can turn on/off their cameras before joining the stage.

Q&A analytics


Goldcast captures Q&A activity and data in your event's Engagement Analytics dashboard. You can use this dashboard to view key metrics like:
- Total questions asked
- The question, email of the audience member who asked it, whether it was answered, the speaker to whom the question was assigned, and typed answer (if any)
These insights help you measure audience engagement and optimize your Q&A strategy for upcoming events. See Engagement Analytics to learn more about the data captured and how to access it.
FAQs
1: How do I know if someone has submitted a question?
A red dot appears next to the Q&A tab for text questions and the Raise icon for video questions.
2: Can I enable Q&A for specific sessions only?
Yes, you can turn on/off Q&A for each session in your event.
3: What is moderated Q&A?
When the Moderate Text Q&A toggle is on, producers or coordinators must approve a question before it becomes visible to attendees. Questions from speakers or organizers are automatically approved.
4: Can questions be assigned to a specific speaker?
Yes, producers and coordinators can use the Assign to Speaker dropdown in the Q&A tab to assign questions to a specific speaker or staff member (this includes both producers and coordinators).
Heads up! You can assign a question only to one person at a time. To reassign it, unassign the question and assign it to another speaker or staff member, as needed.
5: How can speakers view questions assigned to them?
Speakers can access their assigned questions by clicking the Q&A tab. The Assigned To dropdown defaults to showing the assigned questions for the speaker.
6: Is the Assign to Speaker event-level setting captured in event templates?
Yes. The Assign to Speaker event-level setting is captured in event templates. If this feature is toggled on in the template you're using to create an event, it will be toggled on by default in the new event.
7: If a question is assigned to a speaker, can another speaker answer it?
Once a producer/coordinator assigns the question to a specific speaker, it becomes visible only to the speaker. However, if the question is not marked as Answered, the producer/coordinator can reassign it to another speaker as needed.
8: Can a speaker reassign the question to another speaker?
No. A speaker can only Unassign the question from their queue. However, the producer/coordinator can reassign it to another speaker.
9: Can questions be assigned and answered after the session ends?
Yes, questions can be assigned and answered even after the session ends until the session goes into on-demand mode. This approach is helpful if there are unassigned questions and speakers prefer answering them async after the session.
10: Can attendees ask questions anonymously?
Yes, if you have turned on the Anonymous Text Q&A toggle at the event level, attendees can submit questions without displaying their names.
11: Can I edit my answer after posting it?
Yes, speakers, producers, and coordinators can edit their responses by clicking the Edit button after submitting an answer.
12: Can multiple answers be provided for the same question?
No. You can only submit one response per question, though you can edit it if necessary.
13: How can I organize and sort through multiple questions?
Use the Sort By dropdown (Most recent/Most upvotes) and Filter By dropdown (All, Prioritized, Approved/Unapproved, Answered/Unanswered, etc.) to manage questions effectively.
14: How do I display a question on-screen during the session?
Click the Share button next to the question to display it onstage. Use Stop Sharing to remove it from the stage.
15: What happens when I delete a question?
Deleted questions are removed from the Q&A tab in real time.
16: What are some tips for managing Q&A effectively?
Some best practices include:
- Use the Filter By dropdown to regularly check if any questions are unanswered and assign them to specific speakers.
- Use the Assign to Speaker dropdown to distribute questions evenly among speakers based on their expertise. When assigning questions, consider the speaker's expertise.
- During dry runs, inform speakers about the Q&A assignment feature. Remind them to check the Q&A tab during the session to view the questions assigned to them and answer them.
- If you have Video Q&A enabled for the session, inform the audience about this feature and encourage them to join the stage to ask questions by clicking the Raise Hand button.
- Sharing interesting questions onstage to keep the conversation flowing and for lively discussions
17: Help! Q&A isn't working properly in my event.
Try these steps:
- Refresh your browser tab
- Check your internet connection
- Contact Goldcast support (gc.support@cvent.com) if issues persist
How To Share Resources
How to upload resources
Follow these steps to add resources to your preferred Goldcast sessions:
- Log in to Goldcast Studio and select your preferred event.
- Click Program → Agenda in the left menu.
- Click the session to which you want to add the resources.
- Scroll to the Engagement Options section and click the arrow next to the Resources tab.
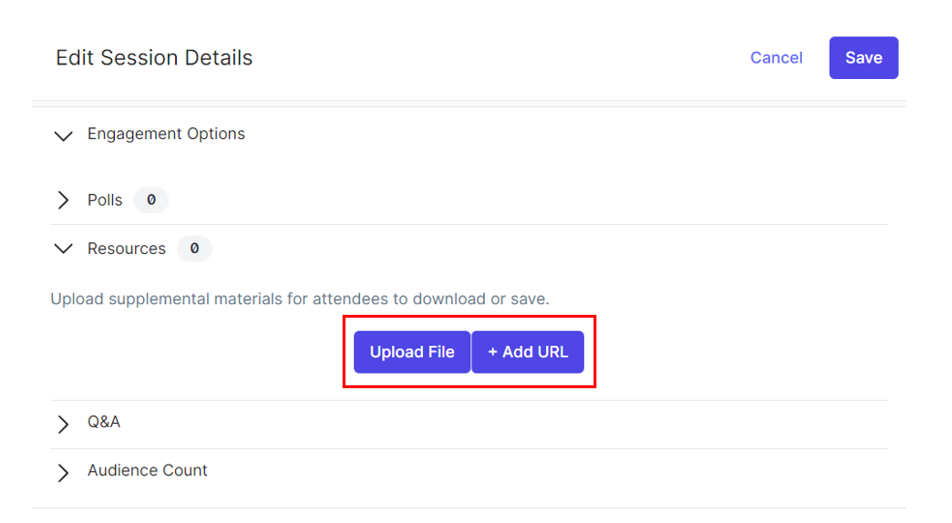
- Click the Upload File button to drag and drop, browse, or copy-paste the local file from your computer. Name the resource and click Save.
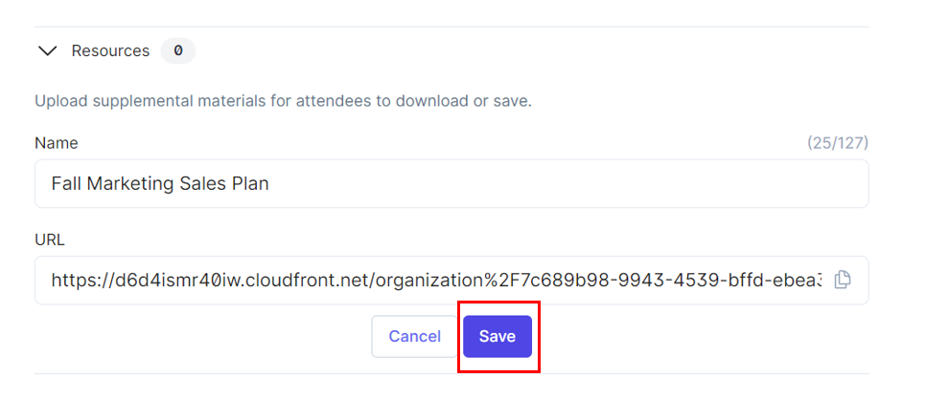
- Use the + Add URL button to share your website or other web pages with your audience. Name the URL, copy-paste the link, and click Save to complete the action.
While adding a link, make sure to include the complete URL, starting with https://www
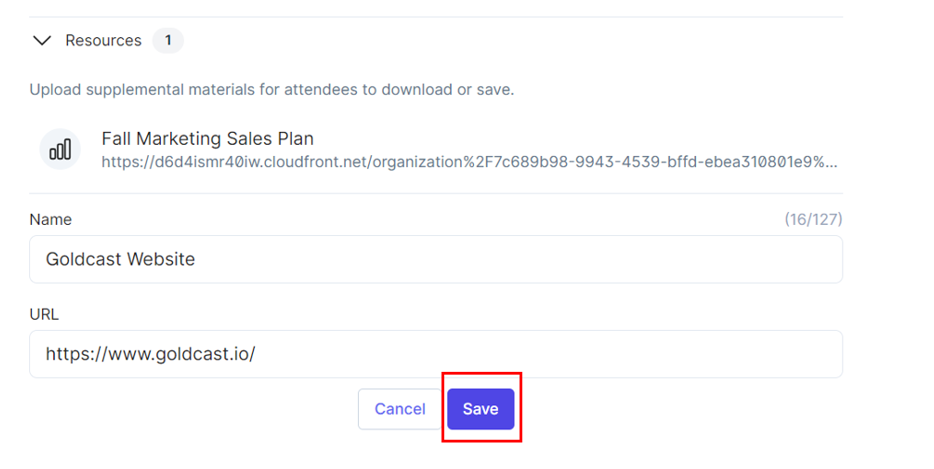
- Click Save in the upper-right corner of the Edit Session details window.
Watch out for the “Session updated successfully” message to confirm that the resources have been uploaded correctly.
Pro Tip: Check with your speakers/presenters if they want to share any handouts or documents with attendees. Collect these resources and add them to the appropriate sessions ahead of time.
How to view and download resources during the event
Attendees can easily view and download the resources anytime during the event without navigating from the main stage. All they have to do is click the Docs tab in the Engagement panel on the right to discover and view the uploaded documents, handouts, and other files.
FAQs
1. What type of resources can I add?
You can add any resource that you would like to share with attendees. Some examples of resources that you can share include:
- Whitepapers
- Links to your presentation
- Calendar link to book a product demo/sales call
- Blog posts for reference
- URLs to videos that you’d like attendees to watch
- Post-session surveys
- Terms & Conditions (T&C), Privacy Policy, FAQs, etc.
2. Are there any restrictions on the number of files?
No limits. You can add as many files as required to each session.
3. Are these resources available across all sessions?
No. Uploaded resources are specific to each session. If you want to share the same resource across all sessions, you must upload it separately for each session.
4. What is the maximum file size?
Each file must be within 50 MB.
5. Are there any restrictions on the type of files I can add to the Resources tab?
No. You can add all popular file formats, such as PDFs, Word documents, spreadsheets, JPEGs, and more.
How To Share a Poll
Polls are a great way to interact and engage with your event audience in real-time. They allow you to ask questions, receive feedback and display results on stage. In Goldcast, event producers, coordinators, and speakers can open, close, and share polls on stage in all session types: live, pre-recorded, and RTMP.
How to add a poll to a session
Follow these steps to add polls to individual sessions:
For Events
- Log into Goldcast Studio and select the All Events button to get a list of all your events.
- From the Events list, click the event you want to edit.
- Once on the event dashboard, click Program in the menu on the left side of the screen.
- Click the session you’d like to edit.

- Scroll down to Engagement Options and click the arrow on the right side to open the section.
- Click the arrow on the left side to open the Polls section.
- Click +New Poll.

- Type your question in the Question field.
- Click +Add Option to add an answer option. Add as many answer options as needed.
- Check the box next to Allow multi-selection if you would like to enable your attendees to select more than one answer option at a time.

- Click Save.
For Webinars
- Log into Goldcast Studio and select the All Events button to get a list of all your events.
- From the Events list, click the webinar you want to edit.
- Once on the webinar dashboard, click the Edit Event button on the top right.

- Click the Assets tab, scroll to the Polls section, and click +New Poll.

- Type your question in the Question field.
- Click +Add Option to add an answer option. Add as many answer options as needed.
- Check the box next to Allow multi-selection if you would like to enable your attendees to select more than one answer option at a time.
- Click Save.
Pro Tip: We recommend setting up polls before the event goes live. However, if you wish to include or modify a poll even while the session is live, you can follow the steps mentioned above. Your changes will be reflected in real-time in the event space.
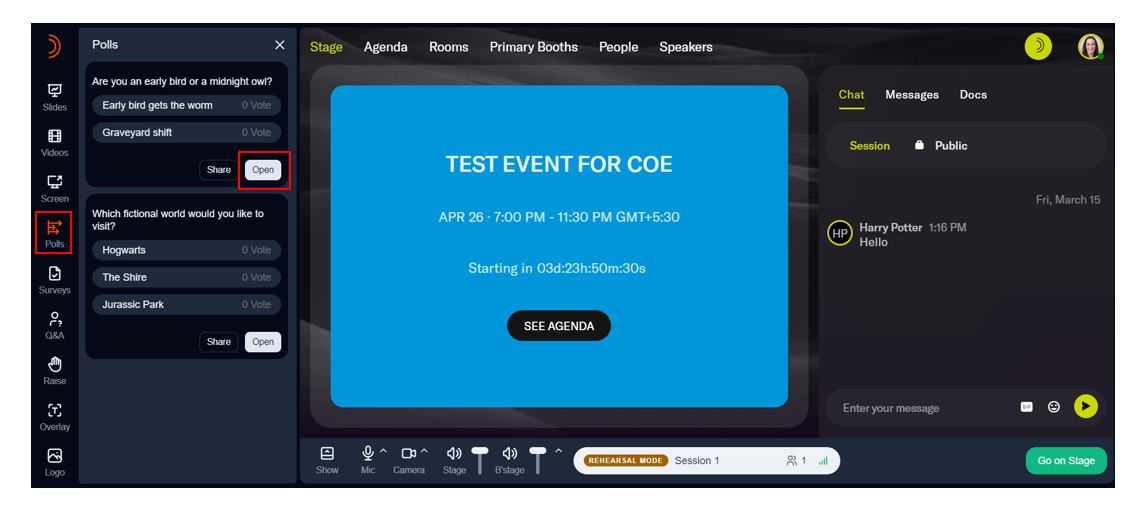
Opening a poll
When you open a poll, it becomes available to attendees, and they can vote on it. However, the poll will not be visible on stage until you share it.
Follow these steps to open a poll:
- Use your magic link to open the event landing page.
- Click Enter Backstage to join the backstage of your session.
- Click Polls on the left-side panel.
-
Click the Open button next to the poll you want to launch.
- When you open a poll, attendees receive a pop-up notification indicating that a poll is open. Attendees won’t see the Poll tab in the Engagement Panel on the right until the organizer/speaker opens a poll.
- Once a user submits a poll, Goldcast displays the response submitted notification on the stage (if the poll is shared on stage) or in the Polls tab in the engagement panel on the right.

Note: The Polls tab in the Engagement Panel in the Event Space will be visible to attendees only when a poll is open. Once you close the poll, the tab will no longer be visible.
Sharing a poll onstage
You can share polls on stage so attendees can see the voting results in real-time. Click the Share button corresponding to the poll to share it onstage.
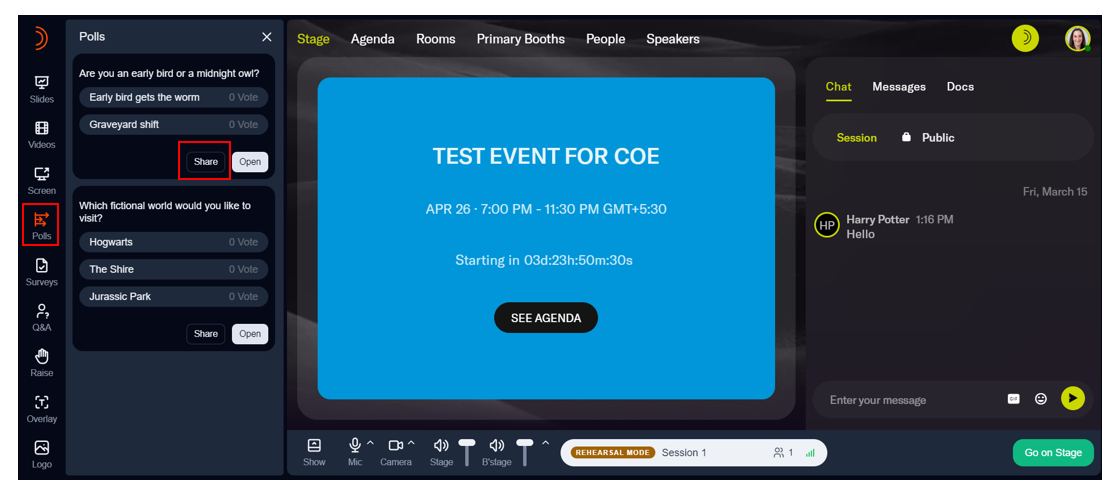
Here are a few pointers on sharing polls on stage:
- When a poll is open and shared on screen, attendees can directly click on the responses on the stage to cast their vote. However, it’s not necessary to share the poll for attendees to vote.
- When a poll is open but not shared on screen, attendees must navigate to the engagement panel to vote.
- When a poll is closed but shared on screen, attendees can view the results but cannot cast their votes.
You can use the Layout button at the bottom of the screen to determine how to display the poll on stage. For more information, refer to our guide on layouts when sharing content on stage.
Note: Speakers and organizers can see the votes cast for each answer in a poll. However, attendees can view the results only as a percentage, not the number of votes.
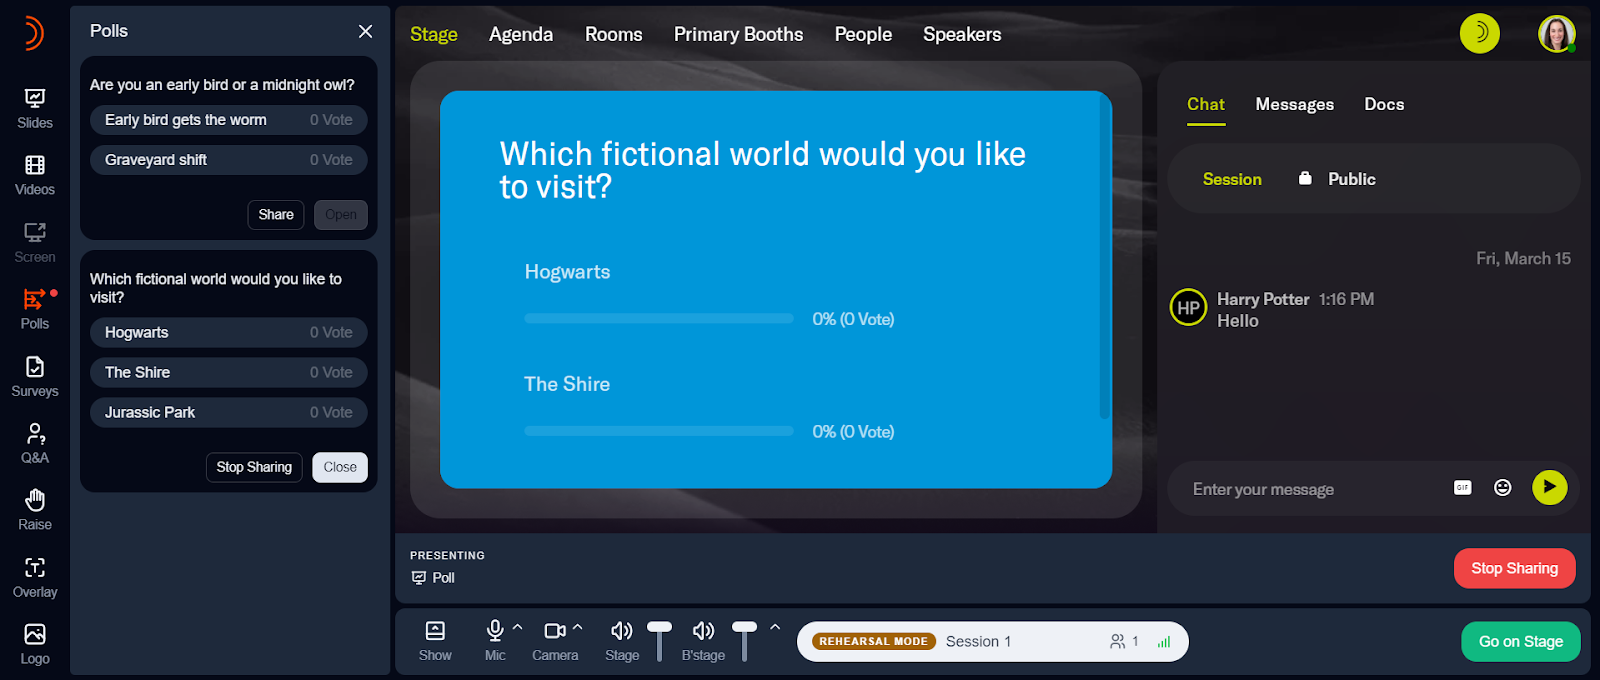
Event organizers and speakers can see the votes cast for each answer.
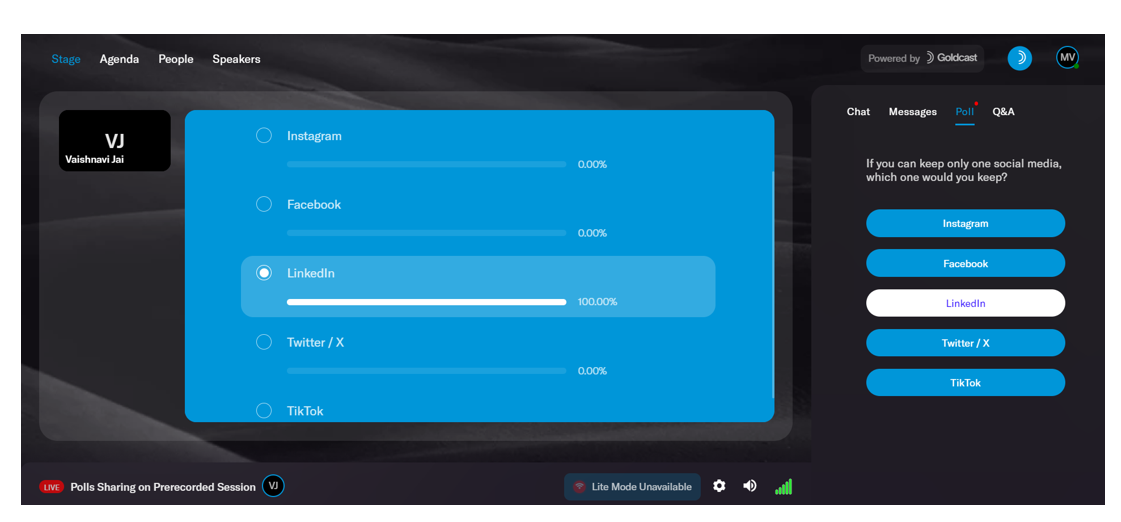
Poll results are displayed as a percentage to the audience.
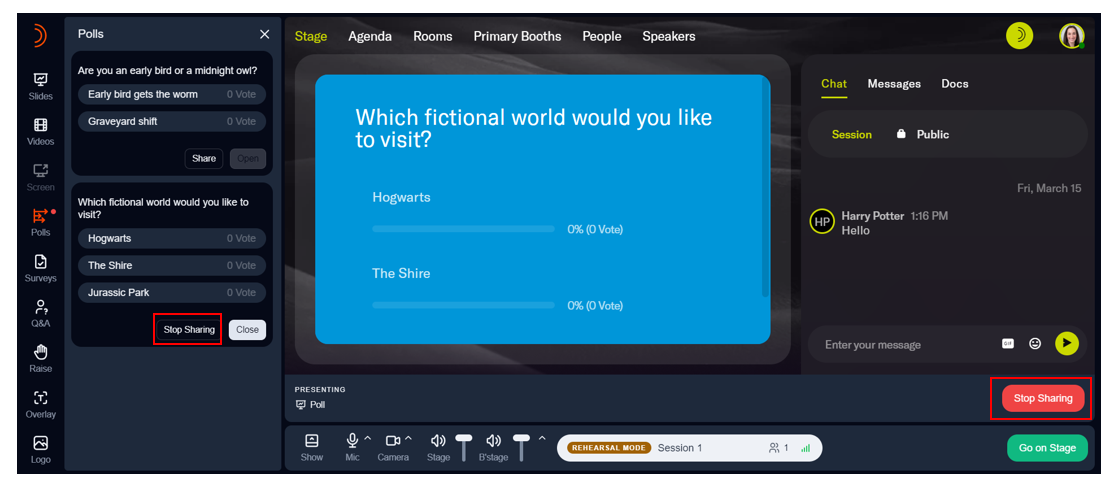
Stop sharing a poll
When you’re done showing the results, click the Stop Sharing button at the bottom-right of the screen or the Stop Sharing button corresponding to the poll in the left panel.
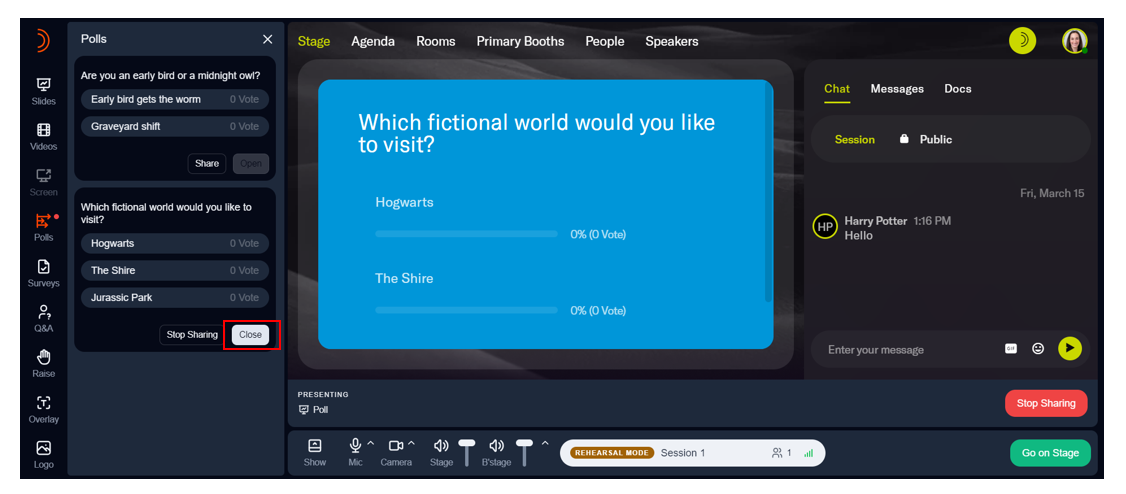
Closing a poll
Once you’re done accepting submissions, click the Close button corresponding to the poll in the left panel. Once a poll is closed, attendees can no longer cast their votes.
Reopening a poll
You can always reopen a poll after you close it. To do so, navigate to the Poll tab in the left panel and click the Open button corresponding to the poll you’d like to reopen.
Launching Polls while Presenting Slides
During your presentation, you can seamlessly switch between polls and your slide deck anytime during your presentation. Here’s how to do it:
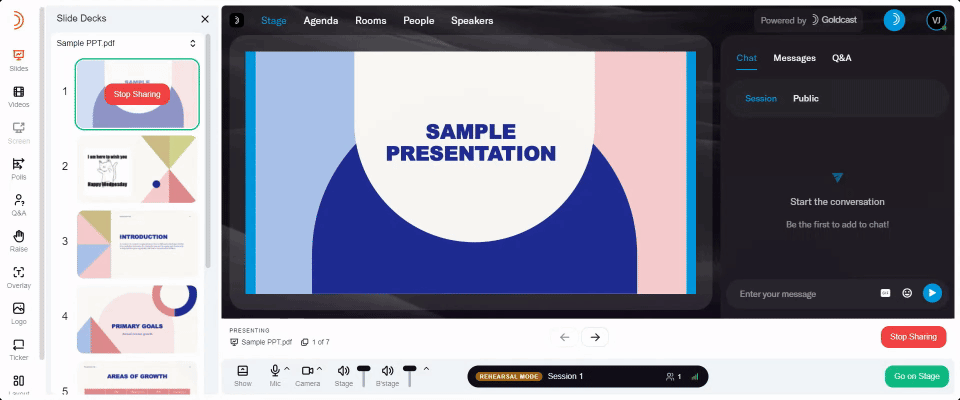
Once you’re in the Event Space, click Slides in the left sidebar. Click the Share button on your preferred slide to share it onstage.
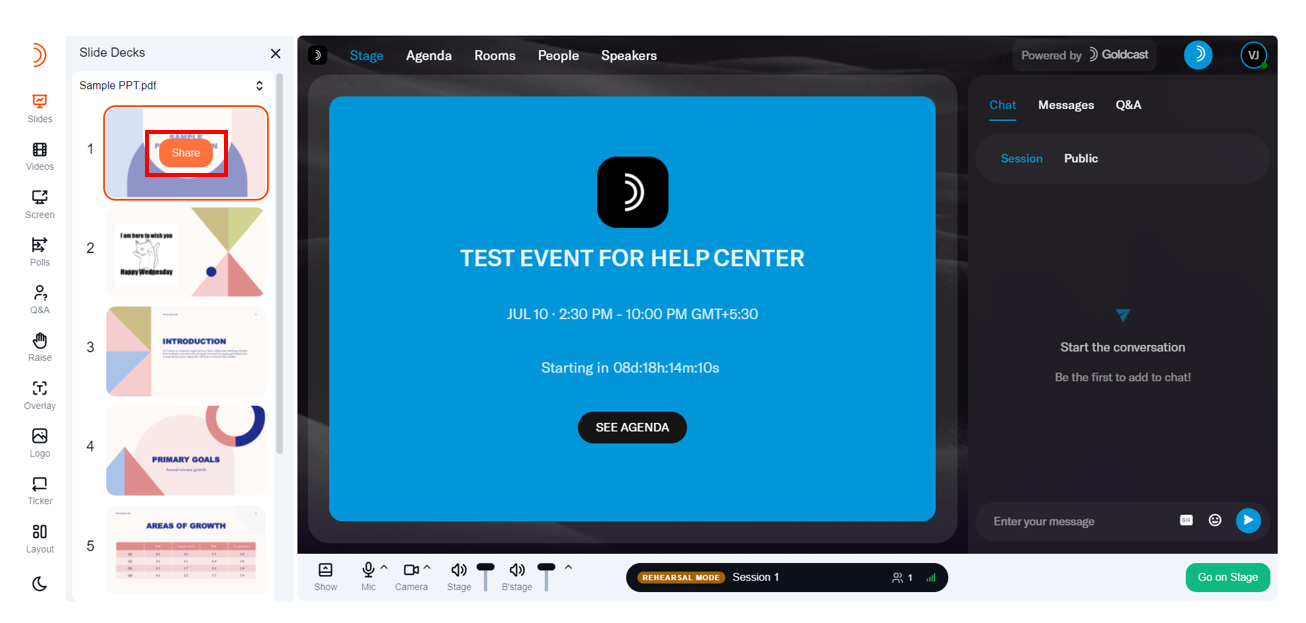
During the presentation, click the Polls tab in the left sidebar and click the Share icon to launch a poll on stage. This action will interrupt the presentation, and Goldcast will share the poll on stage.
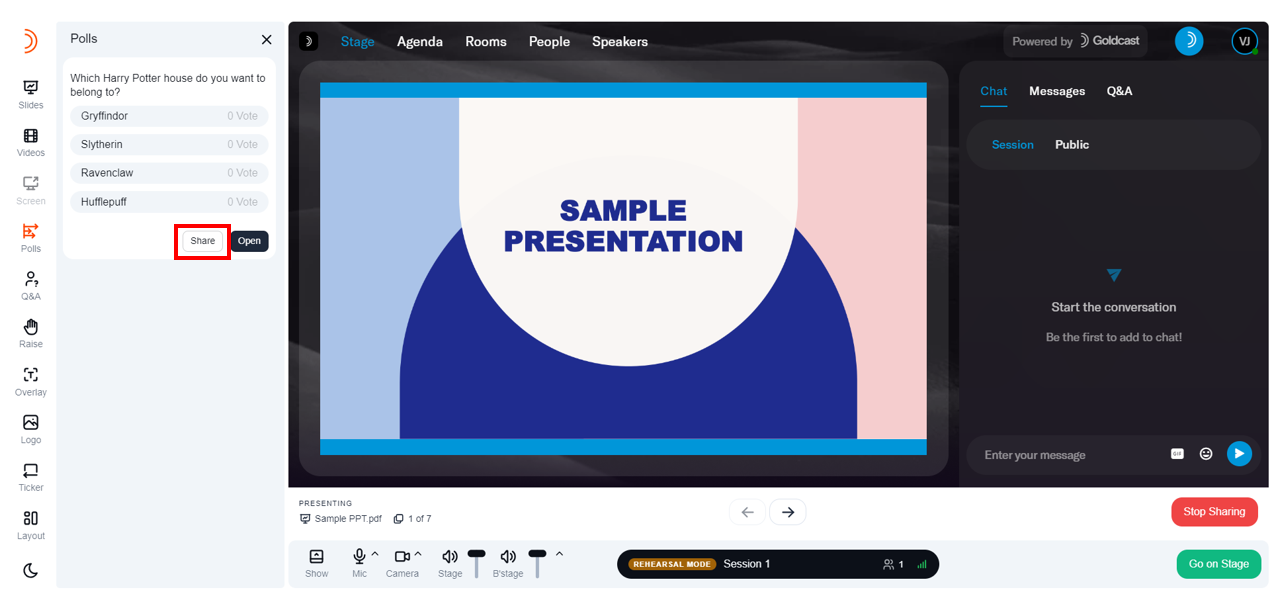
To switch back to the presentation, navigate to the Slides tab and click the Share icon next to the slide you want to present on stage. This action stops the poll from being shared on stage and automatically switches back to your presentation.
Your slide deck is back on stage, and you can continue the presentation right from where you left off.
Note: You can share several polls during your presentation. Remember, the poll is no longer shared on stage when you switch back to the presentation. However, it’s still open to your audience. They can respond anytime during the session until you click the poll Close button.
Viewing poll data
Besides viewing poll responses in real time, Goldcast provides a detailed analysis of poll engagement and user responses.
Follow these steps to view poll data:
- Login to Goldcast Studio using your credentials.
-
Open your preferred event and navigate to Analytics → Engagement using the left navigation panel.
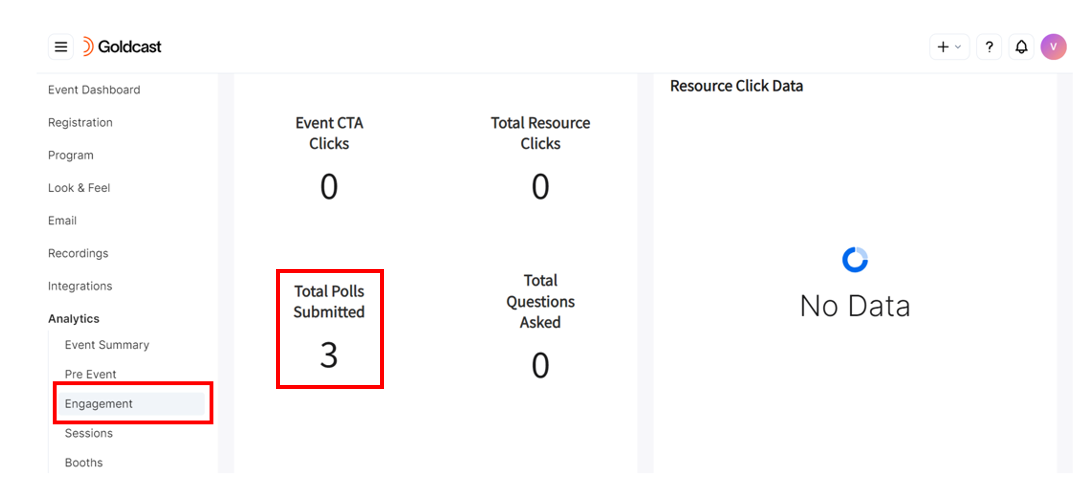
On this dashboard, you can view and download the poll results for your event. Goldcast updates the engagement data two hours after the event is over. For more information, refer to our Guide on Engagement Analytics Dashboard.
FAQs
1: Can I launch multiple polls at the same time?
No. Only one poll can be open at a time. If you'd like to launch another poll, you can close the previous one and open the next one.
2: How do I modify poll questions/responses while the session is live?
Follow these steps to add or modify polls while a session is ongoing:
- Login to Goldcast Studio using your credentials and select your preferred event from the Events List.
- Navigate to Program → Agenda using the left sidebar, and click the session you want to edit.
- This opens the Edit Session Details drawer.
- Navigate to Engagement Options and scroll to the Polls section.
- Add a new poll or modify an existing poll.
- Click Save.
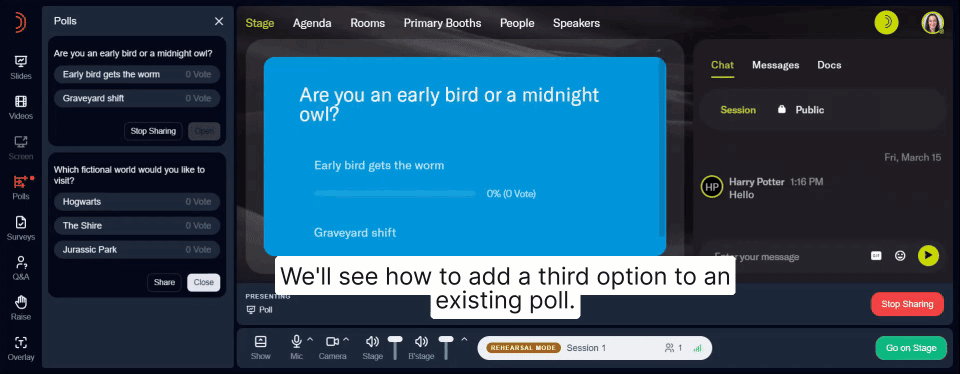
Heads up! Any changes you make to a poll in the Studio are reflected in real time in the Event Space.
3: How many polls can I have in a session?
You can include any number of polls as required.
4: Can attendees change their poll response once submitted?
Yes. Attendees can change their response any number of times until the poll is open.