Plan Availability |
Starter | Pro | Premium | Enterprise |
 |
 |
 |
 |
Overview
When you run a Webinar powered by Smart Event Technology, Goldcast will automatically generate AI-powered post-event content, such as video clips, social posts, emails, takeaways, and more, with the help of Content Lab, our AI-powered video repurposing tool. You can access these assets in Goldcast Studio and share them quickly on your social channels and emails.
Additionally, you can share post-event content, such as event recordings, takeaways, and video clips, on a standalone on-demand page customized to match your event’s branding. Unlike the event hub page, the standalone on-demand page for smart webinars doesn’t require your audience to go to their email to retrieve the magic link. They can quickly consume the content on the page anytime and from anywhere. This standalone on-demand page can be:
- Gated: Page visitors must complete a registration form to view the content. However, if they have already registered for the webinar, they can bypass the form and view the content directly when accessing the on-demand page using their magic link.
- Ungated: All page visitors (including webinar registrants and new visitors) can view the content hosted on the page without submitting any information.
Heads up! Smart webinars are available only for single-session virtual events without rooms, booths, tracks, or breaks. However, they can be part of an event series or repeating events.
How to create a smart webinar
Follow these steps:
- Login to Goldcast Studio, click the + button on the top-right and select New Webinar.

- Enter the webinar title.
- Select the date, start and end time, and timezone.
- Choose the event type: live, pre-recorded, or RTMP.
- Select the event template you’d like to apply.
Heads up! Webinars are not compatible with the basic (old) registration page. If you use a template with a basic registration page, Goldcast will replace it with the registration page builder and the branding of your old registration page in the template will not apply.
- Choose or create event tags (optional).
- If you have teams enabled, select the team you want to assign to this webinar.
- Turn off the test event toggle (optional) and click Create.
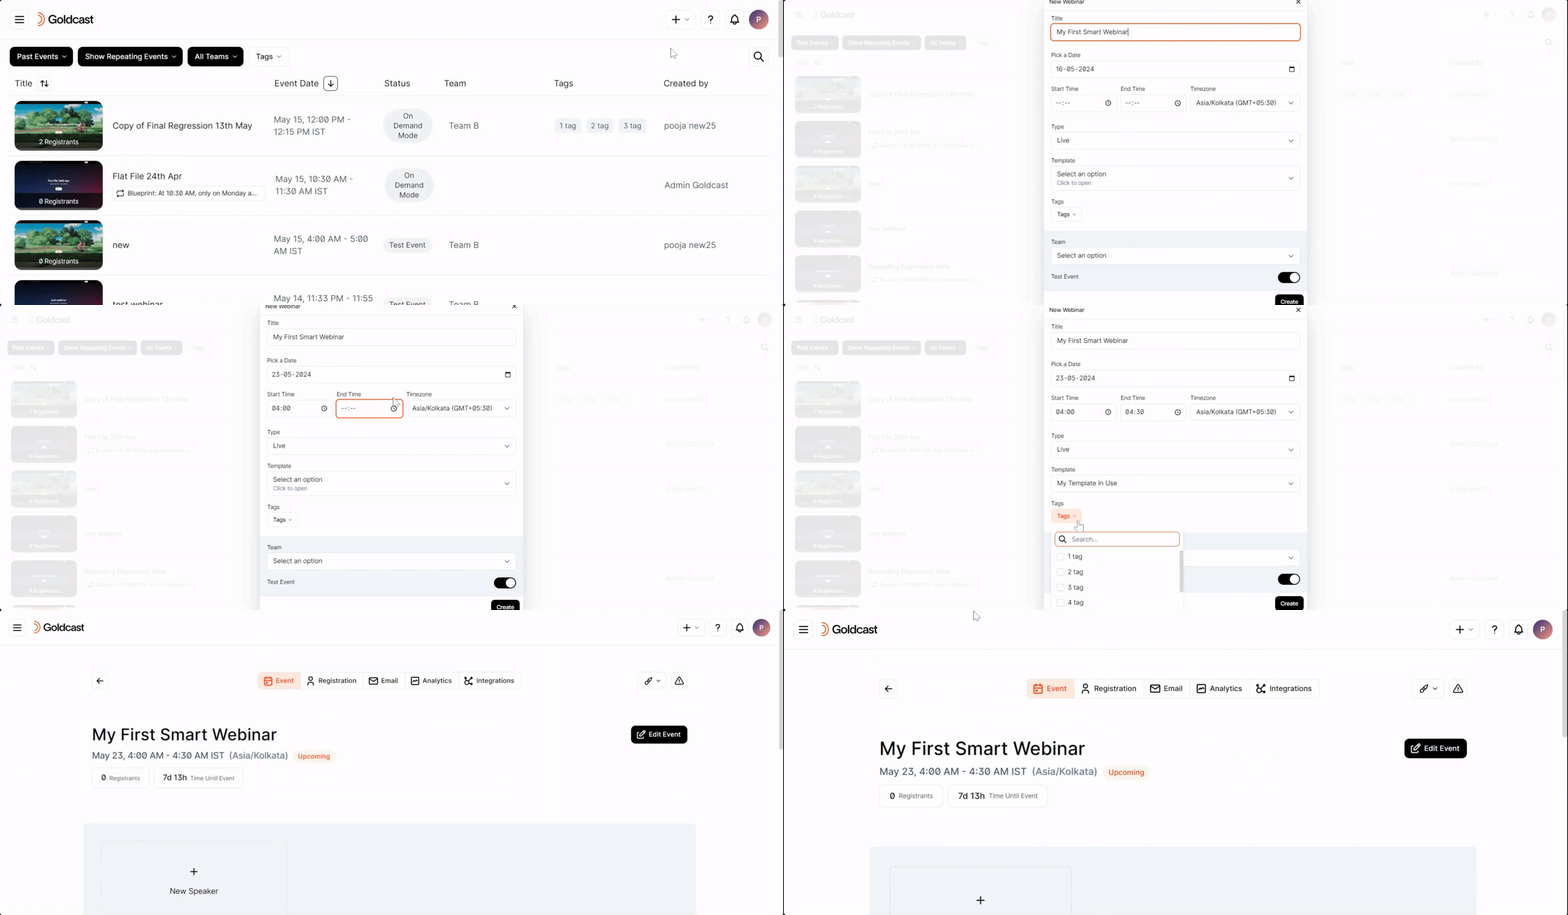
Editing a smart webinar
Once on the event dashboard, you can set up the registration page and form, email schedule and templates, integrations, and other settings, just as you would with a regular event in Goldcast. Use the Registration, Email, Analytics, and Integrations tabs at the top of the page to modify relevant settings.

Pro Tip: For a detailed step-by-step guide on the rest of the webinar setup process, refer to How to Create & Customize Your First Goldcast Single-Session Event.
Speakers

Add speakers
- Click the +New Speaker button on the dashboard.
- Enter speaker details such as:
- Mandatory: First and Last Name, Email
- Optional: Title, Company, Description, LinkedIn, X (Formerly Twitter), and profile picture
- Click Save.
Once you’ve added the speaker, hover over the speaker’s name on the dashboard to edit their details and retrieve their magic link. Use the eye icon to hide/display the speaker profile on your webinar pages.
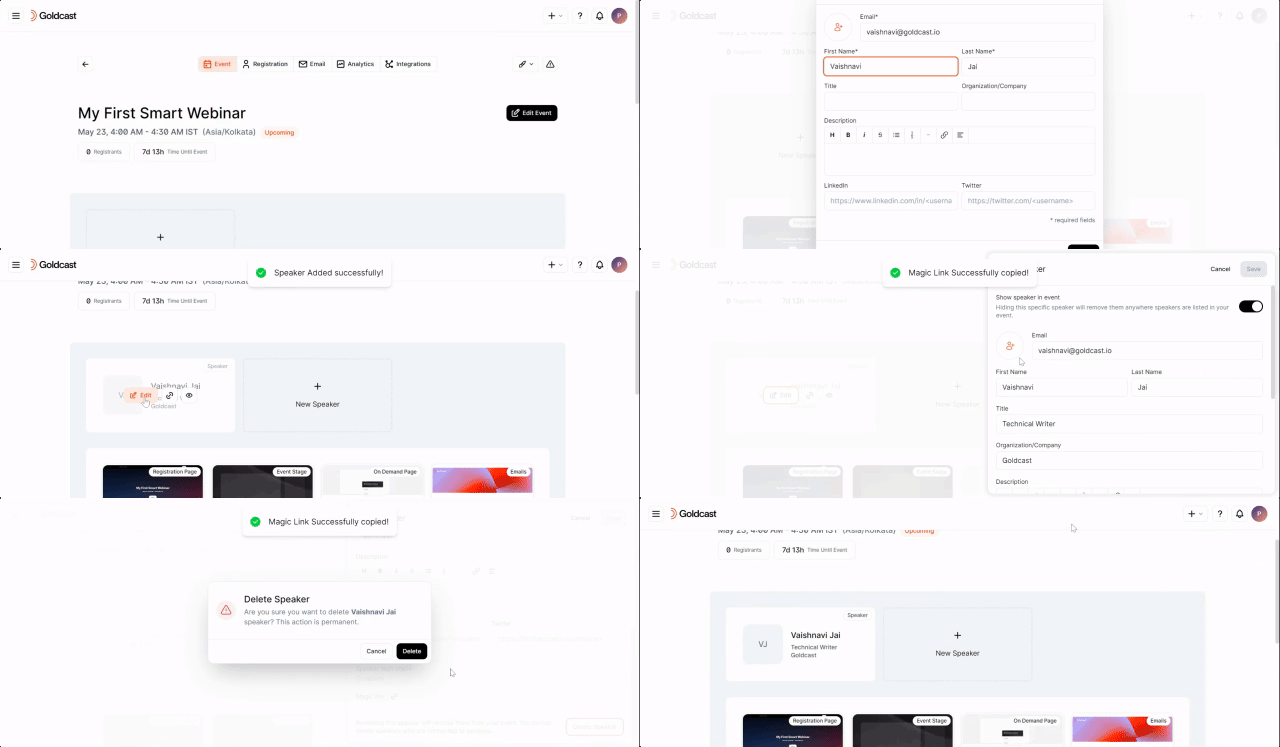
Edit speaker details
Once you've added the speakers, click the Edit button to make any changes to their details. The edit drawer also lets you check if the speaker has completed the Tech Check.

Delete speaker
To remove a speaker, click the Delete Speaker button at the bottom of the Edit Speaker drawer.
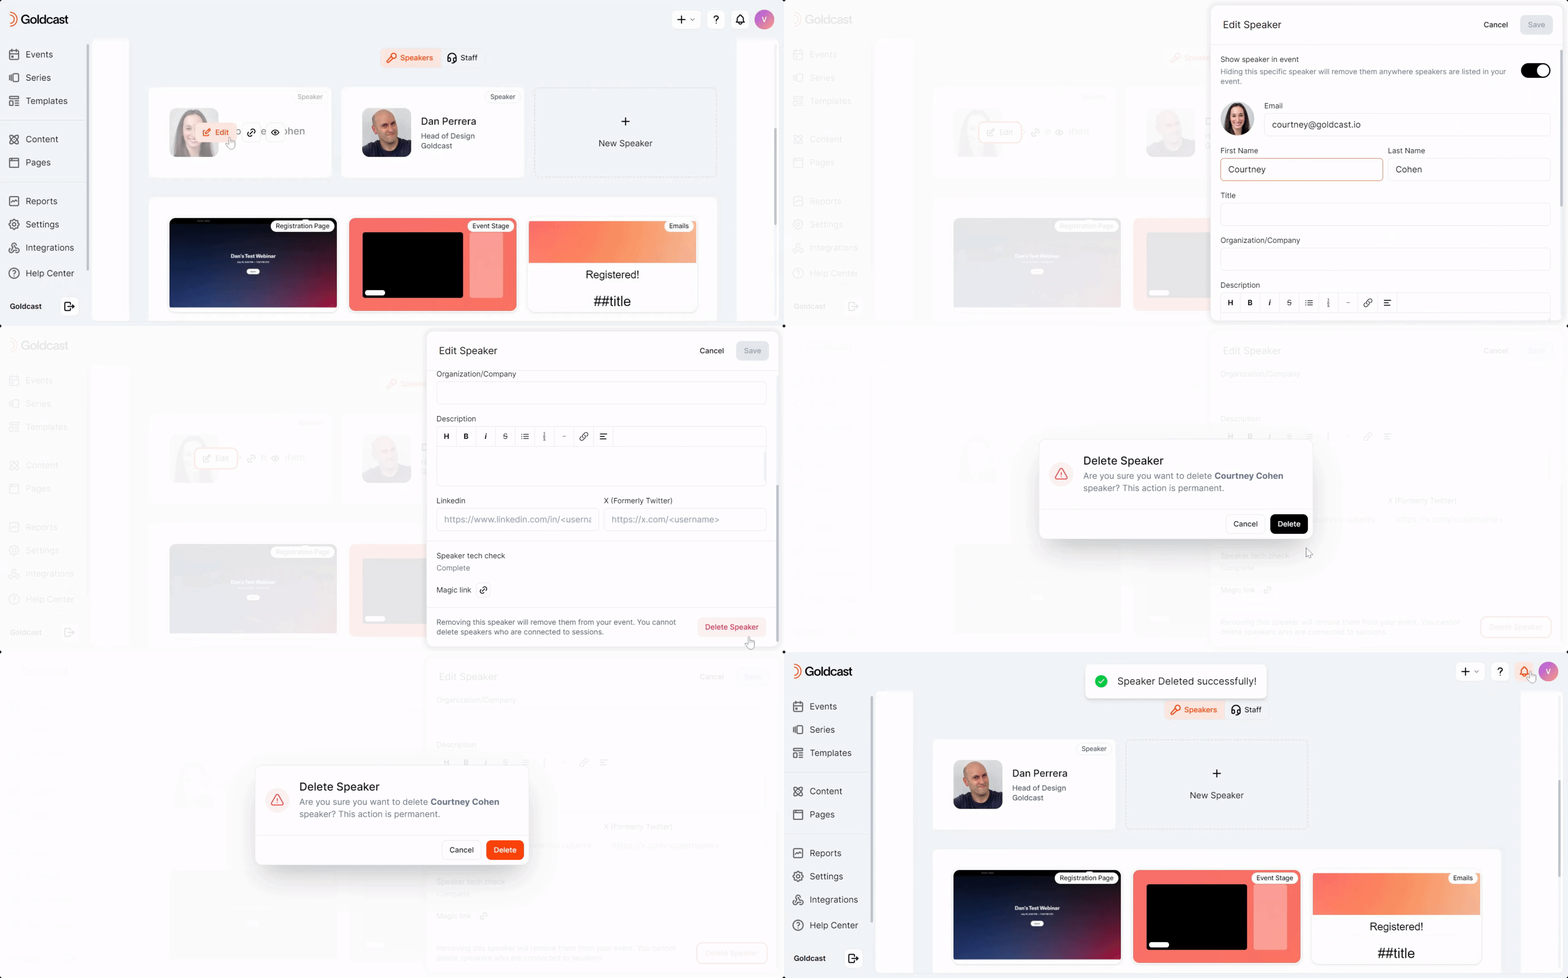
Hide speaker
Sometimes, you might have a special guest at your webinar or not want a speaker listed on the registration and event pages. In these cases, click the eye icon to make the speaker invisible.

Heads Up! Invisible speakers have the same controls as regular speakers. The only difference is that they won't be visible on the speaker section on the registration and event pages.
Details, assets, and settings

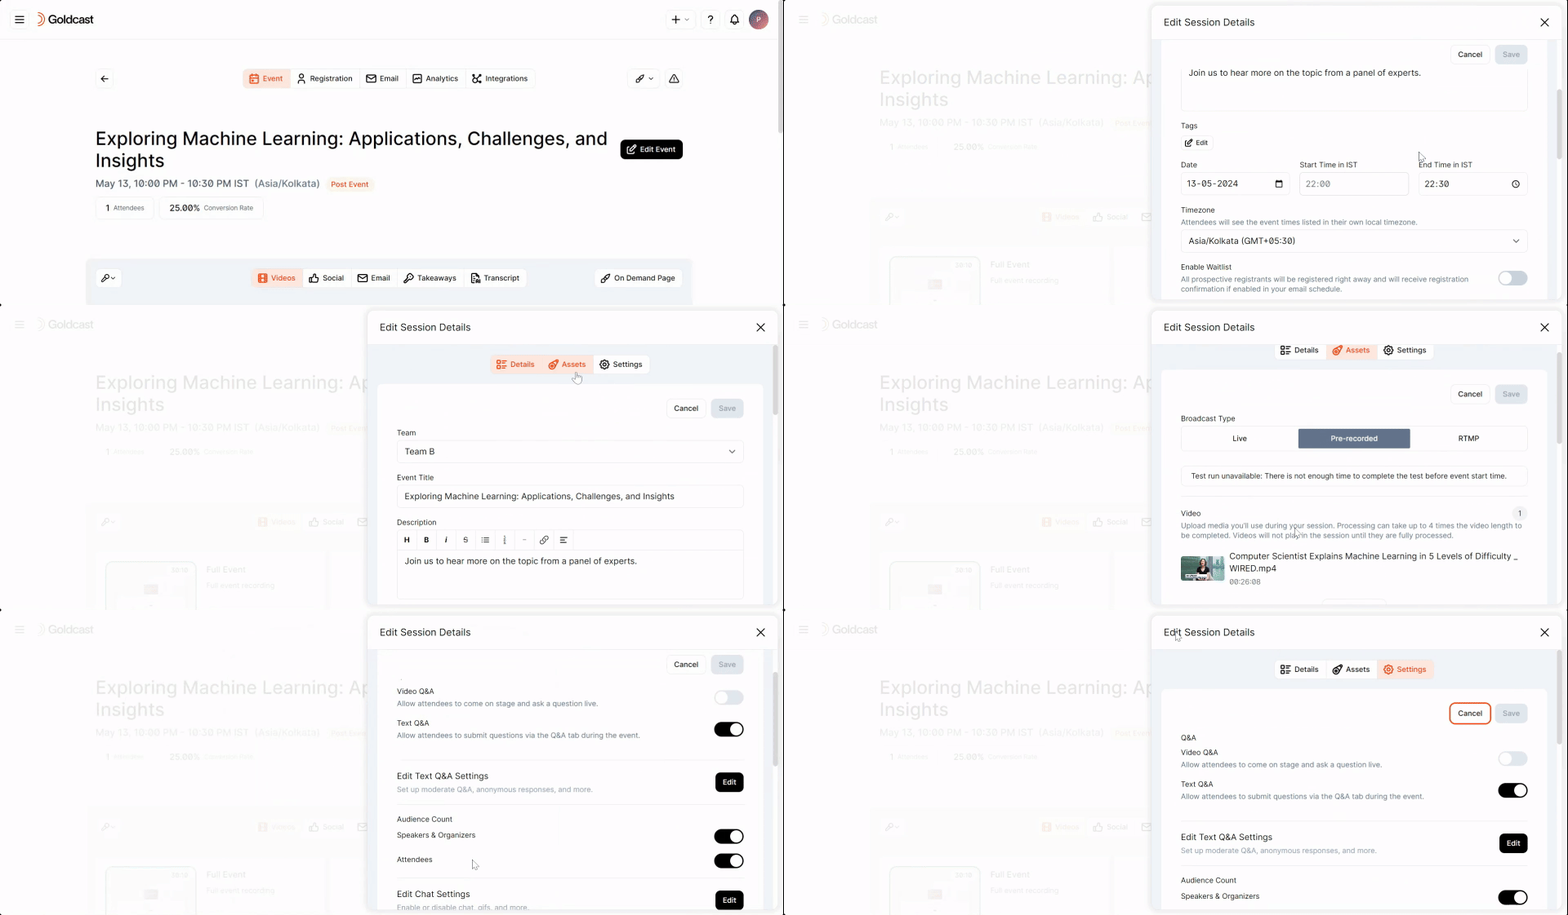
Click the Edit Event button on the top right, and use the following tabs:
- Details: To modify webinar details such as Title, Date, Time, waitlist, primary language, captions, and other settings such as on-demand and session redirection strategy.
- Assets: To change the broadcast type, slides, videos, polls, docs, and post-session surveys.
- Settings: Customize engagement settings such as text Q&A, video Q&A, audience count, chat, and RTMP Out.
Emails
The Email tab at the top of the dashboard allows you to customize the email schedule and templates. For more information, refer to Crafting and Scheduling Emails.

Heads Up! The email reminders for Smart Webinars include a new on-demand email, which Goldcast sends when a person fills the form on the standalone on-demand page. You can turn it on/off as needed.
Pages

Click the paintbrush icon on the top right to design and customize the following pages:
- Registration Page: Use our Registration Page Builder to modify and customize your registration page's blocks and sections.
- Event Stage: This helps you customize the look and feel of the event space. Use the WYSIWYG editor to make and preview changes in real time.
- On-demand Page: To know more about customizing the standalone on-demand page, refer here.
- On-demand Embed: Customize and copy the embed code for the on-demand page to use on your website or elsewhere.
Alternatively, you can also click on the page previews below to design, view or copy the URL of these pages.

Vanity URL
Like always, you can set a vanity URL for the registration page and event space. To set the vanity URL for the registration page:
- From the event dashboard, click the paintbrush icon on the top right and select Registration Page.
- Click the Edit URL button and complete steps 3 to 5 here.

To set the vanity URL for the event stage:
- From the event dashboard, click the paintbrush icon on the top right and select Event Stage.
- Click the Edit Domain button and complete steps 3 to 5 here.

Heads up! The registration and on-demand pages share a common URL. To set the vanity URL for the on-demand page, see here.
FAQs
1. Can I use the smart webinar feature for a pre-existing event?
Yes. However, not all events can be transformed into a smart webinar. For more information, refer to this article.
2. Can I use smart events for events with more than one session?
Currently, no! But stay tuned as our team is working to expand this feature to multi-day/multi-session events.
3. How to add a smart webinar to a series?
Navigate to Series, and open your preferred series. Click the +Add Webinar button to make a smart webinar a part of this series.

4. Can smart webinars be a part of repeating events?
Yes. While creating a smart webinar, use the Repeats dropdown to set the repeating frequency and create a blueprint.

5. Can the session type be RTMP In for smart webinars?
Yes. Select RTMP as the type when creating the webinar. Goldcast will automatically create an RTMP channel for you. Refer to this guide for step-by-step instructions on connecting the webinar to an external streaming platform.
6. Can I embed third-party registration forms, such as HubSpot and Marketo, on the registration page of a smart webinar?
Yes. If you’ve embedded a third-party registration form on the Goldcast registration page, it will be automatically embedded on the on-demand page.
7. Can I use the basic registration page with smart webinars?
No. If you’ve created a smart webinar using a template with the basic registration page, Goldcast will replace it with the Registration Page Builder.
8. How do I identify smart events from the Events list?
You can use event tags to categorize and organize your smart events. For a quick refresher on how to use this feature, refer to this guide.
9. What is the session redirection strategy for smart webinars?
Both manual and automatic session redirection strategies are available for smart webinars. For a quick refresher on how these features work, refer to How Session Redirections Work in Goldcast.
10. Can I connect third-party integrations to a smart webinar?
Yes, you can connect all available third-party integrations and access all Analytics dashboards like you would for regular events.
11. What happens to the registration link when the event enters on-demand mode?
Both the registration and on-demand pages have a shared URL. Depending on the event status, this link will direct users to:
- The registration page - before the event
- The standalone on-demand page - after the event
If you’ve turned off the on-demand mode, this link will direct users to the registration page before and after the event.
12. I have a third-party registration page with the Goldcast registration form embedded in it. Will registrants be automatically redirected to the Goldcast on-demand page after the event?
Currently, you cannot redirect users from an external page to a Goldcast on-demand page or bypass the gate.